|
|
Post by Cro on May 10, 2015 11:15:00 GMT
I did contact these guys when I first saw this and this was their response.....
"Thanks so much for your email and your interest in Carbon3D and our CLIP technology. We do not yet have a commercially available printer, so information like pricing, technical specifications, and launch date are not set. However, I can tell you that we are targeting pricing and marketing around industrial/enterprise level printers."
That was around a month ago, I wanted to know if wax was a possible material, great stuff though, surface finish is incredible.
John, glad you are getting some good rest!
Adam
|
|
|
|
Post by Roger on May 10, 2015 12:58:09 GMT
I guess they can command a premium to repay their investment but ultimately it looks like a cheap machine to manufacture. Gas permeable materials have been used in contact lenses for decades so that's a variation on a theme rather than something new in itself. It certainly looks like it could be scaled up for mainstream manufacturing of small to medium volume parts though. Not having to manufacture a mould must make that look very attractive for those products.
|
|
sis
Seasoned Member

Posts: 113
|
Post by sis on May 10, 2015 16:39:36 GMT
My guess is it will be 5 years depending on the patent situation before it goes main stream. No doubt others are working on variations of this. Once it moves things will move fast.
Based on our fellow forum member from New Zealand I thought the printing of wax is about as good as we would ever need. its simply to wait for the cost of entry to this quality level to drop.
I have reflected a bit more about this demonstration video and this whole thread and this forum in general. Some of the contributors comments in this and other forums (most notably model engineer) lament the hobby's participation dropping. Where they see the golden age of the hobby in the past I genuinely see this as the end of the beginning and the start of a new phase. Phase 1 of model engineering was simply about techniques that have been around for hundreds of years if not more, pattern making, casting, turning, shaping, milling etc etc. We strove to do it like they did it in industry better and better. In practice there was little new, and a victorian time traveller would have been familiar with pretty much everything. We are now entering in to a new era with additive manufacturing and coupled with cnc and CAD we can actually move forward in parallel with new industrial developments. This to me is genuinely inspirational. I predict exciting times lie ahead.
The only problem I see is that with the disappearance of jobbing local foundries and this technology I'll need to seriously consider a home foundary. More projects! :-)
Steve
|
|
|
|
Post by Roger on Jun 8, 2015 19:30:22 GMT
I've just stumbled upon this interesting link for 3D filaments with many different properties, the most interesting of which is a Wax like one. Now, if I could print something accurately enough direct to wax then that's a game changer when it comes to home casting. |
|
|
|
Post by joanlluch on Jun 9, 2015 6:22:26 GMT
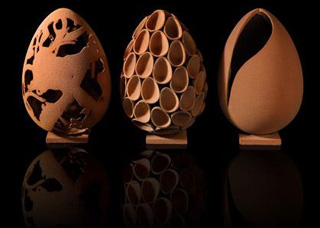
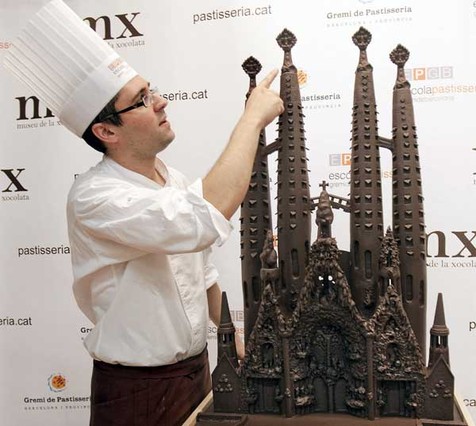
There's a very extended tradition in Catalonia for creating chocolate sculptures during Easter, such as these ones (google: "mona xocolata")  That's an equivalent to what you call an "Easter Egg". But our tradition goes beyond that by enabling us to create figures or big detailed sculptures in dark chocolate (including steam locomotives), which may be consumed during the rest of the year or over a long period of time. This is also done in Belgium I think, but not sure if it is related with Easter. So, I wonder what 3D printing technique would you use to create chocolate figures. I can imagine the first patisserie that would create them will set themselves apart and instantly lead the top rankings. Joan
|
|
|
|
Post by AndrewP on Jun 9, 2015 10:24:34 GMT
Has been done for at least 4 years Joan, see here for instance Andy |
|
|
|
Post by joanlluch on Jun 9, 2015 21:16:02 GMT
Has been done for at least 4 years Joan, see here for instance Andy Well, that's interesting indeed, but I was mostly thinking on a way to use the technology in a more productive way, something which could actually be used in practice, maybe by creating 3D printed silicone moulds before dropping melted chocolate in. I am considering that during Easter millions of mini-statues or figures of chocolate are produced in Catalonia, but to my knowledge nobody uses 3D printing technology for that. Anyway, that was just a curiosity, possibly too off topic now. :-) |
|
|
|
Post by Deleted on Jun 15, 2015 15:49:39 GMT
|
|
|
|
Post by Roger on Jul 3, 2015 18:30:19 GMT
Here's a link to a sintering process that might be similar to the one used by Shapeways for producing those Stainless Steel prints that are almost impossible to machine. In this process, the Stainless Steel powder is held together by a binder which is then cured, leaving a very weak structure. The strength comes from filling the voids with Bronze by capillary action. I've not seen this variant before. |
|
|
|
Post by joanlluch on Jul 3, 2015 21:03:39 GMT
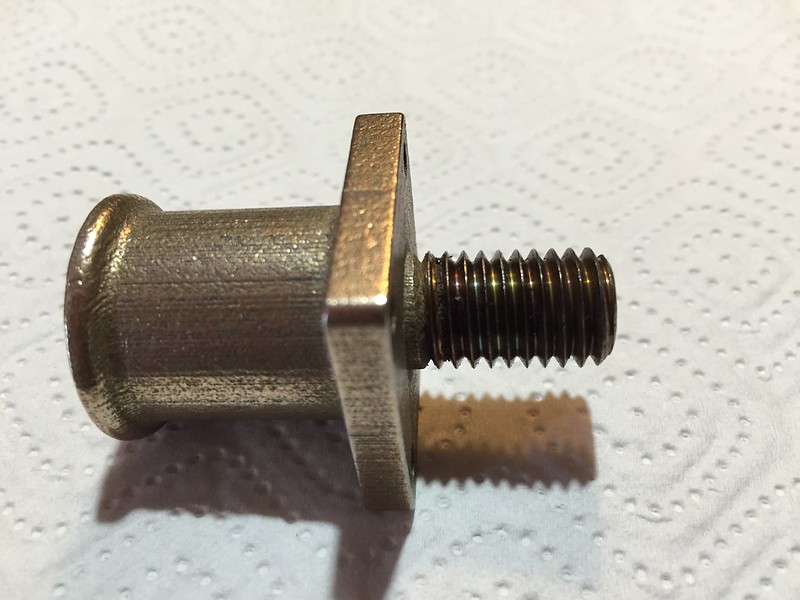
The following is just to show how hard this material is. Look at this:  Mes Mes by joan lluch, on Flickr Notice that the screw was completely burn after using a die on it in a lathe at a very SLOW speed. You must take into account that the screw was part of the design, so it was ALREADY printed by ShapeWays. A die was used on it just to remove the roughness of the 3D finish, and to let the screw to the right tolerance. In fact, the die work was just very superficial -as said the screw was already there-. Still, the part heated that much that the material got burn. |
|
|
|
Post by Cro on Jul 3, 2015 21:12:09 GMT
Joan what do you add the model for the thread before printing it? I know this is not as crucial as other items where threads are used as mechanical fixings but I can't see you getting a thread as accurate and a good enough thread this way compared to if you were screw cutting it or cutting with a die on a plain shank. I can see a lot of errors occuring doing it this way and was just curious what you have modified to ensure you aren't going to end up with a crappy thread?
|
|
|
|
Post by joanlluch on Jul 3, 2015 22:44:55 GMT
Hi Adam, I am unsure if I understand your post. I printed the screw with the hope that it would work as is, but when the part arrived I found that the 3D finish was rough and I could not use a nut on it, so that's why it was treated with a die. The 3D printed screw had perfectly right dimensions, this was not the issue -I think I posted the same parts as they arrived in my lsfornells thread so you can have a look at them-. But the 3D printed layers were disturbing the ability to a nut to screw on. Possibly the inner groves of the screw had too much material deposited in them. So I just passed a die to remove the superfluous material.
Having started from a cylinder would not work as it stands now, because the material is just too hard!. Not sure if this answers your question, but that's why I did it this way.
|
|
|
|
Post by Cro on Jul 4, 2015 5:35:03 GMT
Yeah kind of, It also confirms my thoughts that trying to print a thread isn't accurate enough for use as is which is what I was interested in but I understand what you say about it being to hard to cut if you were doing it just with a die from scratch.
I think the old casting route is possibly still best for something like this, using the methods I have with the printing and LW casting you probably be looking at around £15-£30 a buffer stock maybe less. Don't know what you paid for these but I imagine it can't be there cheap.
|
|
|
|
Post by Roger on Jul 4, 2015 6:23:33 GMT
Although it's not viable to create precision 3D printed threads, I imagine this will be commonplace in the future. The processes and equipment are still in their infancy and it will only be a matter of time before it won't make sense to machine them afterwards. Resolution is only going to get better.
|
|
|
|
Post by joanlluch on Jul 4, 2015 16:46:15 GMT
Hi Adam, Your method is the right one for your purposes because you attempt to create a number of units, and because you have the printer for castable wax (I think). I posted some time ago the ShapeWays prices for my part, see here: modeleng.proboards.com/post/125807 You basically need to look at Stainless Steel->Stainless Steel and Wax->Castable Wax. You will observe that the part in wax is 90.88 EUR, the same printed directly in Stainless Steel is 56.53 EUR. I paid 20% less because I had a discount bonus, but that's to give you an idea. Also you can make the maths on which minimal number of units compensate for the higher price of the wax printed model. Just to have yet another metric, you can also see that ShapeWays would ask 170.75 EUR for the part in Raw Brass by following the casting route. Of course, if you have the wax printer, or you want to obtain the part as a casting then printing it in wax is the sensible route. For my purposes the easiest/cheaper route is direct printing of the part. Unfortunately, parts obtained that way can't be machined so that's the only reason for me why it is not viable. Roger already replied about printing threads. |
|
|
|
Post by Cro on Jul 4, 2015 17:40:21 GMT
Thing is you are looking in the worst possible place, yes shapeways offer a wide variety of options and materials bgt they are by far the most expensive out there for that they are doing and also I can't see the need for them in stainless.
If I went to my foundry to do this it would cost me around £10/£12 for a pattern print, £15 to have the mould made and maybe £5 to have them cast in brass or bronze. Give or take.....and then I can have plenty made and make a little on the side, that's how I started with the washout plugs!
|
|
|
|
Post by joanlluch on Jul 4, 2015 18:09:34 GMT
Thing is you are looking in the worst possible place, yes shapeways offer a wide variety of options and materials bgt they are by far the most expensive out there for that they are doing and also I can't see the need for them in stainless. If I went to my foundry to do this it would cost me around £10/£12 for a pattern print, £15 to have the mould made and maybe £5 to have them cast in brass or bronze. Give or take.....and then I can have plenty made and make a little on the side, that's how I started with the washout plugs! You are completely right. That's why you do it the way you do. Of course there's no reason to do it in Stainless, and I am looking at the wrong place. No worries. :-D Now, seriously. I have already answered your question which does not enter into conflict with what you just have posted, and I have my reasons to make my choice too, which I have posted, so what else do you search?. Maybe you should consider that when you are just going somewhere I have already gone and returned twice... I do not see the reason for you to repeat again and again the procedure you use to make the parts you do, everybody knows it already. I can't see either the need for those parts, so we are tied. |
|
|
|
Post by GWR 101 on Jul 4, 2015 19:27:03 GMT
Dear all, I have been reluctant to enter into this discussion but I have an interest in progressive solutions and as Alan started the thread with 3D printing which would appear to be a useful tool I would like to home in on a couple of areas that appear to be a potential issue for us users. I wonder if it is possible for Joan to provide a little more information regarding the thread that was cut using a die on a lathe. The reference to a very low speed appears to infer that this was under power as opposed to by hand, if this is the case at what rotational speed ?. What type of die was used, solid, split adjustable, or even a die head with chasers ?. And lastly but possibly of greater significance what cutting compound or coolant was used. Has anyone else experience of this problem. Sorry if this is of little interest to anyone else, but if we are to use this method of part production any information is relevant.
Of course there is as we are all possibly aware a multitude of methods for cutting threads many of which are outwith the range of "home workshops" such as EDM (electric discharge machining), grinding, lapping etc. and there is always single point insert tooling which is a possible route. I believe that the dental industry is already using 3D printing including the production of finished parts with threaded portions, that's just a final thought to get your teeth into.  Regards Paul Regards Paul |
|
|
|
Post by Roger on Jul 4, 2015 19:43:33 GMT
Those are very good points Paul, I have to say I was confused by it getting hot. To me that's a manual operation and I wouldn't expect it to get particularly hot, even if it was very tough going.
Since it doesn't cost any more to rough out a thread than to leave a plain diameter, it sounds sensible to leave the finishing process with as little material to remove as possible. I'll also be interested to know the details of how the thread was machined.
|
|
|
|
Post by Cro on Jul 4, 2015 22:35:45 GMT
Thing is you are looking in the worst possible place, yes shapeways offer a wide variety of options and materials bgt they are by far the most expensive out there for that they are doing and also I can't see the need for them in stainless. If I went to my foundry to do this it would cost me around £10/£12 for a pattern print, £15 to have the mould made and maybe £5 to have them cast in brass or bronze. Give or take.....and then I can have plenty made and make a little on the side, that's how I started with the washout plugs! You are completely right. That's why you do it the way you do. Of course there's no reason to do it in Stainless, and I am looking at the wrong place. No worries. :-D Now, seriously. I have already answered your question which does not enter into conflict with what you just have posted, and I have my reasons to make my choice too, which I have posted, so what else do you search?. Maybe you should consider that when you are just going somewhere I have already gone and returned twice... I do not see the reason for you to repeat again and again the procedure you use to make the parts you do, everybody knows it already. I can't see either the need for those parts, so we are tied. I am not saying your way is wrong but trying to show the other options that would have made the finishing of these parts easier as like you say you have struggled with the material. I'm also not saying there is no need for your item, a loco needs buffers so your last comment is irrelevant. I was purely interested in your thought process for choosing that material and following that method which has shown issues that were already risen previously. I like the idea of trying these things, I wouldn't be doing what I am doing if i wasn't open to new techniques. |
|