|
|
Post by 92220 on May 22, 2019 9:41:41 GMT
Thanks Roger. It's been a bit slow but I'm getting there. This is the rest of the smokebox construction. You can see the Protection Plate at the bottom of the inside of the door here. 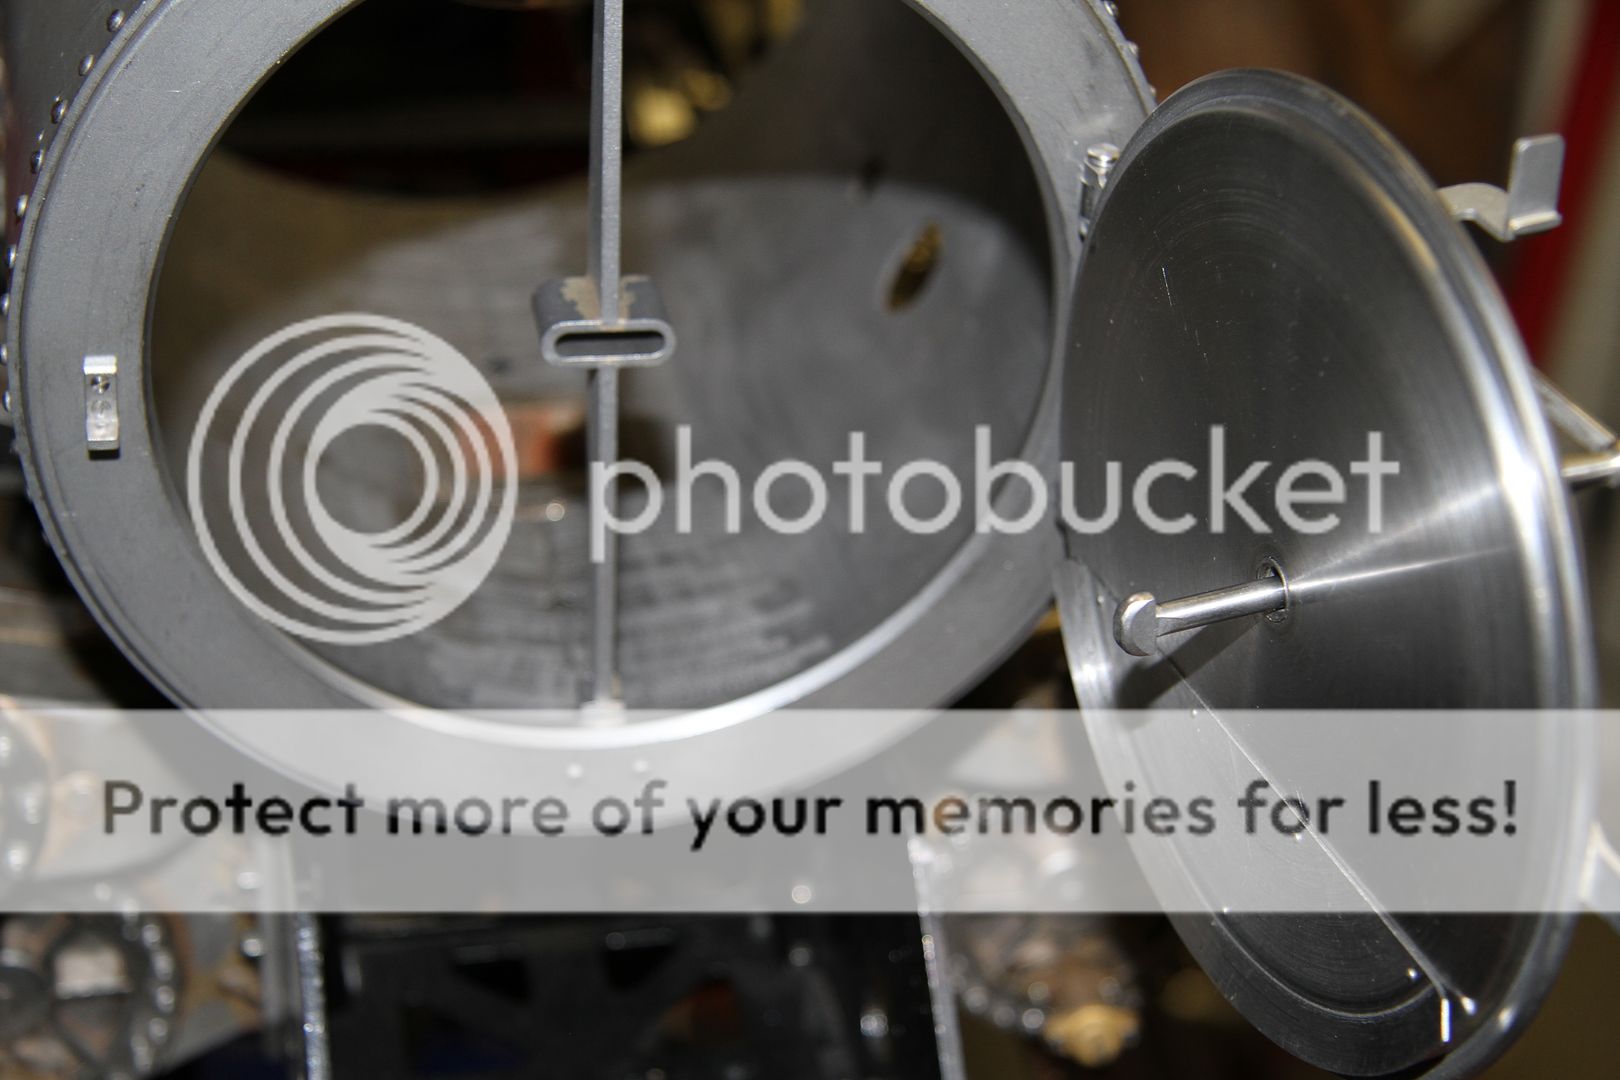 This is the smokebox with the chimney fitted. The chimney has been heavily copper plated so that I just have to mask off the top half and spray-paint the Black on the bottom half. The screws are 12BA with 14BA hex heads. The number plate and shed plate are Diane Carney plates. There have been some questions about whether she is still in business or not, in the past. The answer is a definite Yes she is. still fully operational.  The next job is to rivet the rings to the tube, so I had to make up a rivet squeezer to do this job. This is what I made up with a piece of 12mm thick BMS flat. It worked a dtream and I was able to support the heads on the outside and flatted heads on the inside where it is impossible to see them once the smokebox is in position.  Making the rivet squeezer was made easy by the fact that I had bought a long centre drill and a 6" long x 3/16" diam drill, a while ago, when I saw the centre drill listed in the clearance sale of EW Tool Supplies for the centre drill and Linear Tools for the 3/16" diam drill. 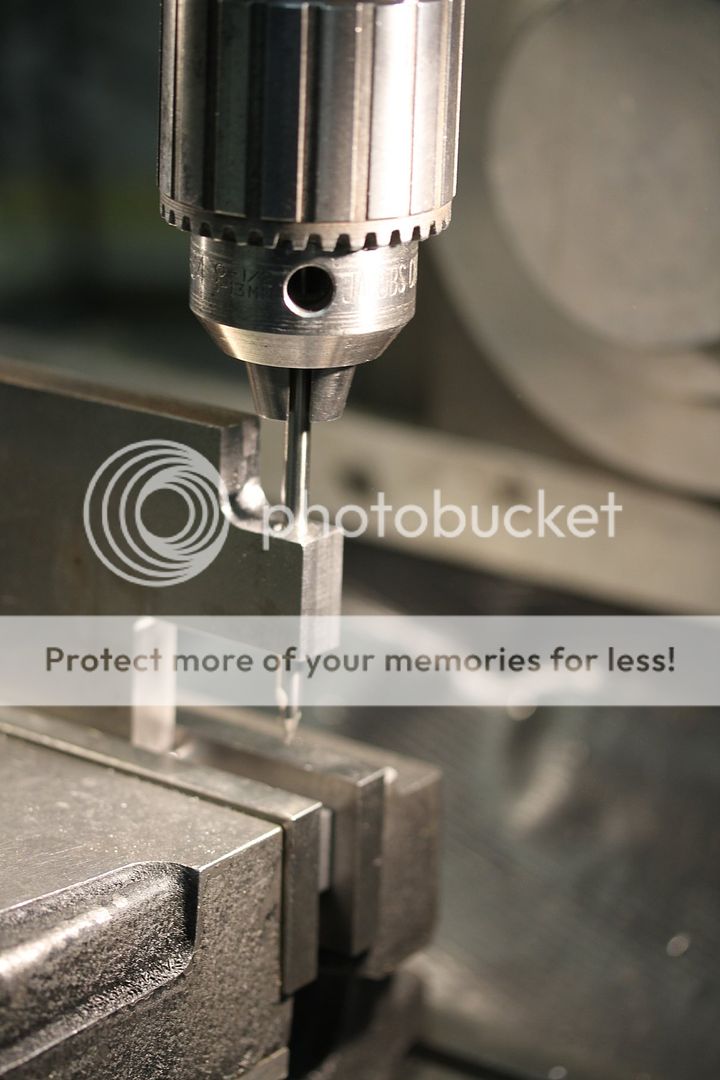  With the smokebox and boiler fionally positioned correctly, this is where I'm at: 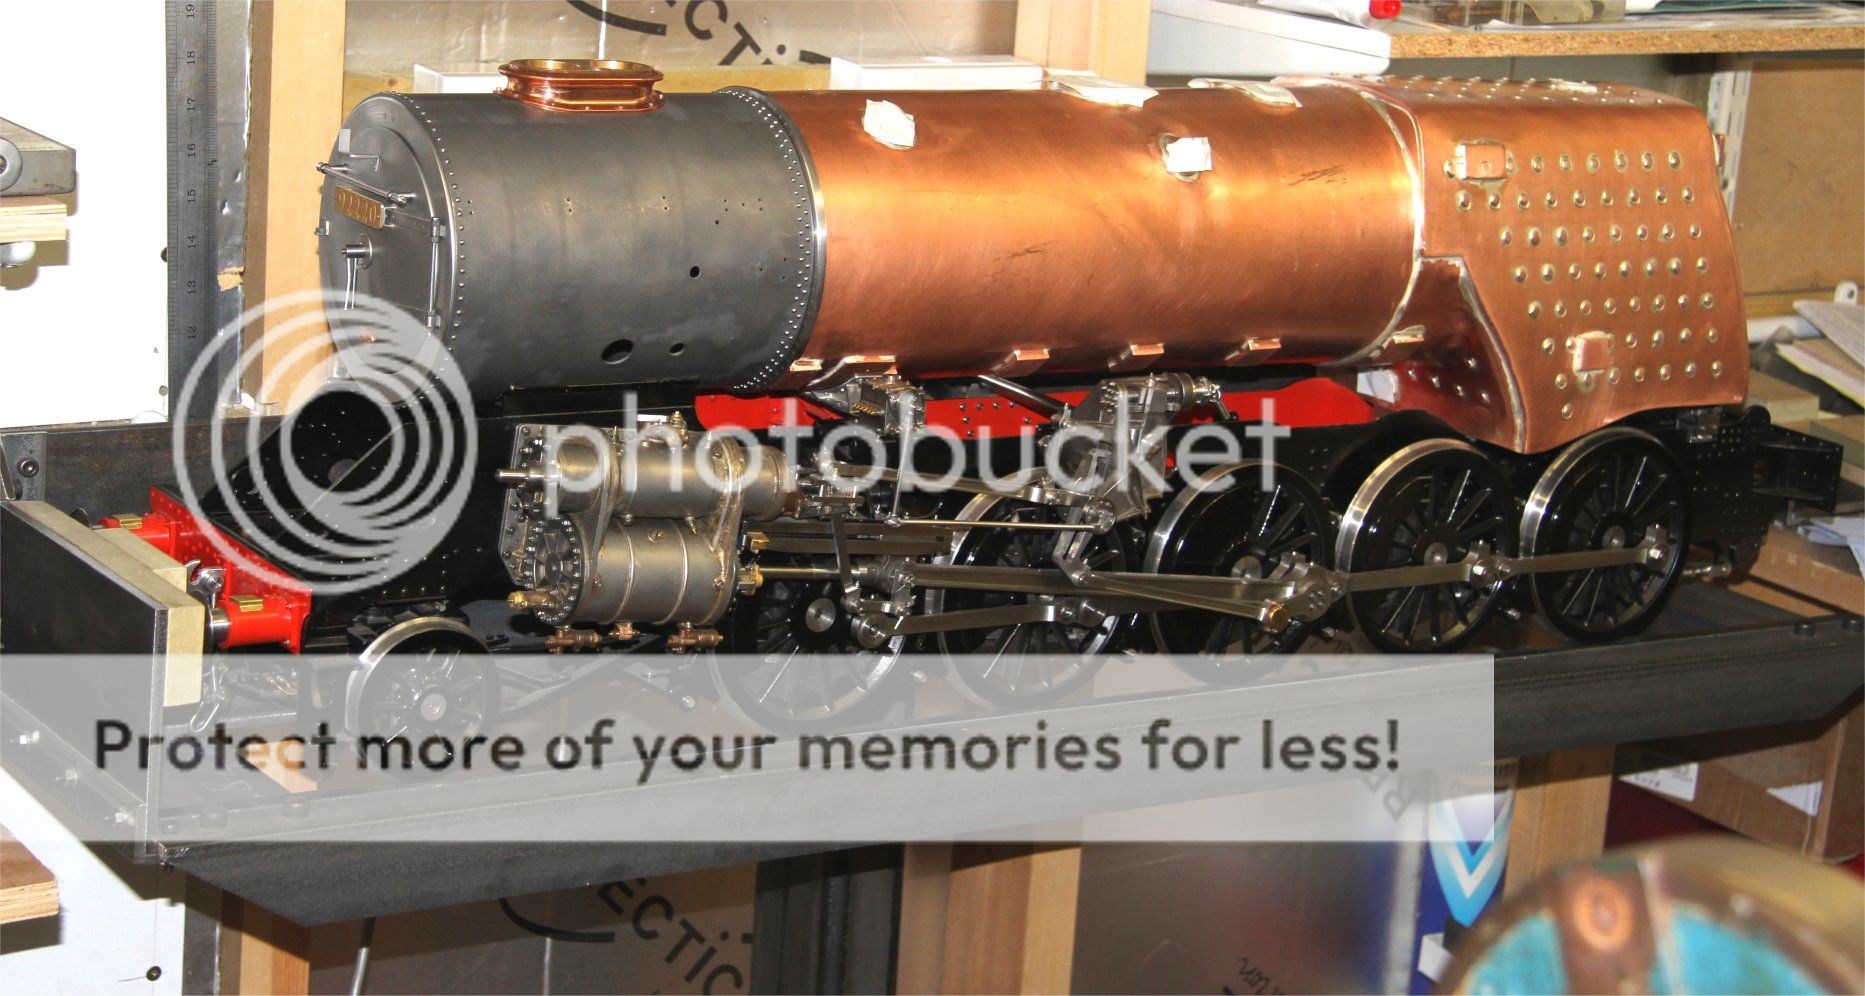 The next job is to paint the cab floor and underframe, and mounting brackets and get them fitted. The next, after the cab, will then be the backhead cladding. I've got to look at the backhead cladding to make sure it clears the cab floor and leaves enough space for expansion. To that end, I am buying a sheet of nickel silver that can be used for the cab and the tender tanks. I have found a supplier that can supply a 5' x 2' sheet of 1mm for about the same price as a sheet of brass. Why have I gone for nickel silver? Because the internals of the tender will be able to be seen through the filler dome and I want the inside structure to look like steel which was not painted inside. The nickel silver I'm ordering is the same as used for 5p, 10p and 20p coins. It is also soft solder and silver solder compatible and non-corrosive. Actually I've just looked at Metals4You site and they list a 1000mm x 1000 sheet of 0.9mm brass at £205 plus VAT against my 1500mm x 600mm x 1mm nickel silver at £160.00 plus carriage and VAT, so it actually works out far cheaper!! |
|
|
|
Post by Deleted on May 22, 2019 10:21:03 GMT
that looks 'ace' Bob, she's looking the part sir...well done...  Pete |
|
barlowworks
Statesman
 Now finished my other projects, Britannia here I come
Posts: 874 
|
Post by barlowworks on May 22, 2019 16:10:15 GMT
Hi Bob. The engine looks amazing and totally different with the boiler on. I love working with nickel silver, so much cleaner than brass and a lot easier to solder. Could I enquire where you ordered your sheet from.
Mike
|
|
|
|
Post by 92220 on May 22, 2019 18:40:24 GMT
Hi Mike.
Columbia Metals Ltd. I have 0.6mm and 1.0mm on order. It is coming in the 'soft' state so it will be interesting to see if I can get away with using the 0.6mm for the cab, or whether I have to use the 1.00mm. You are right. Having the boiler in place has made such a difference to the appearance. It's beginning to look like a loco at last! I've got to get the cab started too, because without the cab sides in place, I can't be sure exactly where the footplate will come so that the holes for the mounting brackets can be drilled and tapped, in the right places on the mounting pads.
Bob.
|
|
|
|
Post by simplyloco on May 25, 2019 9:46:22 GMT
|
|
|
|
Post by 92220 on May 25, 2019 15:32:56 GMT
Hi John.
You are right!! It doesn't stand up to too deep an inspection. Pipework, as you say. There's also the paint work. And it's got the early BR crest on the tender which is completely wrong. The front, lower cab panel, just below the valance is painted Green when it should be Black. £7999 is a bit steep too......for a 3.5"g !!
Bob.
|
|
|
|
Post by Cro on May 25, 2019 18:24:42 GMT
Been here before, always excellent quality.....first class....let's not say too much though the seller frequents our social space..... Bob, loco looking truly lovely and can't wait to see the cab come together, once I've sorted my backlog it's the next thing on my list, at this rate you will over take me! Adam |
|
|
|
Post by springcrocus on May 25, 2019 22:40:16 GMT
Been here before, always excellent quality.....first class....let's not say too much though the seller frequents our social space..... Bob, loco looking truly lovely and can't wait to see the cab come together, once I've sorted my backlog it's the next thing on my list, at this rate you will over take me! Adam Seems to have purchased a slightly better camera, probably to his own disadvantage.  Steve |
|
|
|
Post by Cro on May 26, 2019 9:24:15 GMT
Been here before, always excellent quality.....first class....let's not say too much though the seller frequents our social space..... Bob, loco looking truly lovely and can't wait to see the cab come together, once I've sorted my backlog it's the next thing on my list, at this rate you will over take me! Adam Seems to have purchased a slightly better camera, probably to his own disadvantage. Steve Agreed, good to see you sir, look forward to a long overdue Brit update please! Adam |
|
|
|
Post by David on May 27, 2019 4:27:47 GMT
That's really something. There isn't any one part of it than can be pointed to as a standout, it's all fairly spectacular!
|
|
|
|
Post by 92220 on Jun 6, 2019 18:14:58 GMT
Now the loco has a boiler, it's now much too heavy to lift without help. I was intending to build a gantry crane like Roger described in the May issue of MEW. However, I mention this to a friend of mine who isn't a model engineer, but he suggested an ideal alternative that would cost a lot less and be movable. He suggested I look on Ebay at 'patient hoists'. Brilliant!! An easily movable crane. I found an ideal hoist listed at £199 or make an offer. I offered then guy £175.00 and I would collect the next day and pay cash. He accepted my offer and I went to collect it, thinking I'd have a bit of a struggle to get it in my car. When I arrived, there it was in 2 pieces......the base and the pillar. The guy said he would show me how it fitted together and it took all of 5 seconds!! It is actually designed for quick and easy dismantling and building. So I had a new, cheap, crane. When I checked on the cost of a new one, they were, when made about 10 years ago, just over £2000!! Anyway, when I got it home I realised that I was going to have to do some modification to use it in the confines of the workshop. Because these things are made to lift disabled patients, they have to be ultra stable. To help with this, the legs with universal casters at each end, can be power extended by about 18" but when closed were still too wide to push around the workshop. Also the jib would not lower enough to lift the loco off the floor. Also, the legs stuck way out in front of the end of the jib, again, for extra stability when lifting a patient. I was able to lop 13" of each leg and they still stick out 4" past the end of the jib, so still stable for lifting the loco. I wanted to modify it quite extensively but I wanted it to look as if it was as bought...just smaller. I found a service manual on the web, that showed every single part in it's construction, and how it all went together and how to dismantle it. The lift is done buy extending the mast with a heavy strap fixed at the lower end. The mast extends upwards underneath the strap and so it lifts the load. It has a SWL of 200Kgs so is plenty strong enough to lift the largest 5" gauge loco. All together the modifications have taken about 20 hours work. I did have to do a bit of fiddling to get the mast and jib sections on the mill to drill all the necessary holes in the right places. I've taken some pictures before and after so here they are: I forgot to take a photo of the crane before modification so had to look for a picture of one on the web. This is identical to the one I bought:  The following photos are of the modified crane: Mast at the highest: 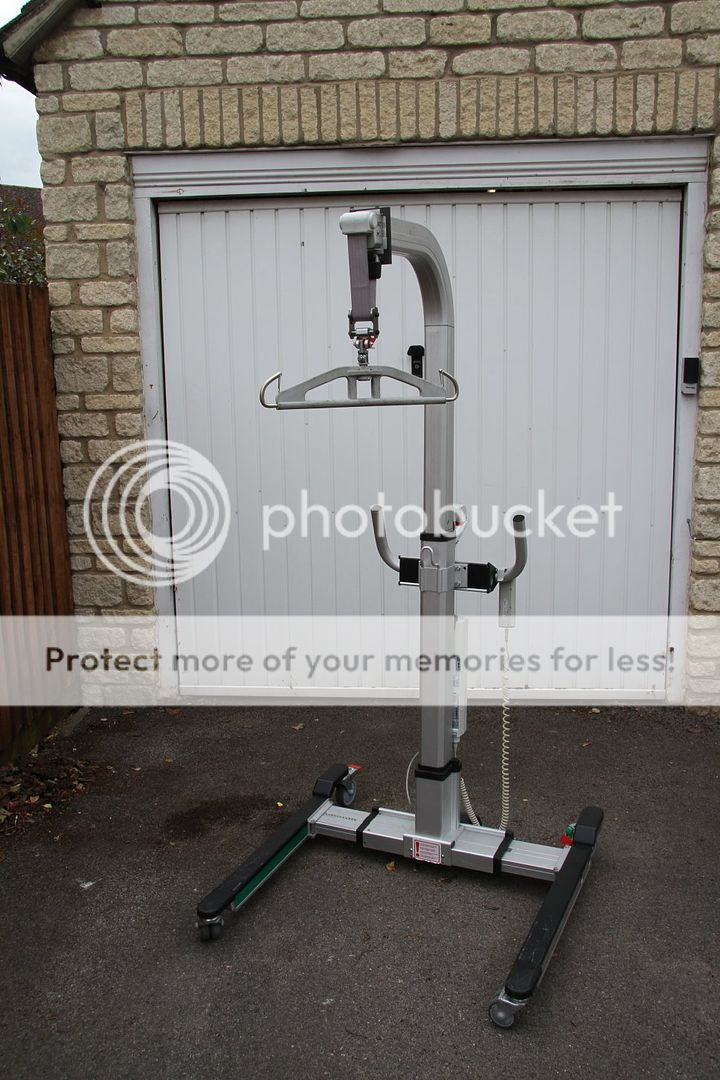 Mast at the lowest: 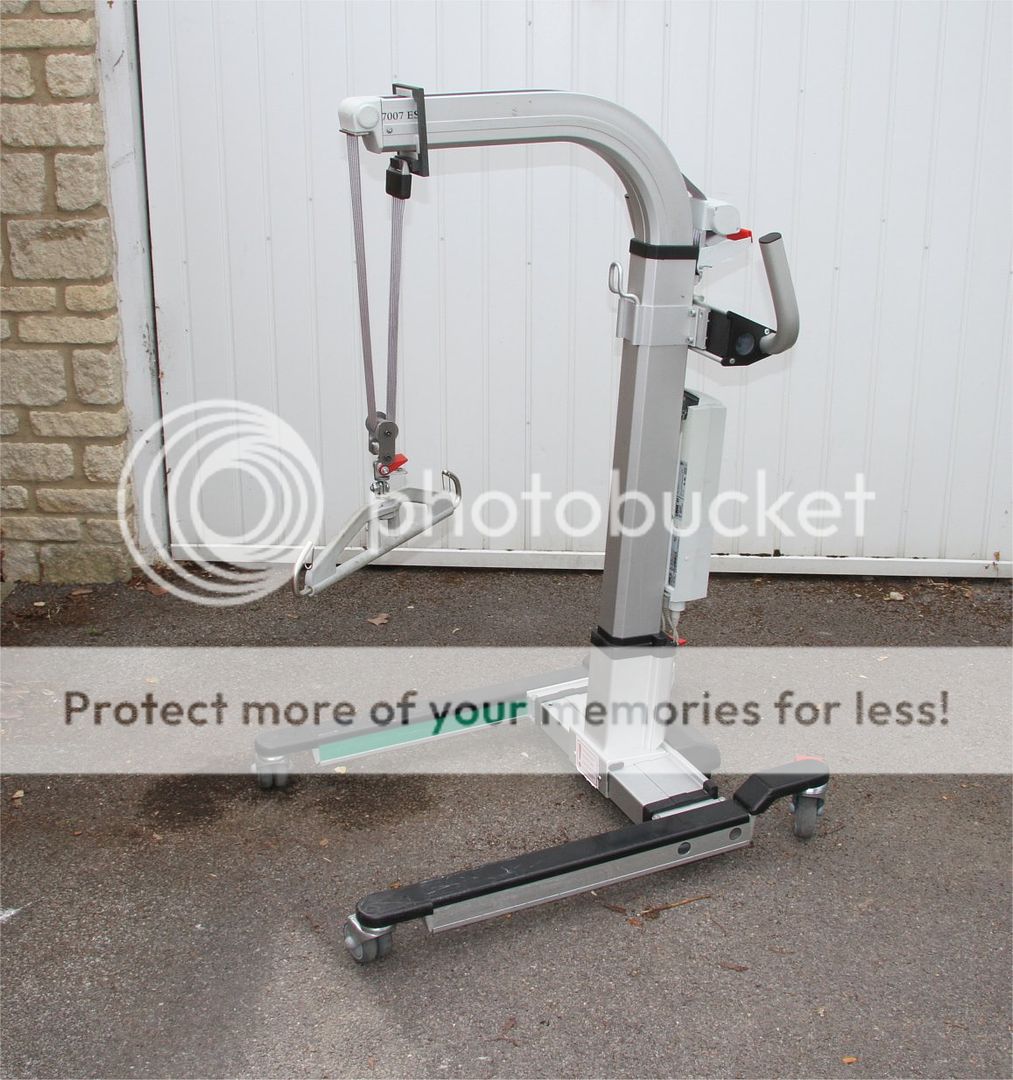 The legs (forks) at their narrowest: 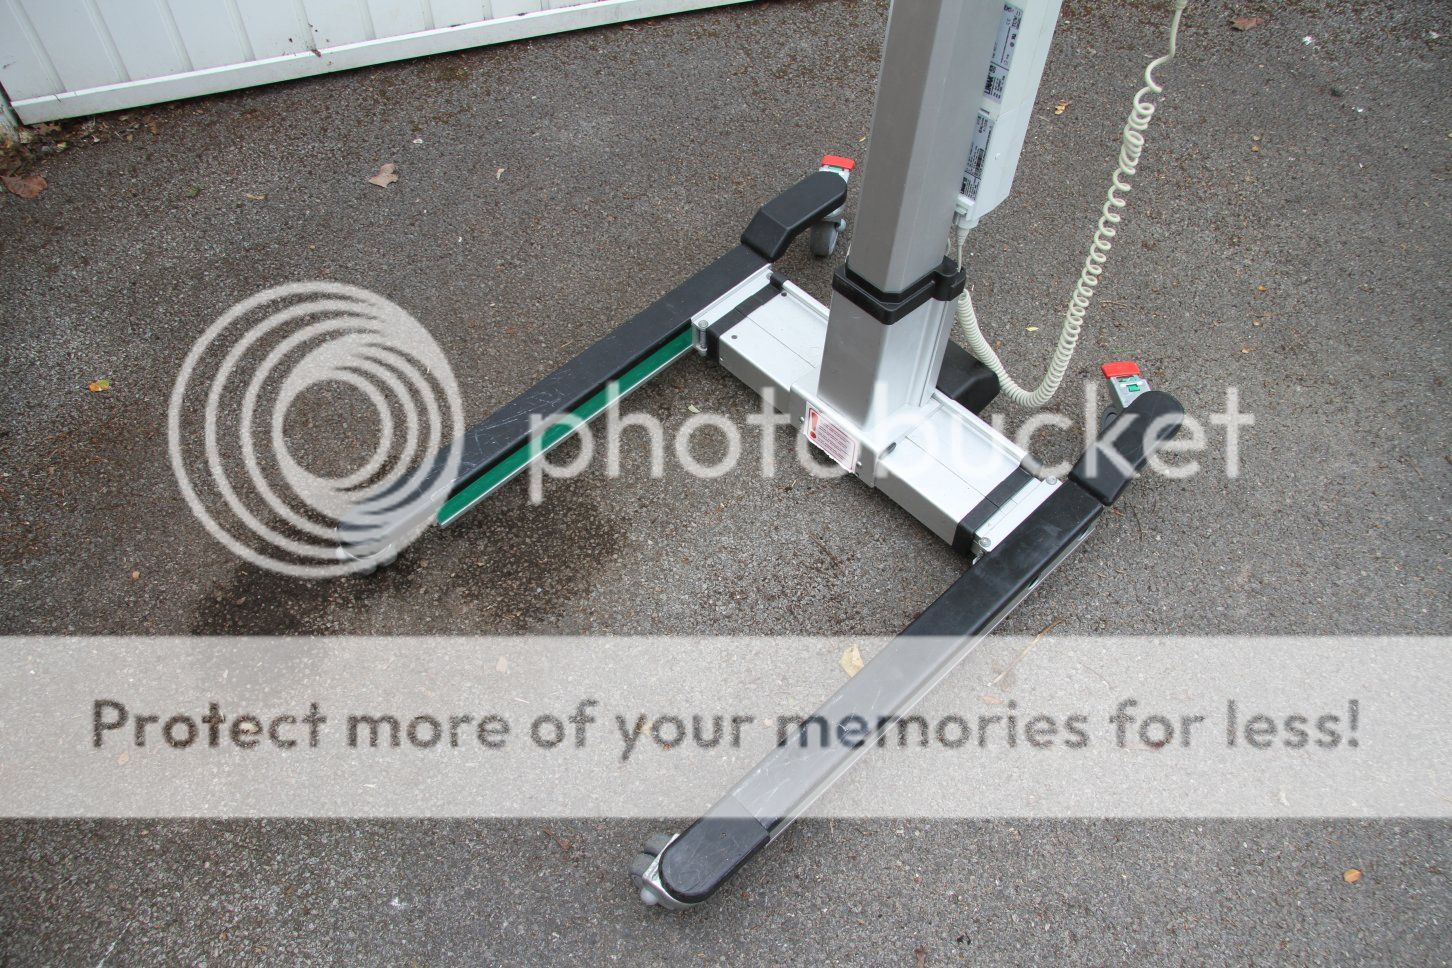 The legs (forks) at their widest: 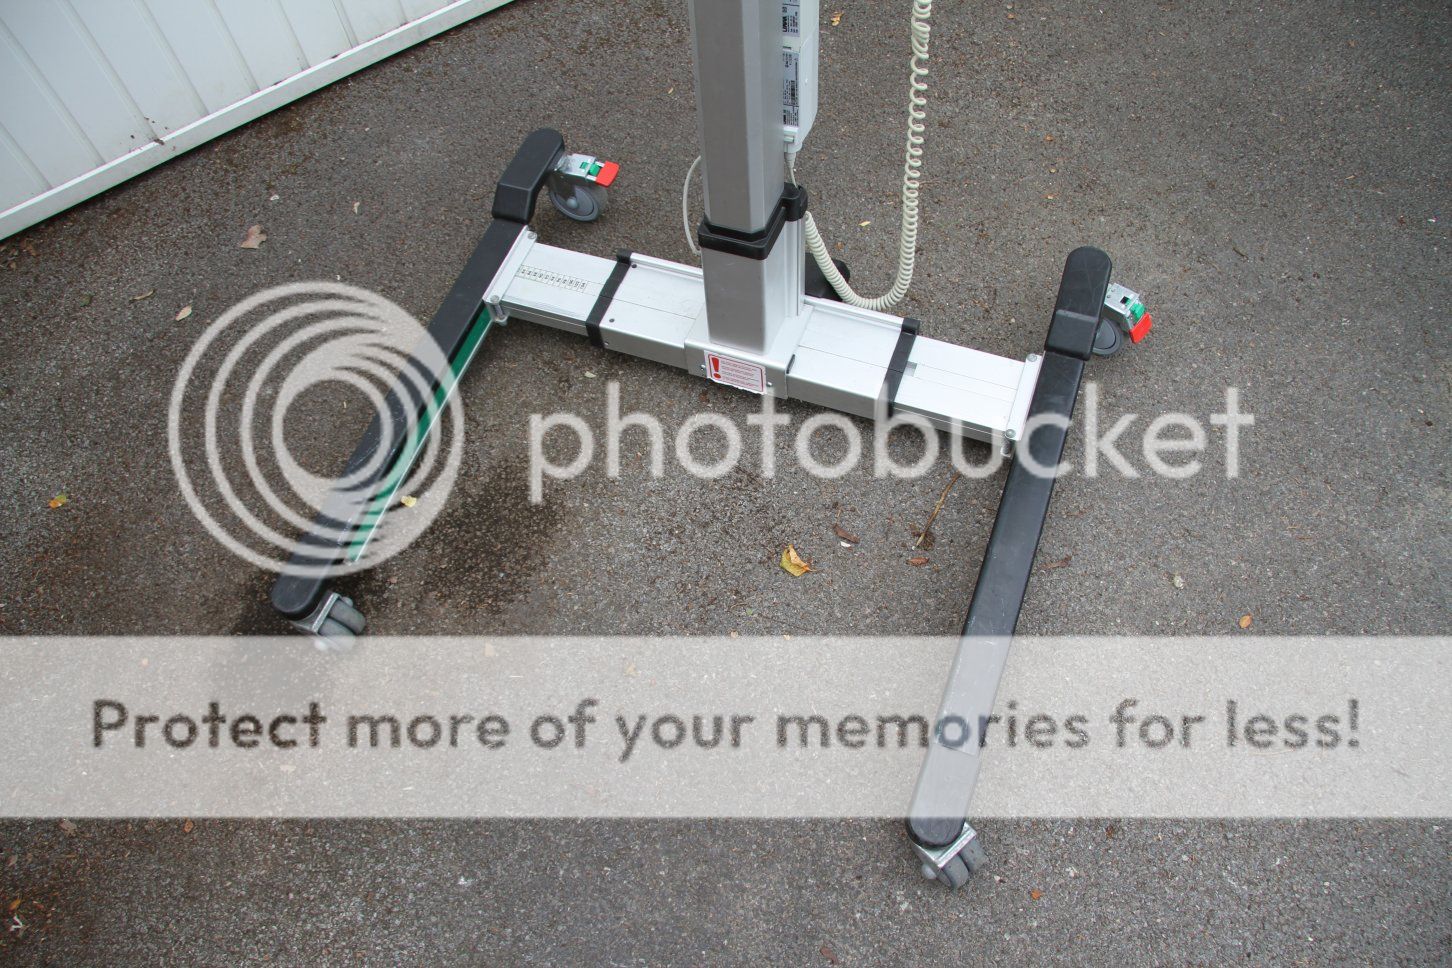 This is the mast separated from the legs unit, for transporting in the car: 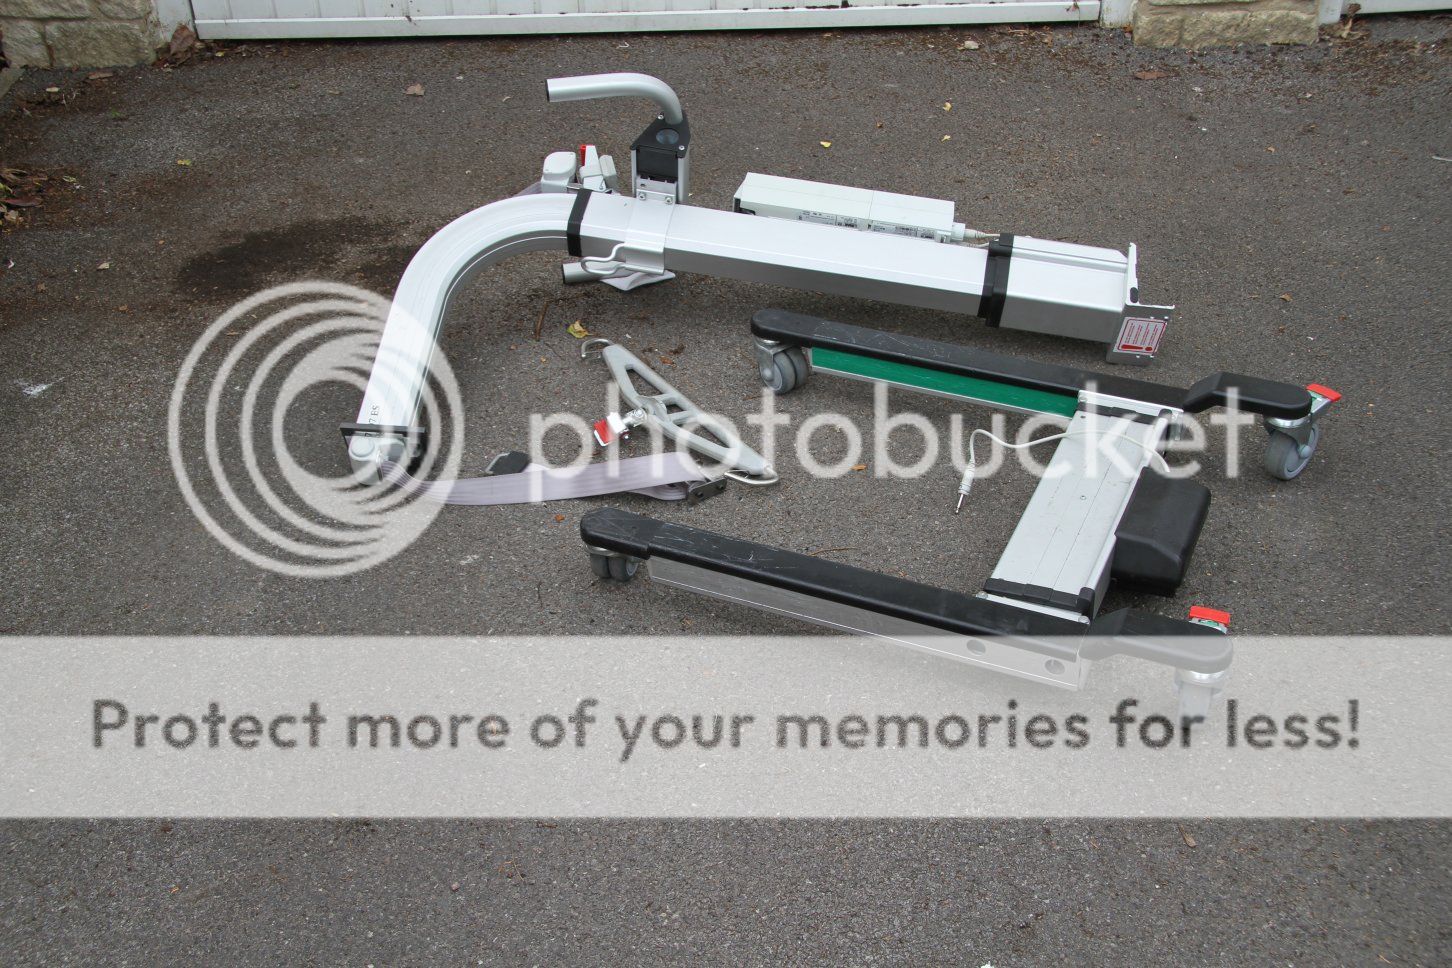  Fitting the mast to the legs is easy, it literally just clips on and 2 screws are fitted to lock it in place. The same 2 screws are moved to 2 other holes and screwed in. This releases the mast from the legs unit, for transport. |
|
|
|
Post by 92220 on Dec 20, 2019 18:57:45 GMT
I haven’t posted anything recently because I have had a major tidy-up in the workshop, to have new vinyl floor covering fitted. Hopefully I will be able to keep it a bit cleaner and be able to find those little bits that drop on the floor. Anyway, I got back to loco work and have been making the safety valves. I started by trying to make safety valves with an exact scale outline, and with only minor internal alterations from fullsize. Unfortunately I found it impossible to get a perfect seal with a scale valve so had to resort to the more usual ball valve.
(hopefully these photos will come out on here. I have ditched Photobucket because although I paid for a subscription, I found it impossible to log in today, so got back into my old Flickr account)
This is what I ended up with:-
This is a photo of all the parts that make up the safety valves:
 Img_3970 by Robert Shephard, on Flickr Img_3970 by Robert Shephard, on Flickr
This is a photo of the finished safety valve:
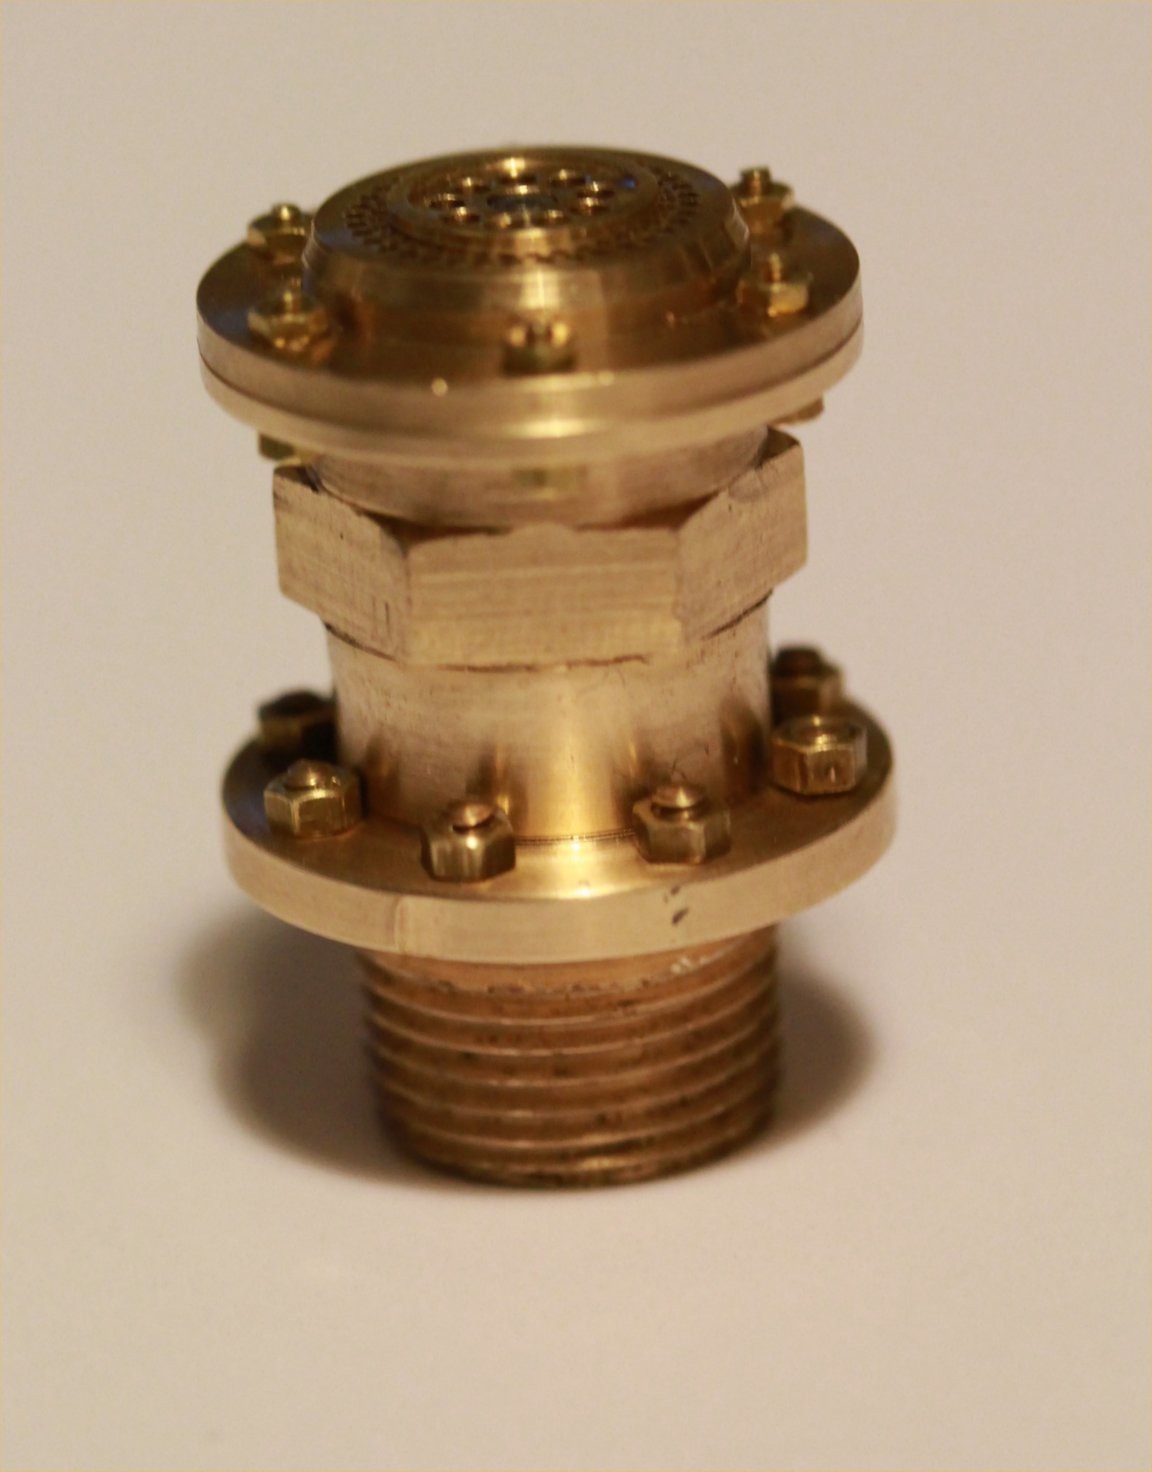 Img_3956 by Robert Shephard, on Flickr Img_3956 by Robert Shephard, on Flickr
This is the top view, showing the holes for steam to escape:
 Img_3954 by Robert Shephard, on Flickr Img_3954 by Robert Shephard, on Flickr
This is a photo of the valve with the top cover off, to show the pressure adjuster:
 Img_3976 by Robert Shephard, on Flickr Img_3976 by Robert Shephard, on Flickr
The valves are made of phos.bronze with stainless steel valve ball and guide shaft, with a stainless spring.
I wasn’t sure how to seal them into the boiler bushes, but Roger suggested using o-rings. I just have to turn a groove in the base flange to fit a 12.5mm I.D. x 1mm section, O-ring.
The next job will be to make the clothing over the backhead, then I can complete the clothing over the firebox.
EDIT:_ I hope I have just found the way to get photos up. We shall see when I save it!
Edit 2:- No. That didn't work either. Anyone got any ideas?
EDIT £:- GOT IT!!! But how can I make the posted photos a bit smaller?
|
|
|
|
Post by 92220 on Dec 20, 2019 19:01:11 GMT
Ah. Now the photos haven't come out....just a link. Anybody know what I've done wrong? To post the link to the photo, all I did was right click on the photo in my Flickr album and copy the link address, then paste it into the text.
Bob
|
|
uuu
Elder Statesman
 your message here...
Posts: 2,814
|
Post by uuu on Dec 20, 2019 19:12:05 GMT
When looking at the photo on Flickr, there should be a curved arrow symbol to the lower right of the picture. This should bring up a link that you can paste into here. The "BBC" choice is the one you want - you can choose the resolution.
Wilf
|
|
|
|
Post by 92220 on Dec 20, 2019 19:22:52 GMT
Thanks Wilf. I finally remembered it and have edited the links. The photos now show above, but it would be good to find a way of making them smaller on here. Any ideas?
Bob.
|
|
don9f
Statesman
Les Warnett 9F, Martin Evans “Jinty”, a part built “Austin 7” and now a part built Springbok B1.
Posts: 960
|
Post by don9f on Dec 20, 2019 19:57:08 GMT
Hi Bob, very nice indeed!
Cheers Don
|
|
|
|
Post by dhamblin on Dec 20, 2019 21:22:02 GMT
Thanks Wilf. I finally remembered it and have edited the links. The photos now show above, but it would be good to find a way of making them smaller on here. Any ideas? Bob. Hi Bob, there should be an option on sharing the photo to generate the BBCode. Underneath the generated code should be a drop down menu that allows you to choose the display size. I go for 800x600 or nearest equivalent and it also auto resizes to match the screen width on mobile phones. Regards, Dan |
|
|
|
Post by coniston on Dec 20, 2019 23:06:27 GMT
Super looking valves Bob. I use Paint 3D (previously used Paint) to reduce the size of images, then save them as the smaller size. In Pint 3D the option is in 'canvas' just pick a reduction percentage that suits.
Chris D
|
|
|
|
Post by 92220 on Dec 21, 2019 9:44:26 GMT
Hi Dan.
Thanks. I thought there should be a means of reducing the pictures.
Hi Chris.
I use Paintshop Pro 7 to reduce photos down to the 4M size, but it hasn't helped. Dan's pointer, above, should get it sorted. I'll have to do some more photos to see if I have finally sorted it out.
Thanks Guys.
Bob.
|
|
|
|
Post by Roger on Dec 21, 2019 12:16:39 GMT
Hi Dan. Thanks. I thought there should be a means of reducing the pictures. Hi Chris. I use Paintshop Pro 7 to reduce photos down to the 4M size, but it hasn't helped. Dan's pointer, above, should get it sorted. I'll have to do some more photos to see if I have finally sorted it out. Thanks Guys. Bob. Hi Bob, Maybe I'm misunderstanding the issue, but I think Wilf has the answer. You just select the BBCode resolution you want the link to have. You upload the full resoluion picture to Flickr and let it deal with the resizing. If you don't want to upload very high resolution images, you can probably set the Smartphone or Camera to take lower resolution pictures in the first place. These modern devices are taking pictures at far higher quality than you're ever going to need unless you're aiming at publishing quality. |
|


