rrmrd66
Part of the e-furniture

Posts: 339 
|
Post by rrmrd66 on Apr 5, 2017 6:46:39 GMT
Thanks for the encouraging remarks Julian. Next step was to finish drilling the frames. As previously explained I was not able to do this on the milling machine as planned because of problems with the DRO. So, I did it the old fashioned way with marking blue, scribe, digital verniers, rule and center pop. There appeared to be two critical dimensions with regards to the centres of the axles lying on an inclined plane. To ease finding the exact location I made hardwood filler pieces to fit the existing cut outs as shown of the pic below. 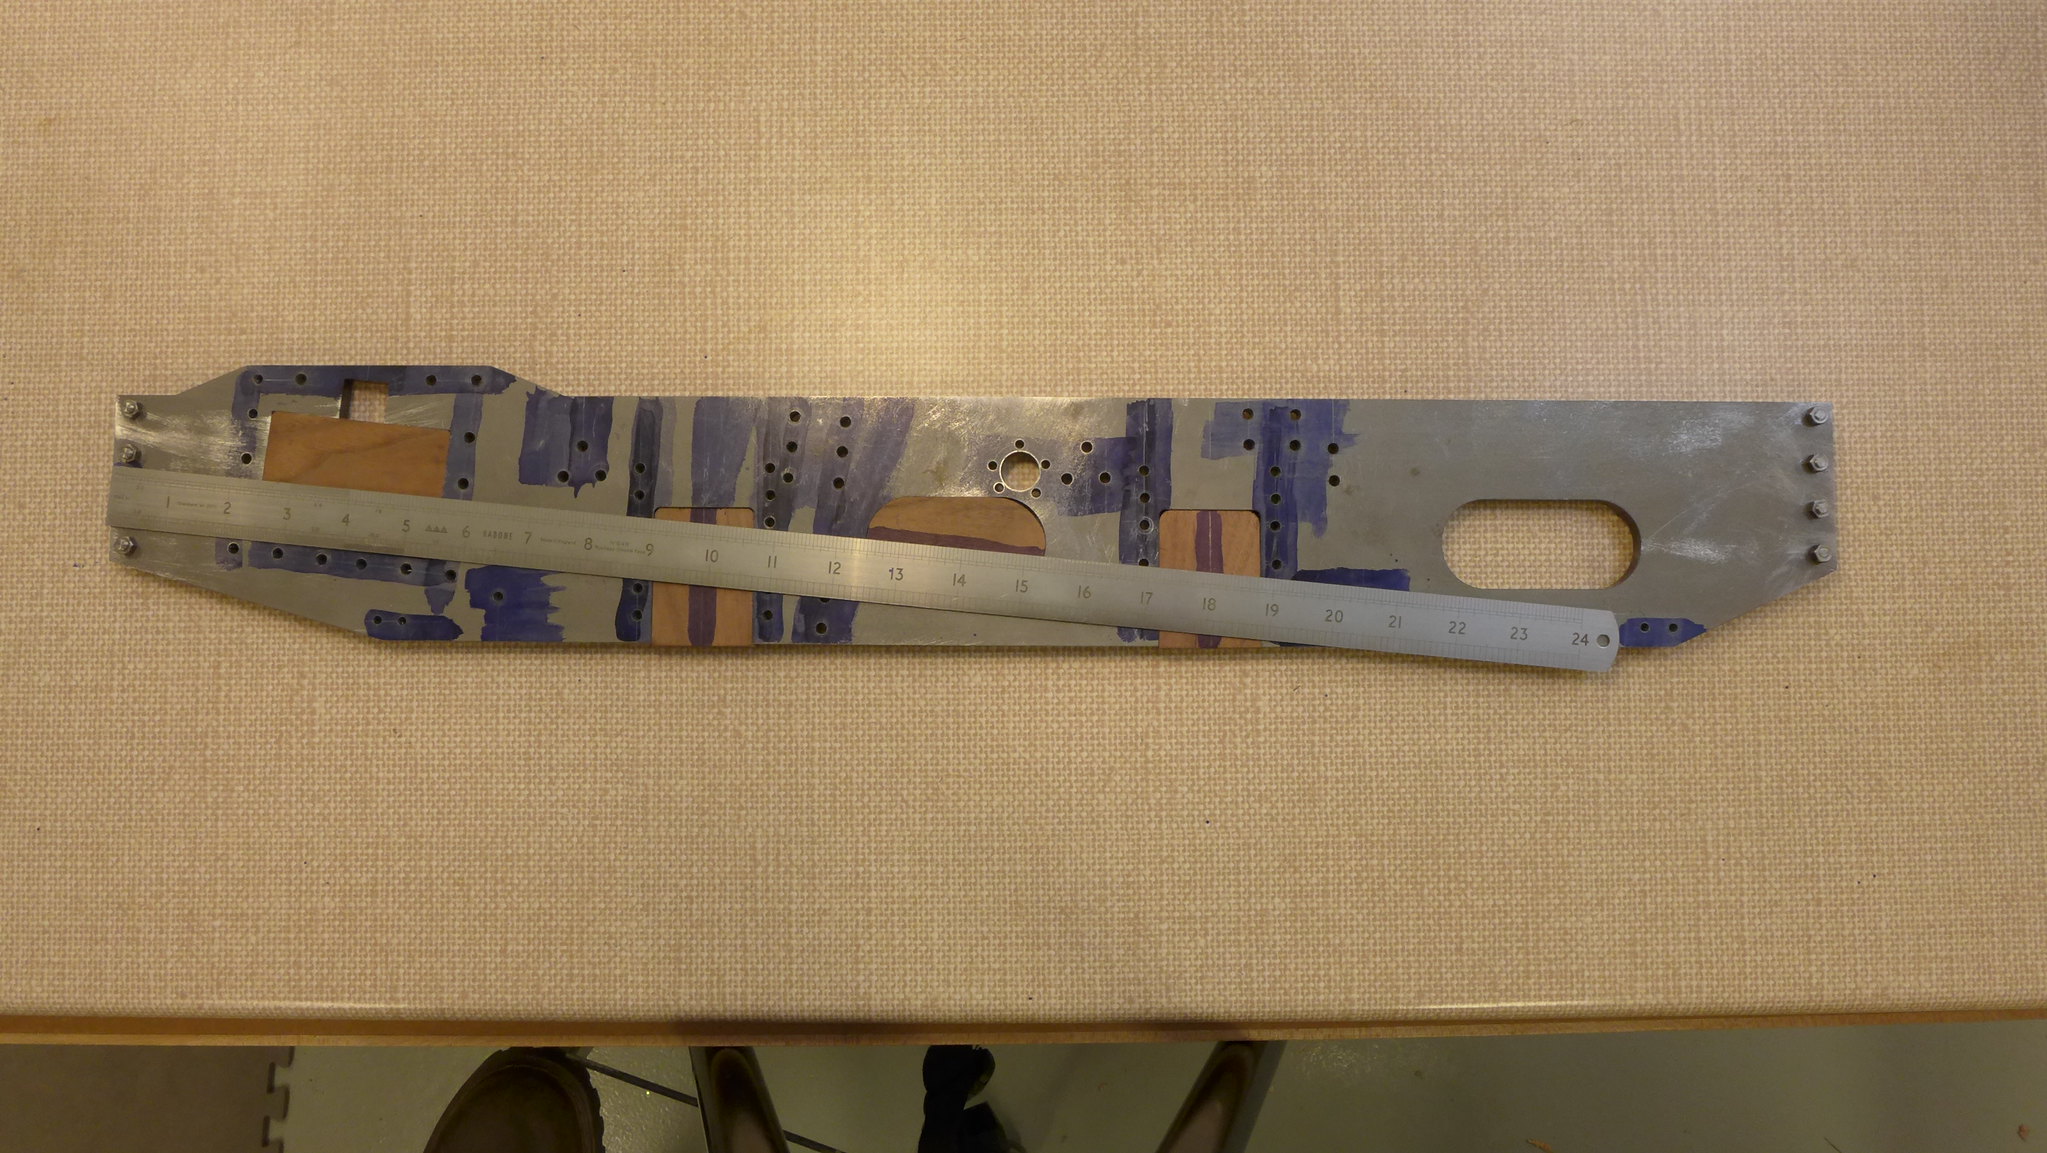 P1010068 P1010068 by Malcolm HARWOOD, on Flickr A point at the centre of the rear axle must be 3.25" from a line normal to the inclined plane to the centre of the weight shaft trunnion and 14" to the centre of the cylinder .These centres all to be lying on this inclined plane. Whilst generally checking dimensions I discovered that the two "sausage slots" were not cut to the drawing dimensions. 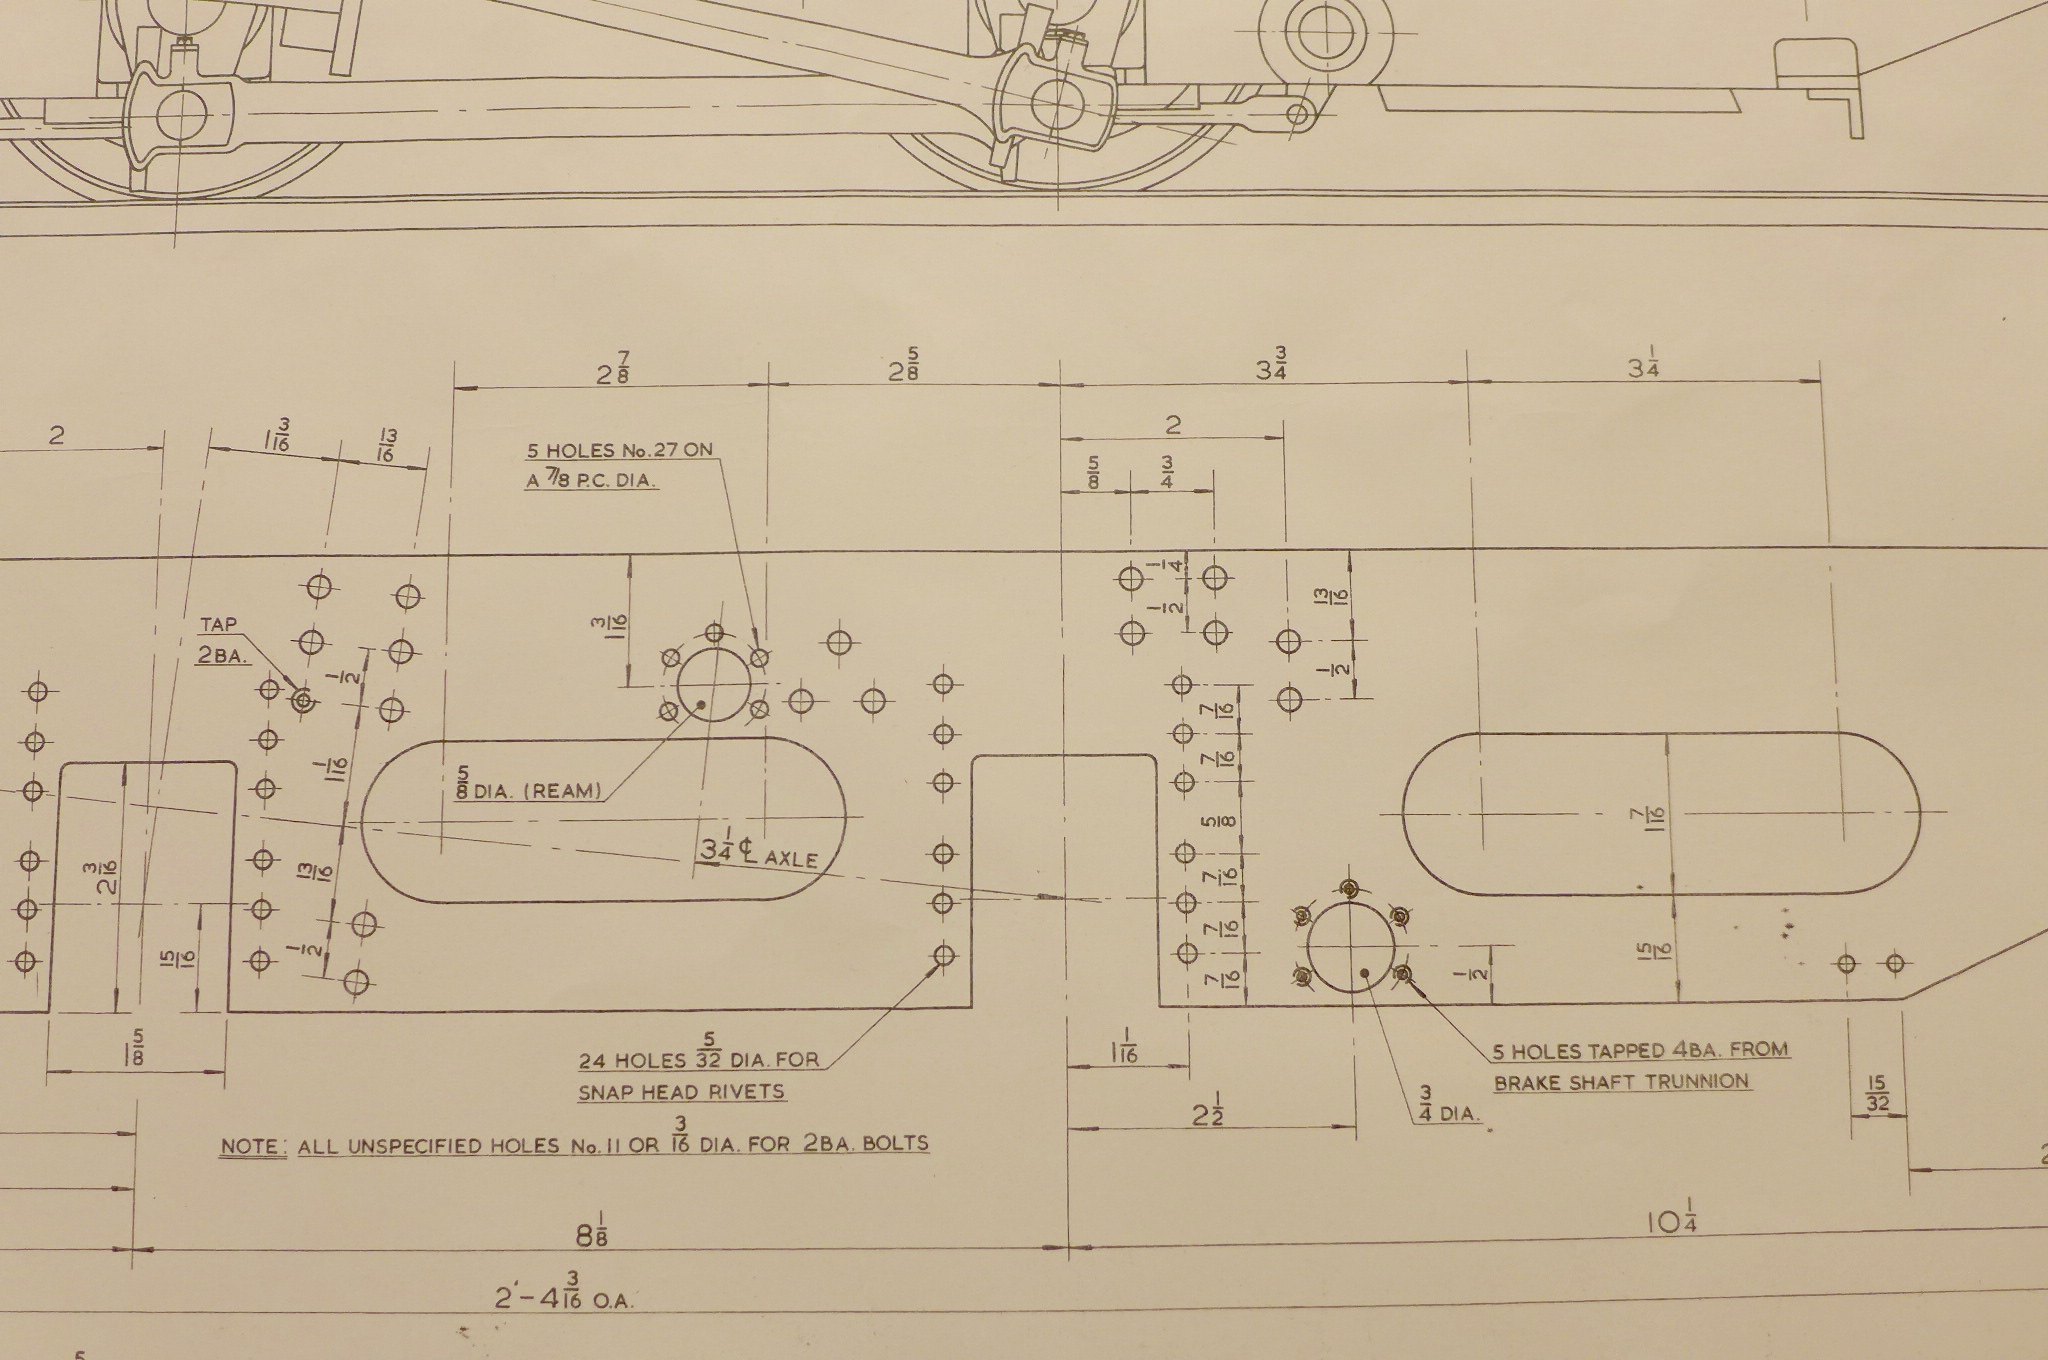 fullsizeoutput_5c5 fullsizeoutput_5c5 by Malcolm HARWOOD, on Flickr You will note that the centres of these slots are shown as (left hand) 2.875" and 9right hand) 3.25". The Reeves laser cut frames were in fact 2.875" and 3.25' overall length. I asked Reeves why this was so and could they check with their laser cutting contractor? This is a common sort of mistake. I got a reply from Reeves saying this was the first time anyone had pointed this out (!) and a contact of theirs who had built three Hunslets for them some time ago told me he had never noticed this. He noted " The only thing that goes through the front RH opening is the delivery pipe from the axle pump to the bypass valve under the running board. I cut an oval hole 1/2" high by 7/8" long, 1-1/2" from the top of the RH frame, 7/8" from the back buffer beam for the delivery pipes from the injector and axle pump to the two clacks on the back head. These pipes could have come through the back sausage opening if it were bigger." Maybe this builder says it will cause a problem later on when I come to fit the pipe form the axle pump?? Has any other recent Hunslet builder noticed this apparently uncritical error? Anyway I will press on regardless. Next step is to mill and part the horns. Thanks for reading Malcolm |
|
jma1009
Elder Statesman
  
Posts: 5,922
|
Post by jma1009 on Apr 5, 2017 21:16:24 GMT
Hi Malcolm,
There will be no problem with the axlepump pipework. Hopefully you will fit 2 injectors and dispense with the axlepump. If my memory is correct, none of the Don Young 5"g Hunslets I have driven had axlepumps fitted, just 2 injectors.
When you get to the valve gear details mentioned previously, the inclined cylinders and hence also centre line of the valve gear have a big effect on the computer simulator when working out the corect details if you go down this route, as lots of dimensions have to be re-calculated. However all the examples I've driven worked excellently. However when I know there is an error in Don Youngs's valve gear I want to put it right as it offends my OCD on such matters!
Cheers,
Julian
|
|
rrmrd66
Part of the e-furniture

Posts: 339 
|
Post by rrmrd66 on May 14, 2017 20:56:35 GMT
Evening everybody. It's Grantchester on TV so here is an update despite Easter, Grandchildren, visitors and some initial problems with the new milling machine (more of this anon in a thread I will open in the workshop and/or tools and tooling section.) The frames are finished and the front and rear beams drilled plus the stiffening pieces. I have cleaned everything up including those marks left by the laser cutting on the edges. Should I now get the plates bead blasted as per Chris Vines book and apply a coat of acid etch primer or should I leave this until after assembly? Advice welcome. I am guessing do it now as 100% coverage after assembly will be all but impossible. If this was cabinetmaking I would always prime as I went along. Yes the milling machine is up and running and the DRO fitted and working. Now to make a start on the phosphor bronze horn block castings. You will recall for my earlier post that i am a complete novice to 5' gauge loco construction. Did I ever machine phosphor bronze castings when an apprentice? Can't remember. I certainly turned it, but milled a raw casting. Don't think so. I don't know about you but as the casting cost something in the region of £75 each and Don Young's articles in LLAS blithely states casting tolerances are approximately 1/8" , I was a little nervous! Is it +/- 1/8" or +/- 1/16". Also, and I have touched on this before there are no tolerances on the drawings. To establish the correct width of the horns and also to give me a datum edge to work from I bolted the horn casting to the mill bed . Note the 4 gauge steel spacers as I was worried about the end mill possibly marking the bed even though the spigot , in its raw state, prevents this. By moving the clamping bolts as the machining progressed I was able to create a flat surface on the top side of the casting, as well. 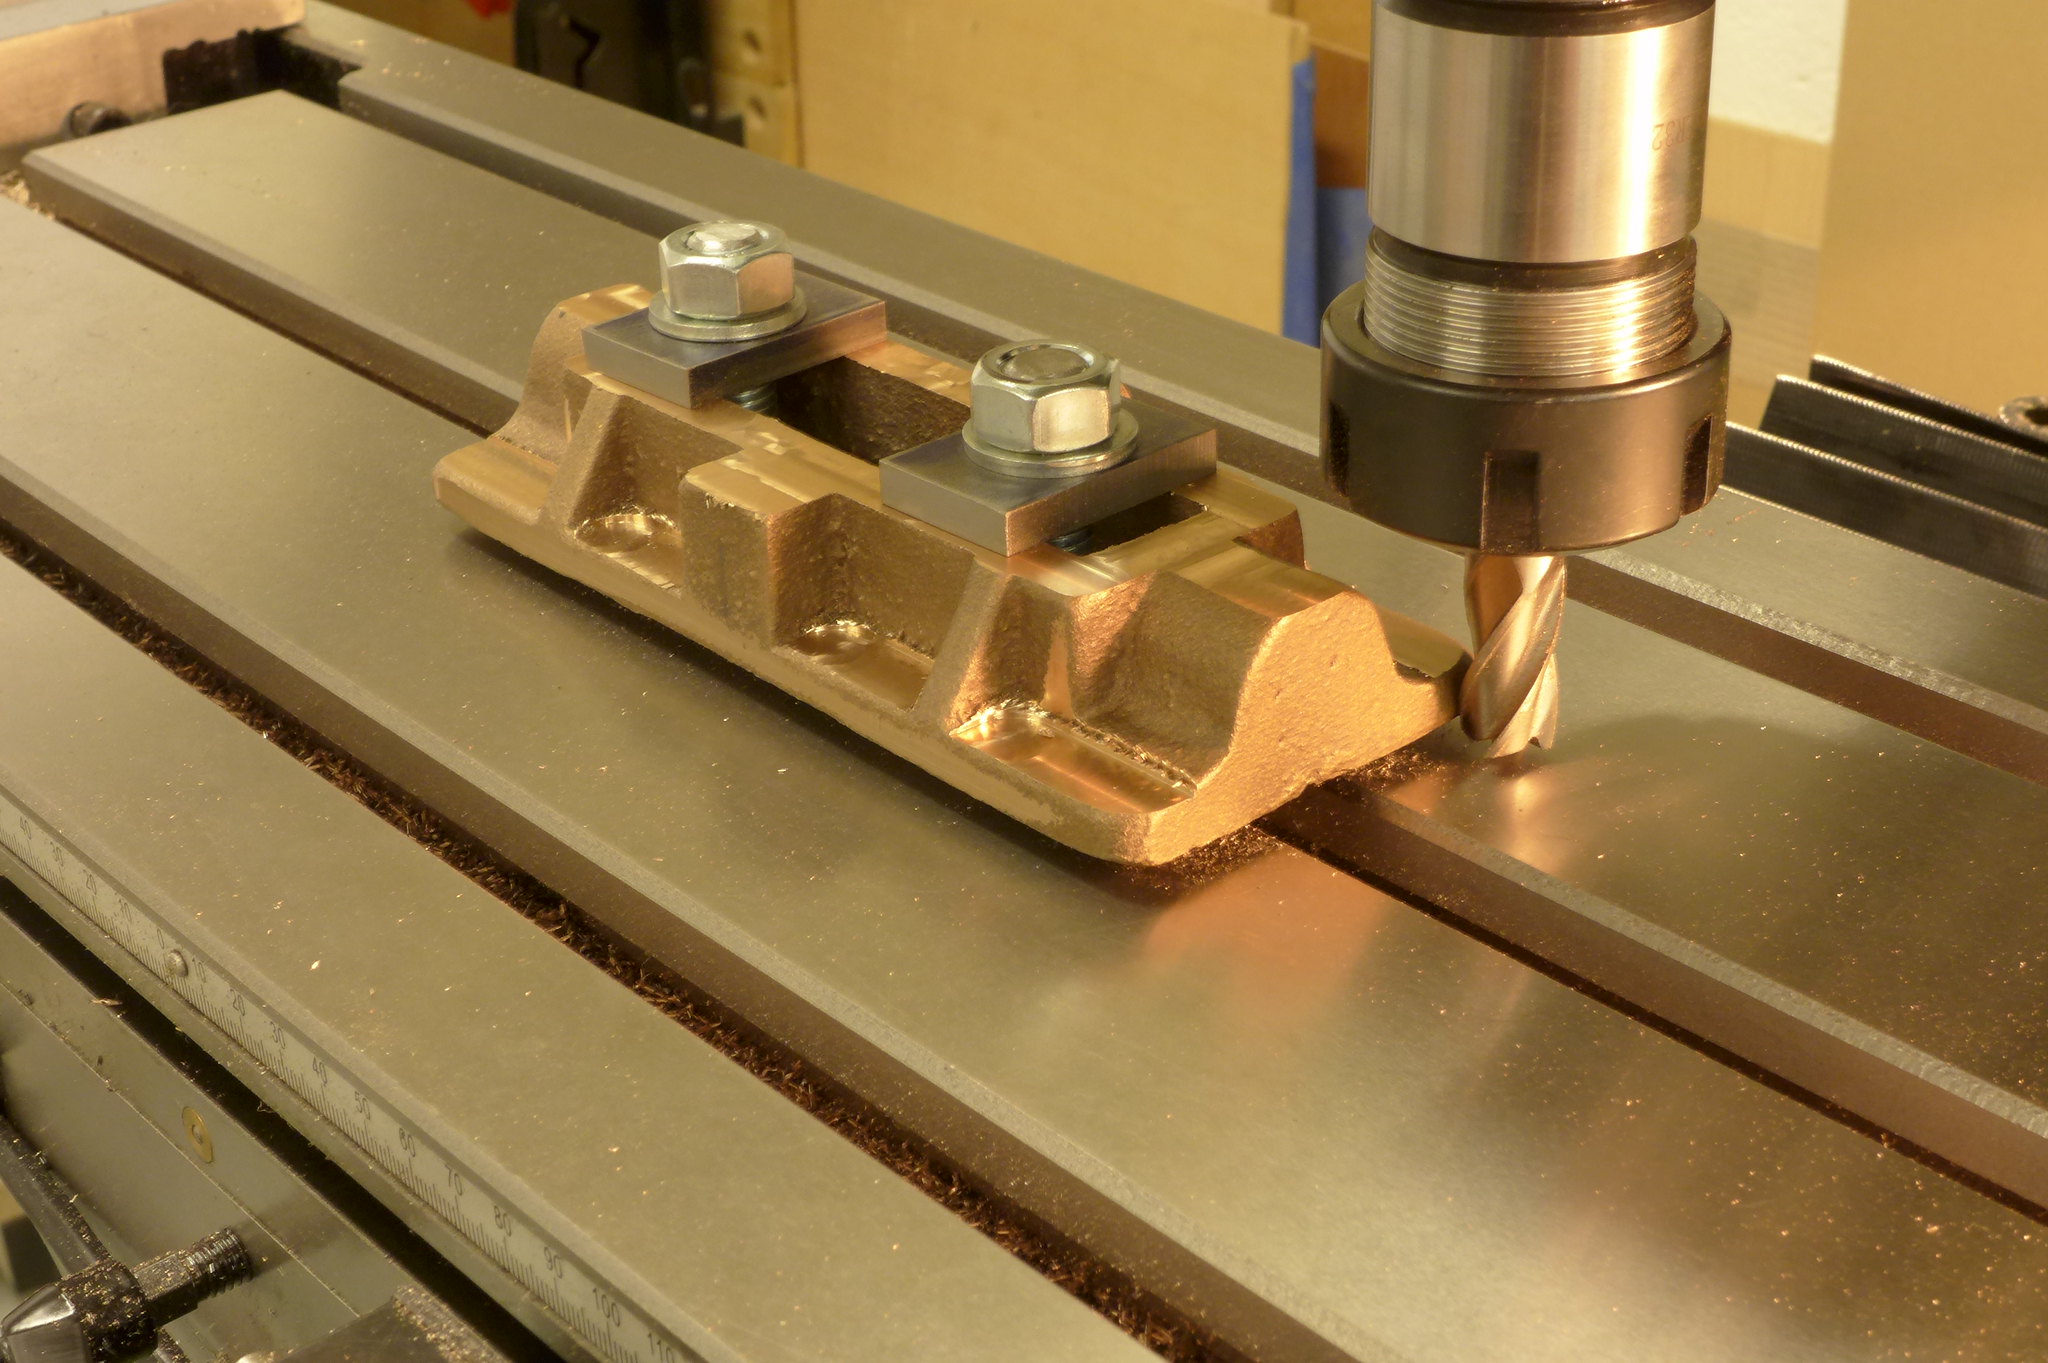 P1010069 P1010069 by Malcolm HARWOOD, on Flickr I then made a quick "fag packet sketch. 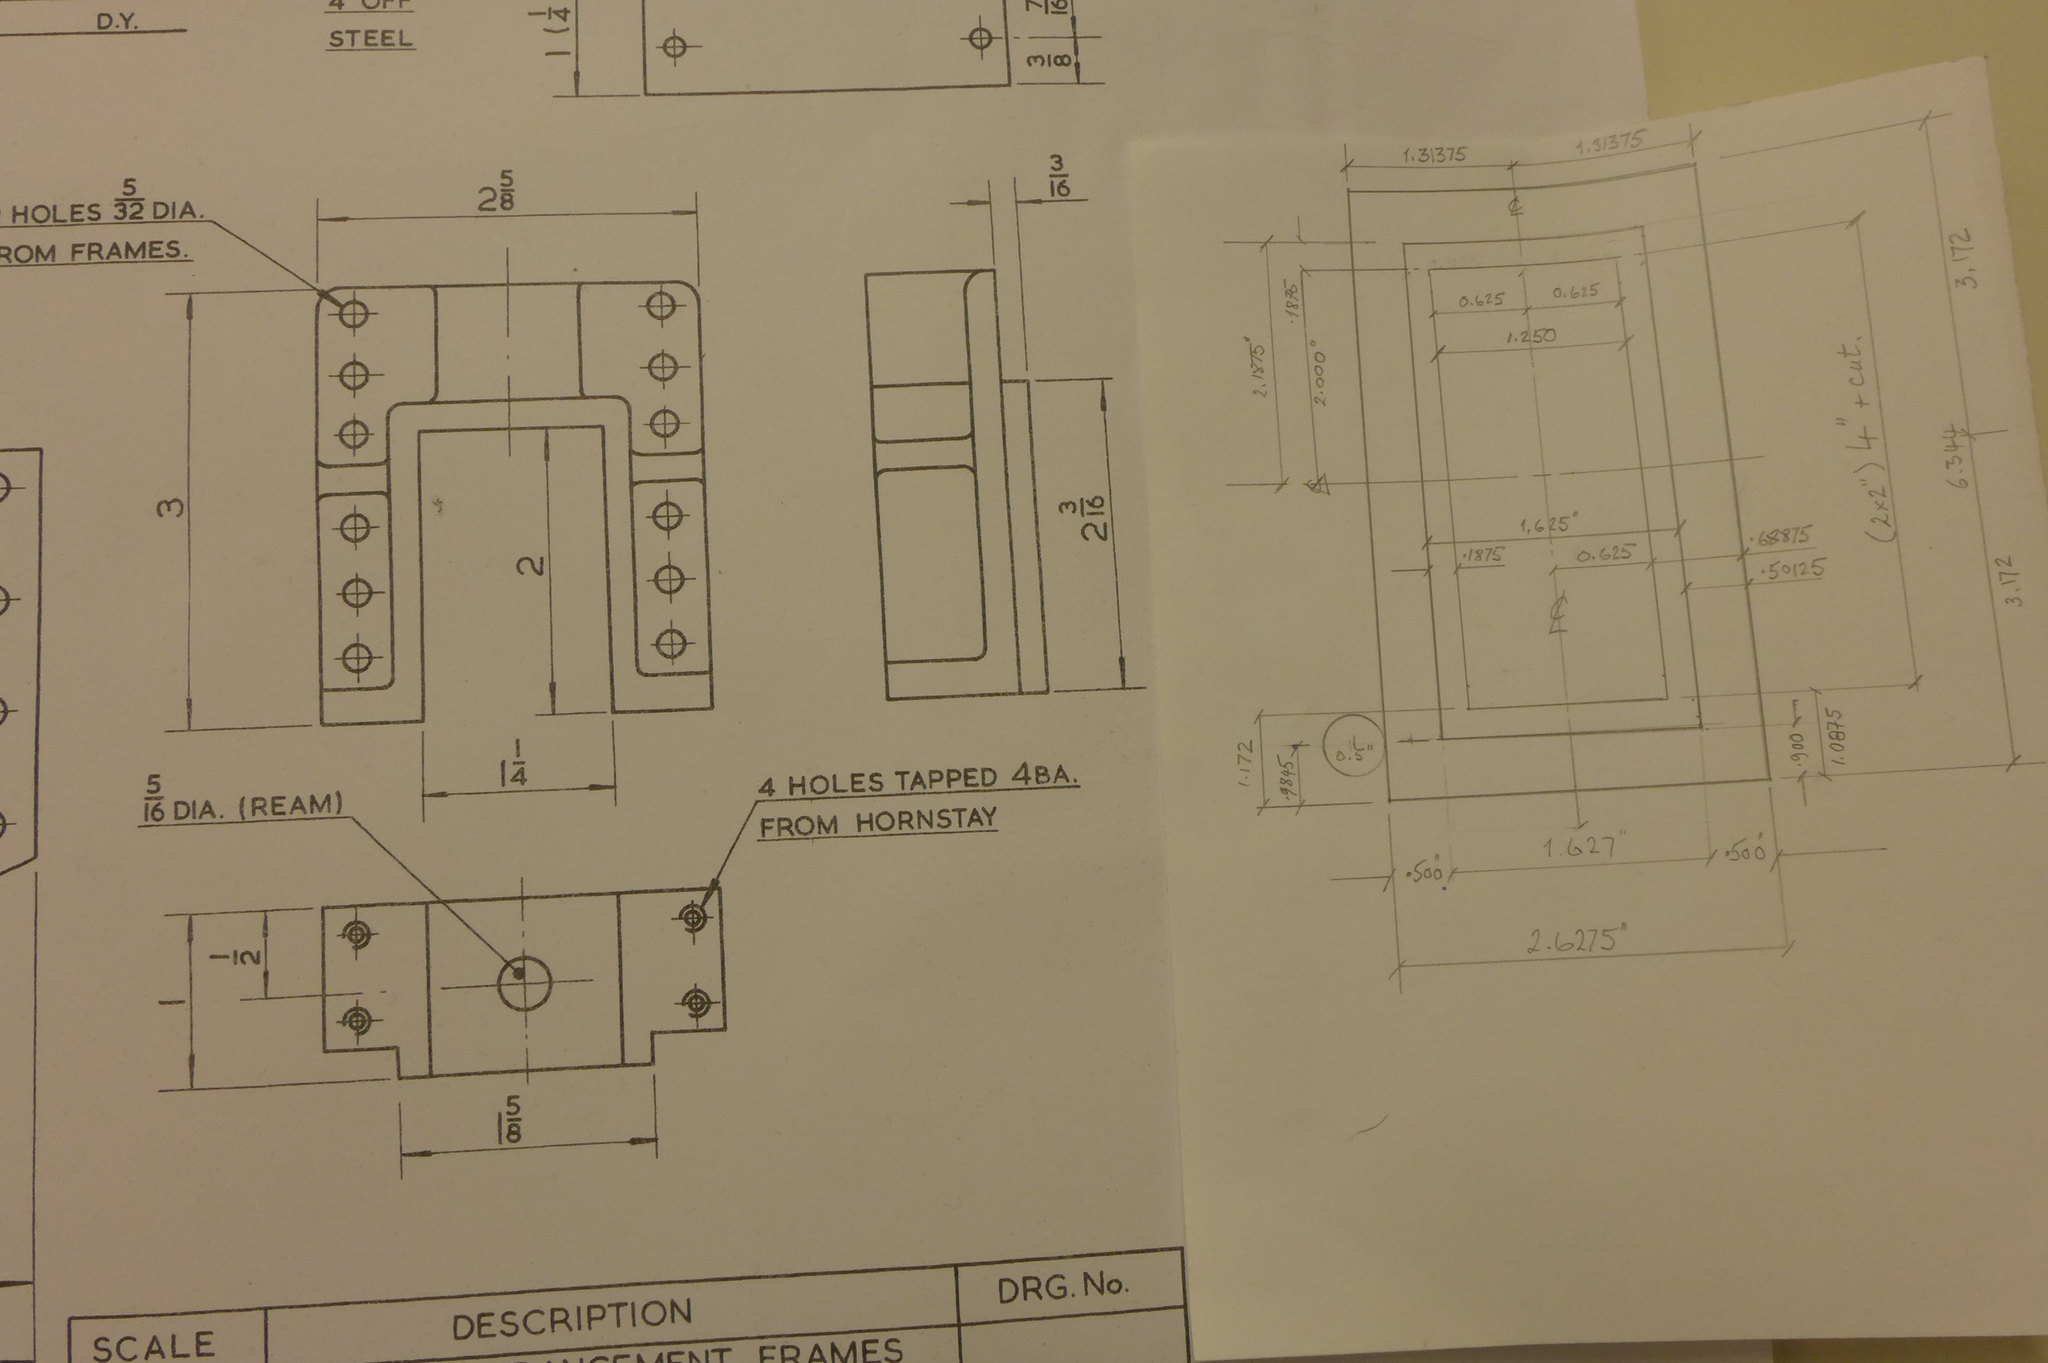 P1010072 P1010072 by Malcolm HARWOOD, on Flickr This gave me the "edges that I must not go over". It also allowed me to ensure that the horns would have sufficient metal left on them after cutting in two to achieve the drawing dimensions. This is important as you need to give yourself sufficient "wiggle room" around the center line when the cut is made. i am think of mounting vertically and using a slitting saw. Next the marking blue was used along with a vernier height gauge on a flat surface and the all important spigot was marked out from the "fag packet" sketch. This has to be a tight fit in the frames. 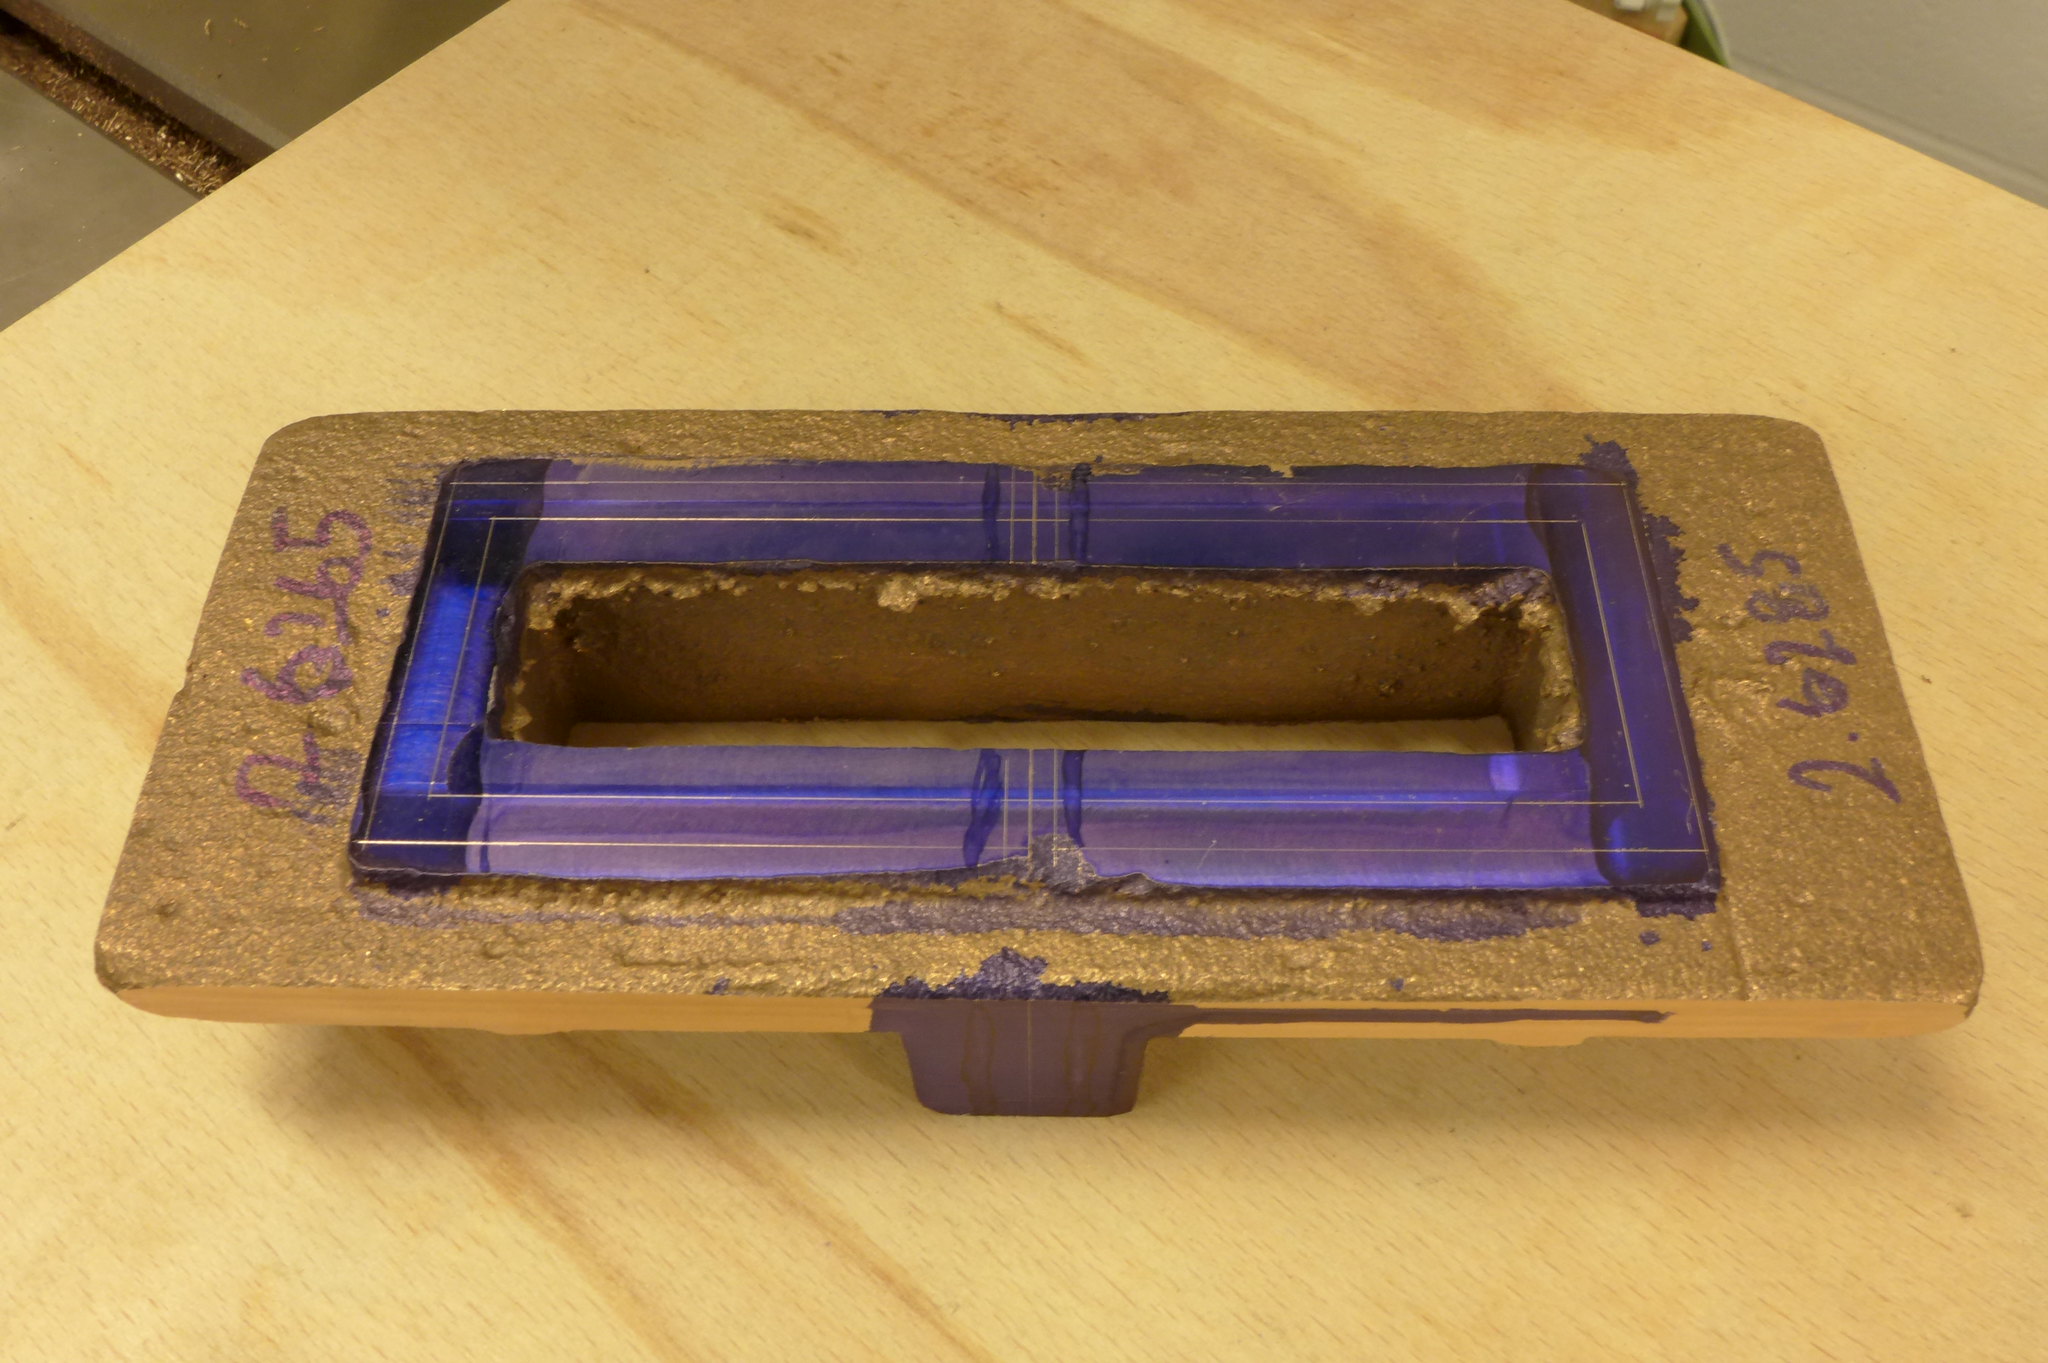 P1010073 P1010073 by Malcolm HARWOOD, on Flickr In the next post I will show the finished spigot fully machine to the correct height. Thanks for reading. Malcolm |
|
|
|
Post by Roger on May 15, 2017 22:28:37 GMT
I do like that setup, nice and rigid with excellent access all round.
Personally I wouldn't use a slitting saw to separate them unless it's a pretty thick one and a small diameter else it may well wander. You'll almost certainly have to machine both faces afterwards anyway, so I'd saw them carefully, using a Junior hacksaw if there isn't much meat.
I do use slitting saws, but they tend to have a mind of their own, and most power feeds go too fast or are a bit erratic for my liking. With CNC it's possible to program a very slow feed so it's not such a problem.
|
|
rrmrd66
Part of the e-furniture

Posts: 339 
|
Post by rrmrd66 on May 16, 2017 6:54:28 GMT
I do like that setup, nice and rigid with excellent access all round. Personally I wouldn't use a slitting saw to separate them unless it's a pretty thick one and a small diameter else it may well wander. You'll almost certainly have to machine both faces afterwards anyway, so I'd saw them carefully, using a Junior hacksaw if there isn't much meat. I do use slitting saws, but they tend to have a mind of their own, and most power feeds go too fast or are a bit erratic for my liking. With CNC it's possible to program a very slow feed so it's not such a problem. Hi Rodger Thanks for the tip Cheers Malcolm |
|
rrmrd66
Part of the e-furniture

Posts: 339 
|
Post by rrmrd66 on May 27, 2017 7:30:32 GMT
Good morning everyone. The Hunslet build continues at pace slower than I would have wished. However there is progress to report. The last action was to mark out the "boundary lines on the casting so that I had sufficient metal left in the right places to achieve the drawing dimensions. The casting was then machined internally to about approx half its depth, then turned over and repeated . This way I could see what was happening at all times. The bottom corners I would tidy up later as will be shown below. 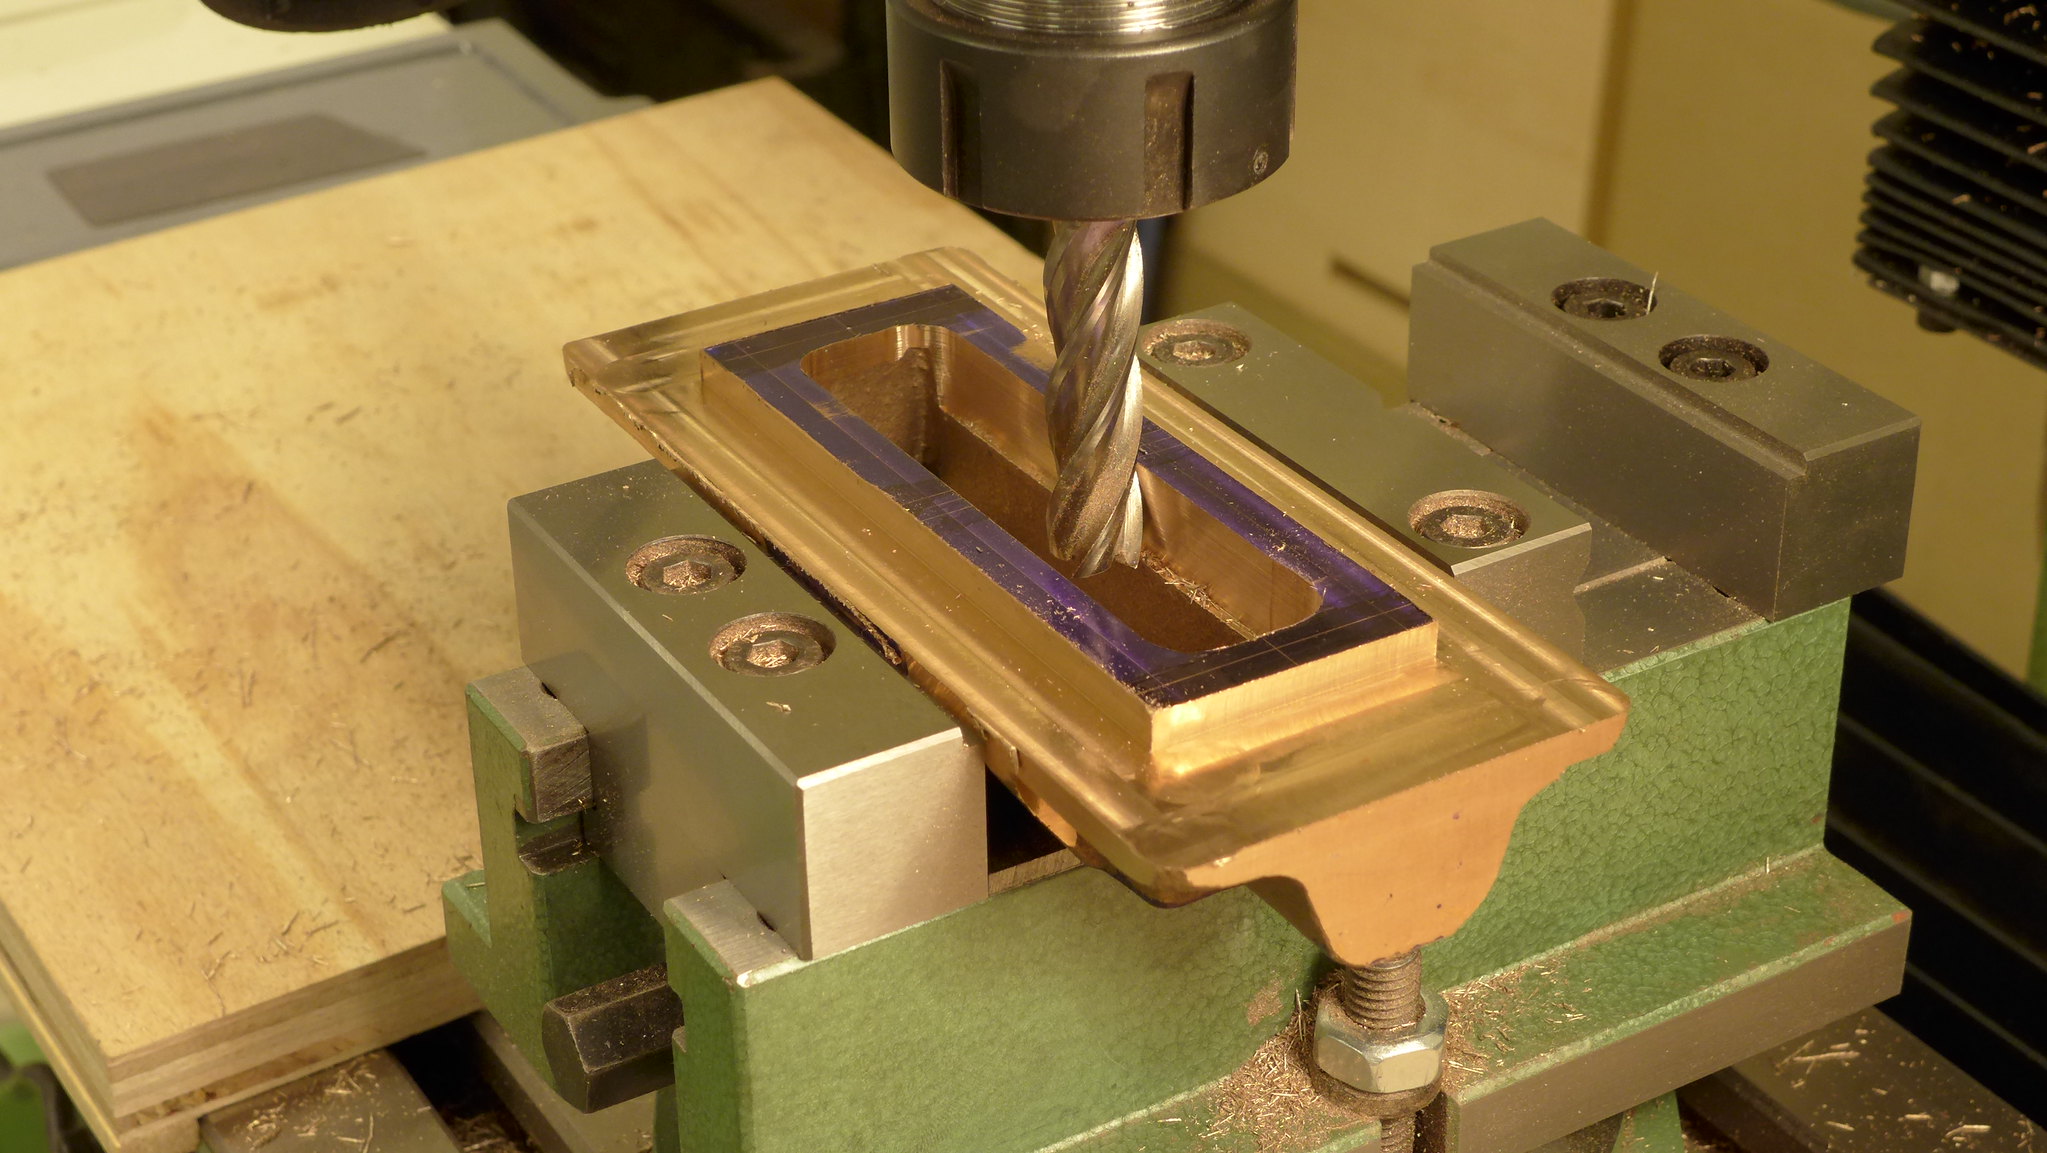 P1010084 P1010084 by Malcolm HARWOOD, on Flickr The casting was then carefully hand sawn in half. 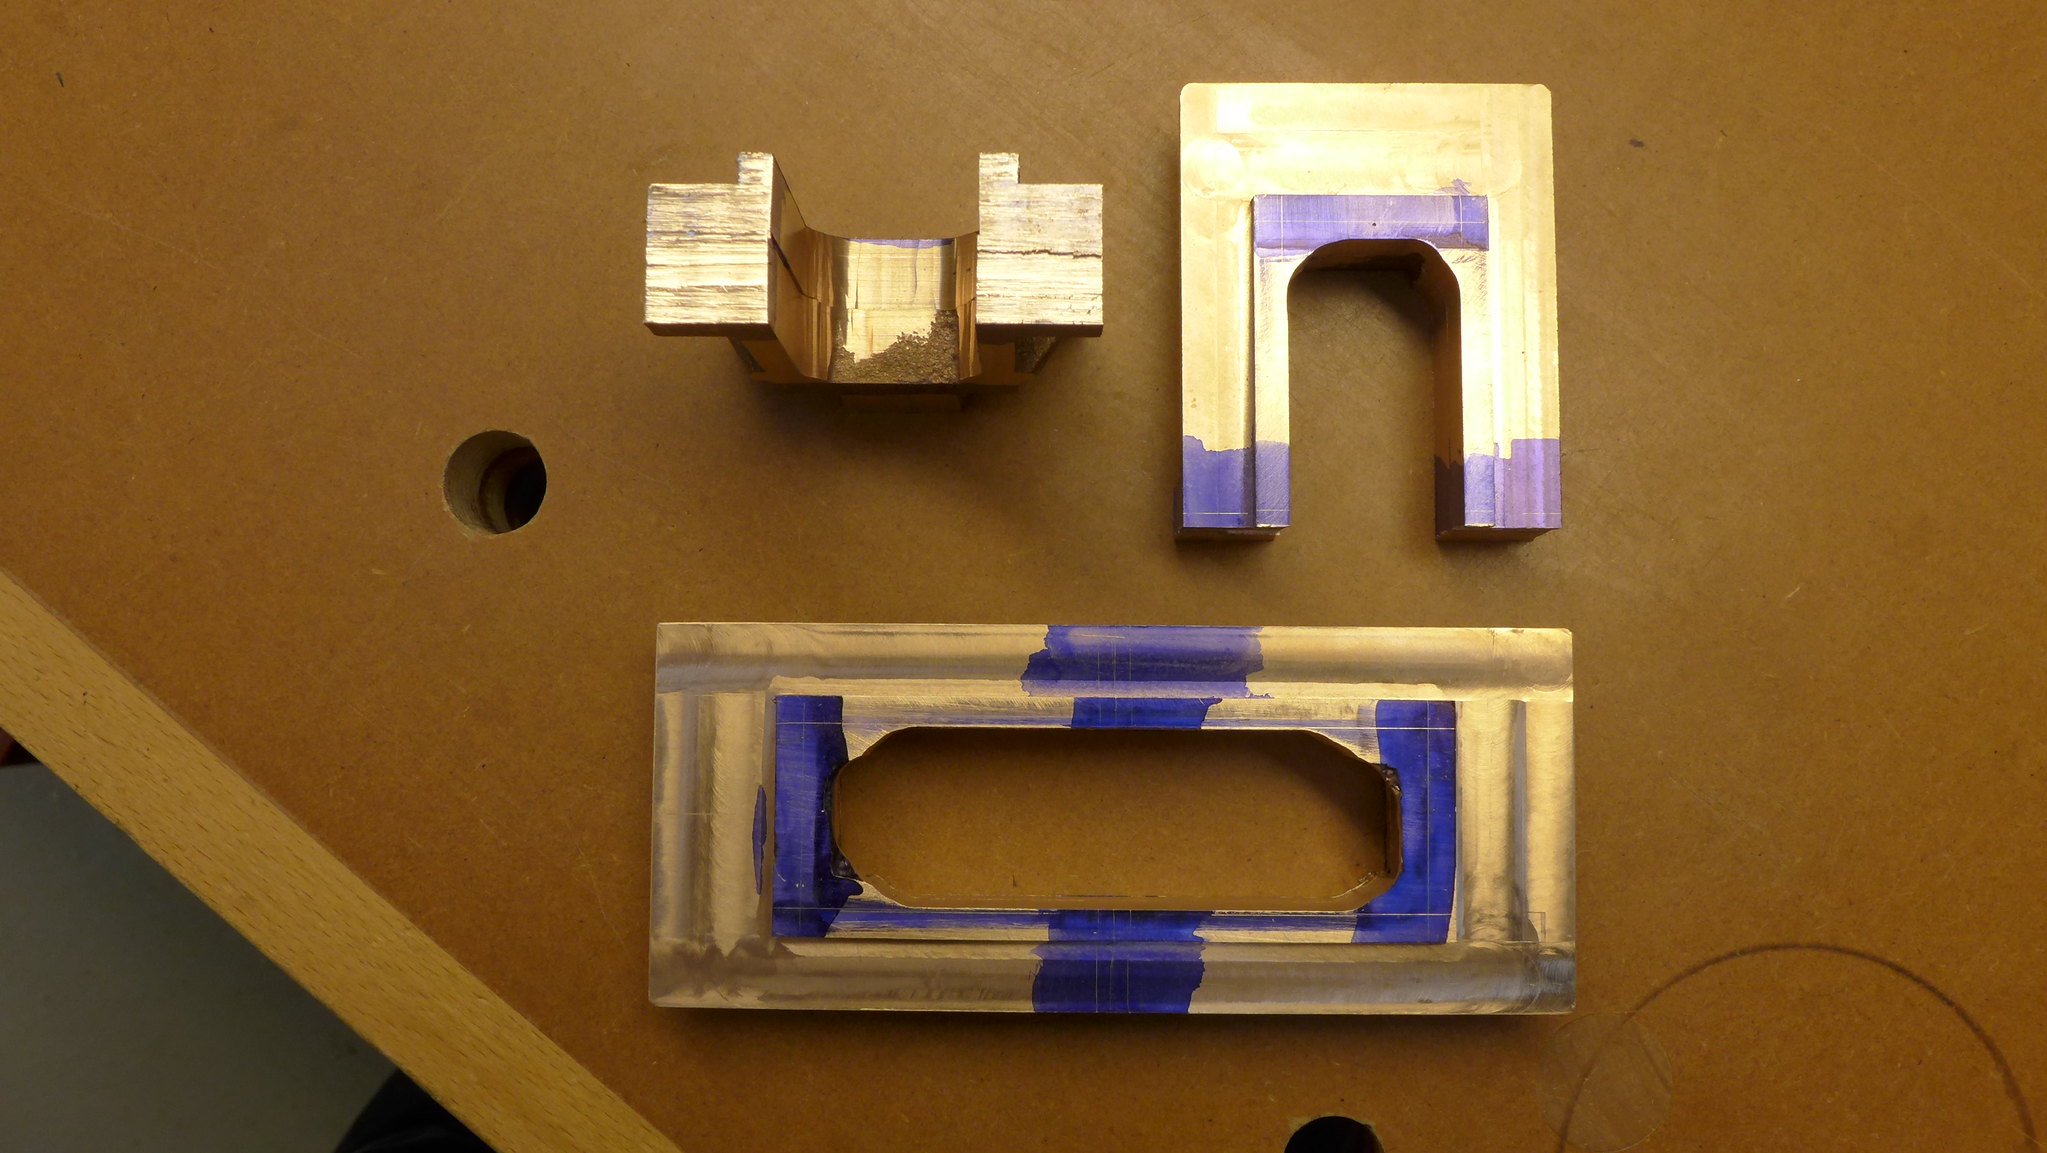 P1010085 P1010085 by Malcolm HARWOOD, on Flickr The "feet" of the horn blocks were then tidied up. 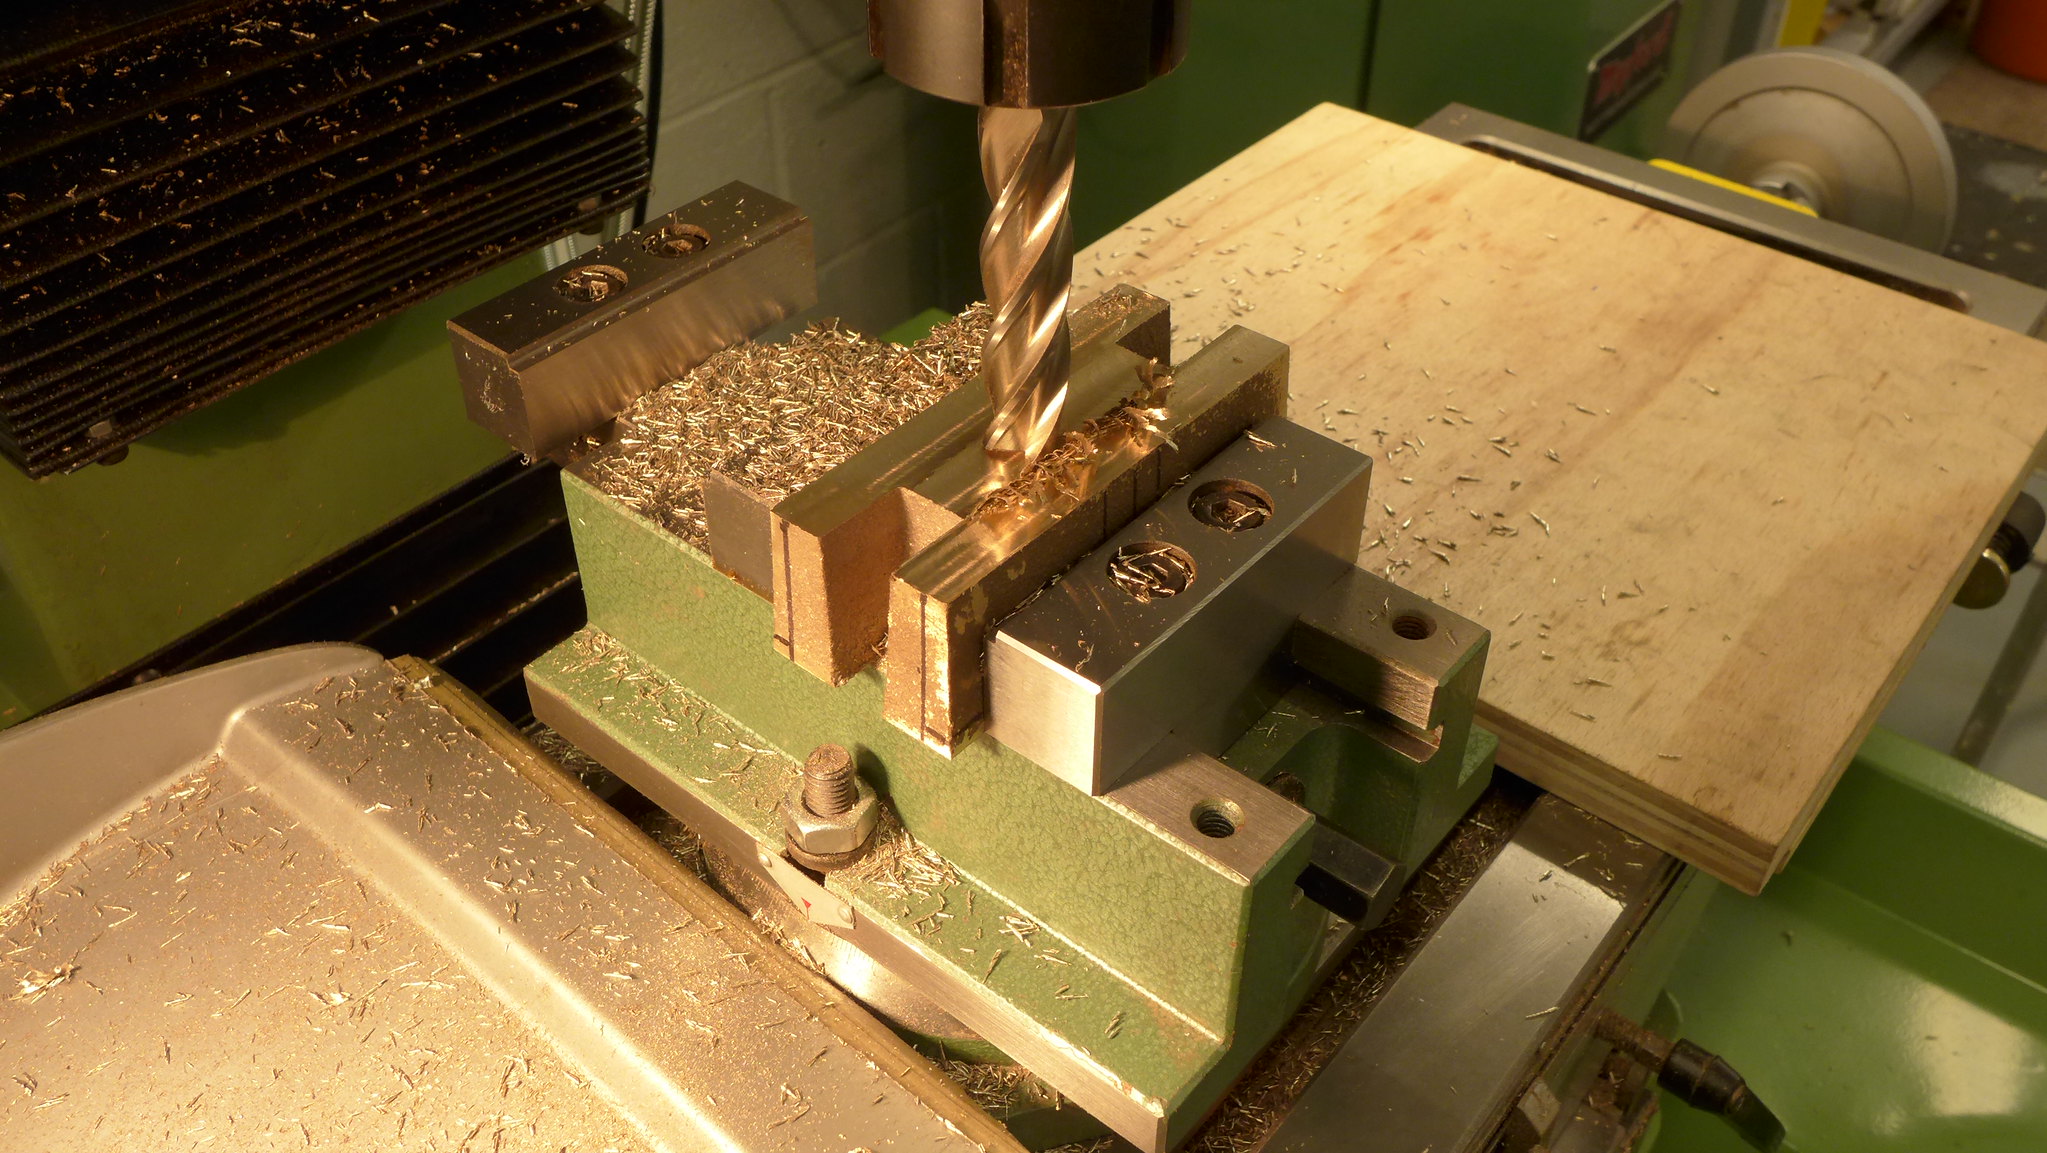 P1010096 P1010096 by Malcolm HARWOOD, on Flickr To achieve the 2" depth dimension and square corners at the bottom of the horn I changed to a long series 5/8" end mill which has an effective depth of cut greater that 2", something like 2.75" (a half inch diameter long series end mill should do it, but doesn't...believe me!). 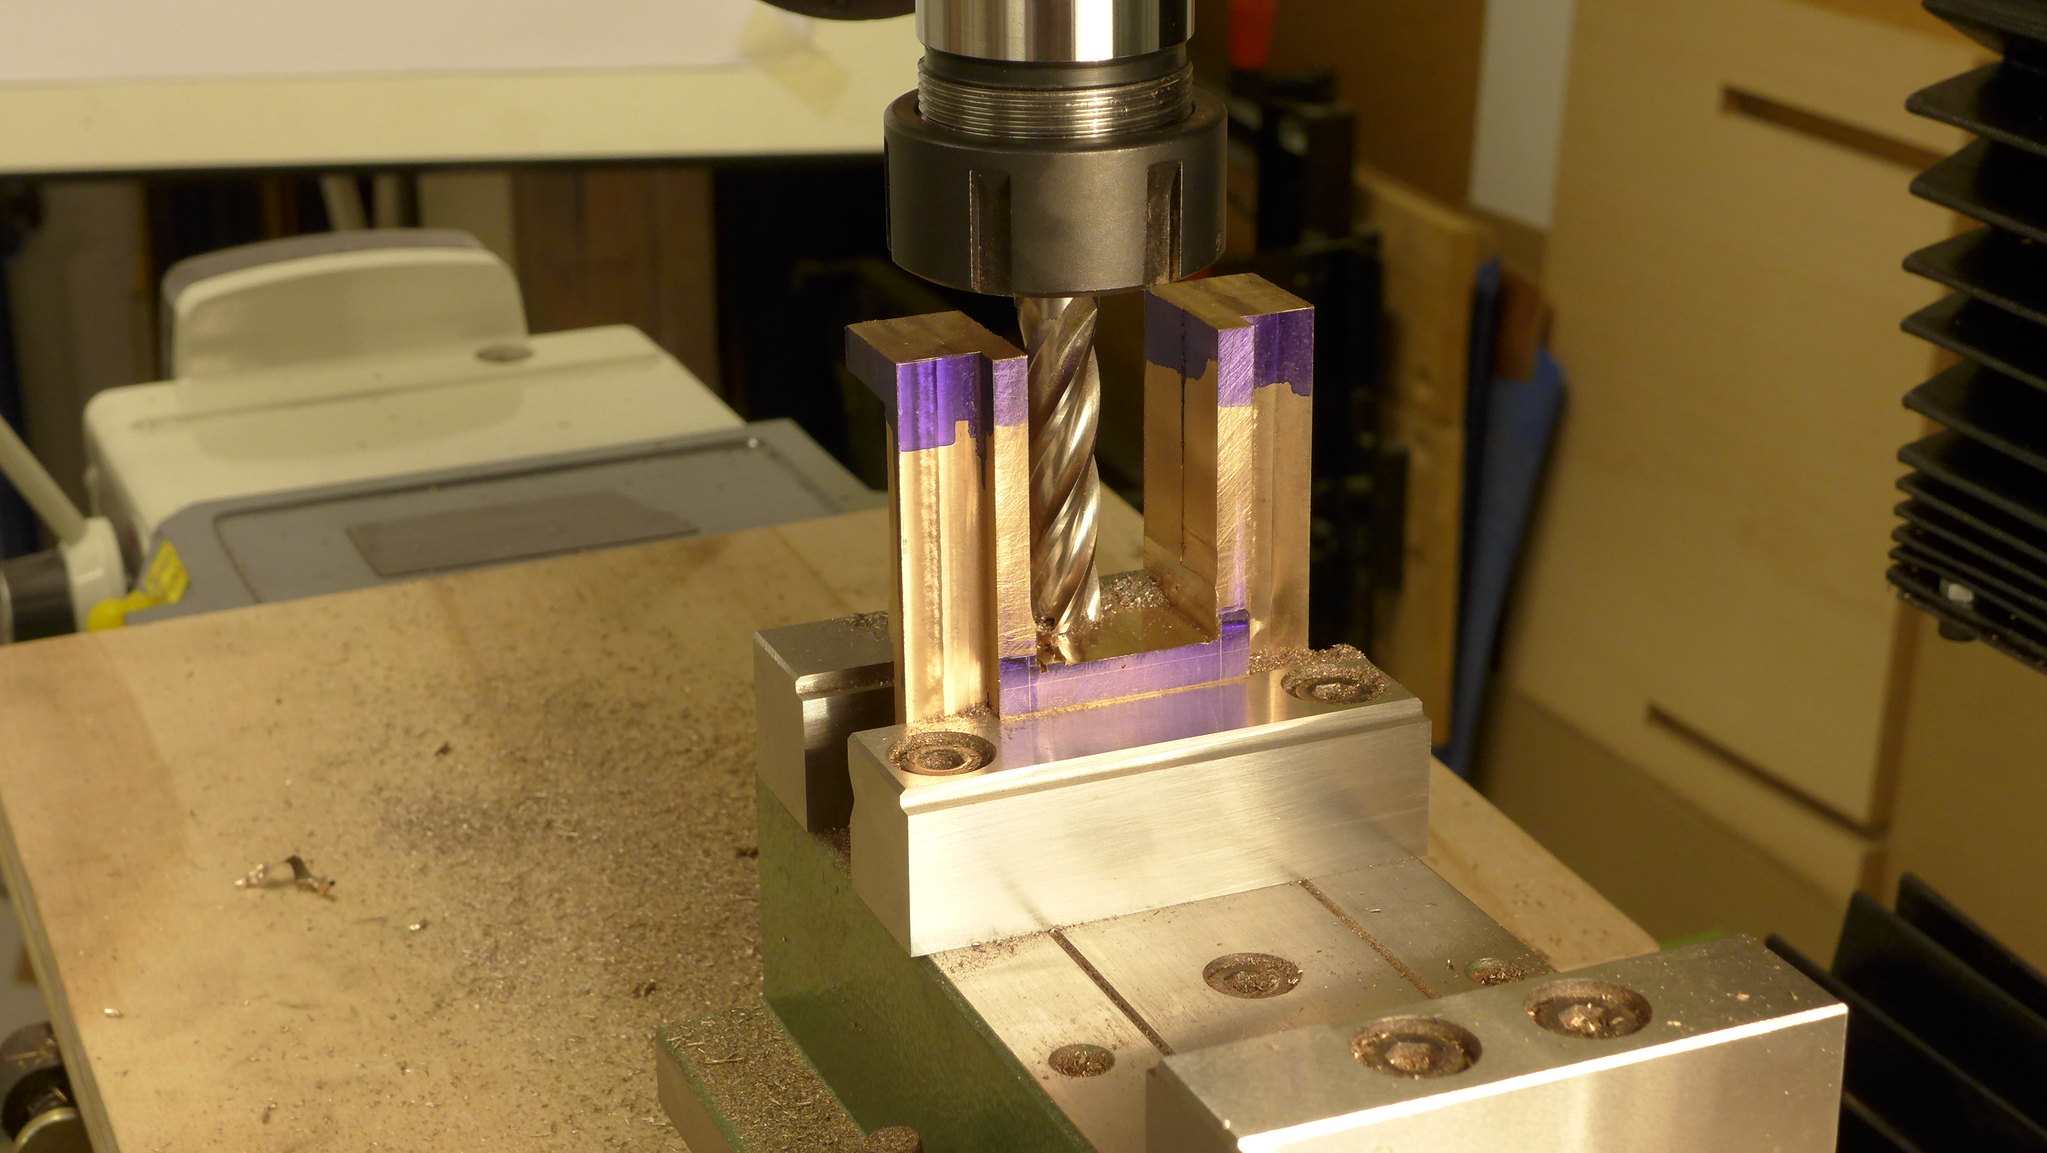 P1010088 P1010088 by Malcolm HARWOOD, on Flickr I have left something like .010"-.020" on each leg so that I can finish machine to size and at the same time ensure that the axle blocks run in parallel faces when they (the horns) are fixed to the side frames. I had intended to fix the horn blocks with nuts and bolts as per DY's suggestion but have been seduced by Roger (of Speedy valve gear fame) and his excellent WIKI on clamping them face to face and milling to the final dimension . This necessitates riveting them with 5/32" round head soft iron rivets and obtain a flush surface to clamp together by heading the rivet into a countersink. See "http://building-lbscs-speedy.wikia.com/wiki/Horn_blocks" for full details. That's it for now. I am off tho practice hand riveting! Thanks for reading Cheers Malcolm |
|
rrmrd66
Part of the e-furniture

Posts: 339 
|
Post by rrmrd66 on Jun 14, 2017 19:59:41 GMT
Evening all. The horn blocks are now all finished bar the final few thou to be removed when I have the two frames locked together a la Rogers WIKI on his Speedy construction. 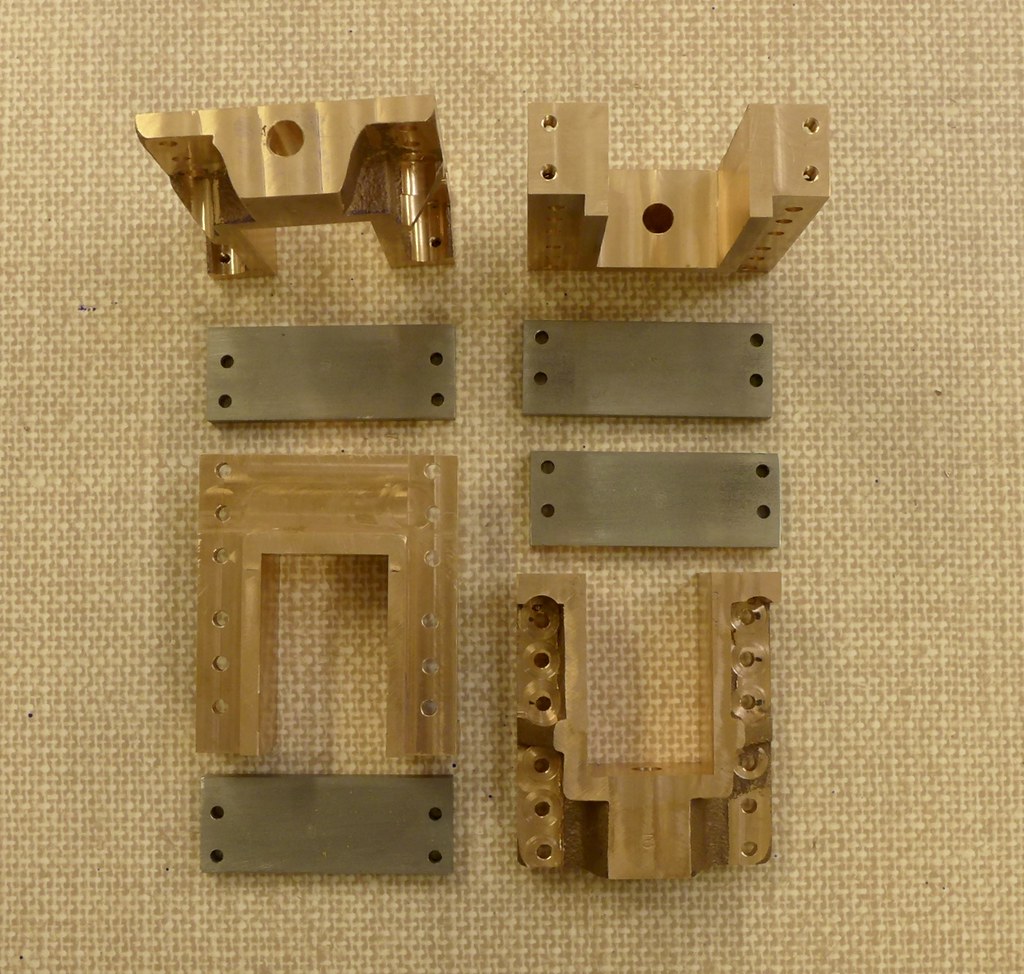 fullsizeoutput_5eb fullsizeoutput_5eb by Malcolm HARWOOD, on Flickr Here they are above, complete with keeps, all number stamped as matched pairs to the frame. Because I have decided to rivet the horn blocks to the frames, as opposed to nut and bolt, I have in effect "spot faced" the holes with a 10mm dia end mill. This is to allow the 5/32" rivet snap to sit vertically to the side frame. After a few practice runs, on some scrap plate, I found that if the the plate being riveted was not held horizontal and the snap vertically, with little or no "fidgeting", then all was well. However if this was not the case then the snap OD started marking the plate and a small gap would appear under the rivet head. As can be seen I have had to cut into the webs on some, but I am sure there is enough thread engagement (with Loctite) to give me a good fixing. I have been reading Chis Vine's excellent book " How (not) to paint a locomotive". Should I undercoat as I go along or wait until the end and mask off? Maybe I should do a bit of both? However, I was trying to finish the frames and decided to grit blast them and apply a coat or two of acid etch primer . I have noted that on other threads this seams to be common practice. Fortunately I have an acquaintance with a grit blast cabinet and a big compressor. He kindly let me grit blast them for the price of a couple of pints. I countersunk the frame rivet holes on one side only to accommodate the swaged over rivet head. I then made a very rudimentary spray table in my empty garage and primed both frames and the front and ream beams. 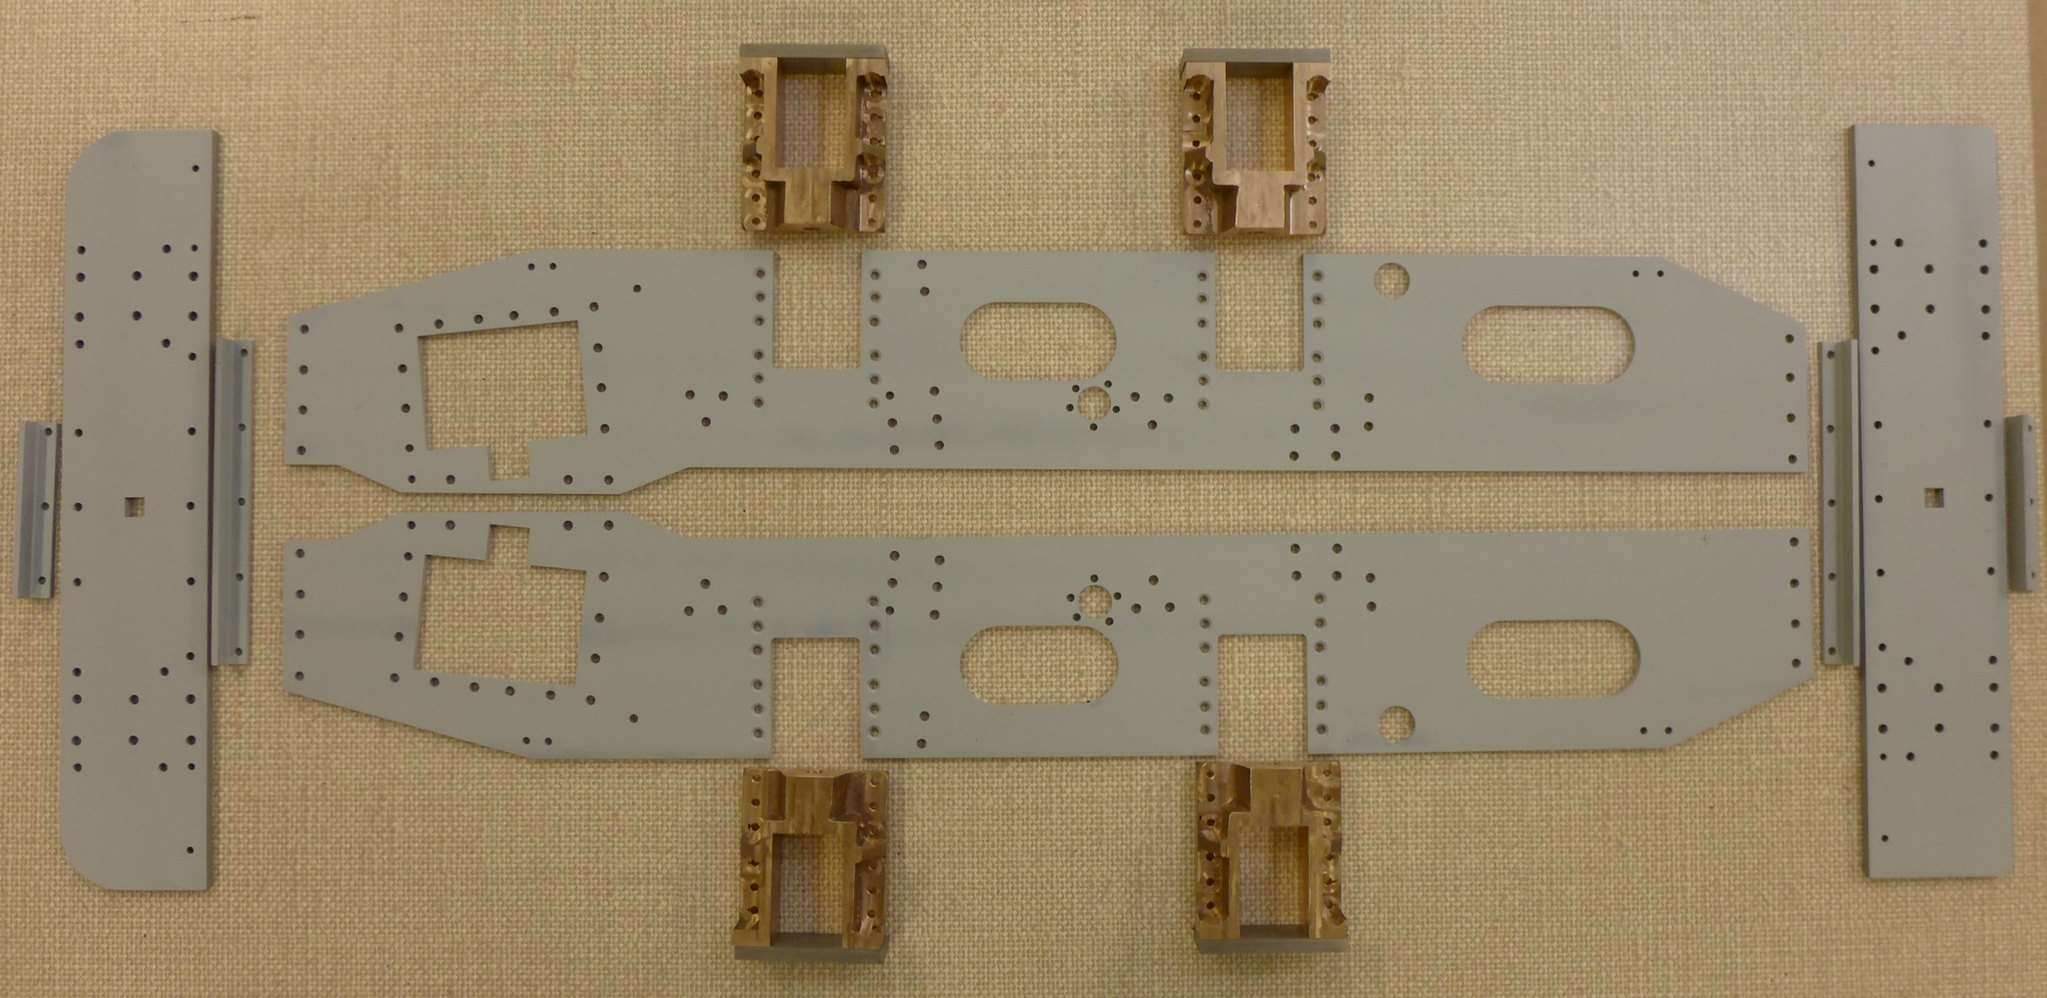 fullsizeoutput_5ed fullsizeoutput_5ed by Malcolm HARWOOD, on Flickr Here they all are after two coats of U-pol no 8 acid etch. Easier than I feared. I can now start riveting the horn blocks to the frames. That will be in the next post. Thanks for reading Cheers Malcolm |
|
dscott
Elder Statesman
  
Posts: 2,440
|
Post by dscott on Jun 15, 2017 9:48:53 GMT
The full size ones only have 4 holes for rivets each side I tried both just one is quicker!! Then I got married again?  It is a Hobby! Oh and you will find that the Hornstays are too wide if you look at the drawing the brake rods clash! I made new 5/16 square ones and put them in the outer holes!! They make nice packing pieces?? David and Lily. |
|
|
|
Post by builder01 on Jun 15, 2017 10:02:32 GMT
The full size ones only have 4 holes for rivets each side I tried both just one is quicker!! Then I got married again?  It is a Hobby! David. Geting married again? That is a hobby? |
|
dscott
Elder Statesman
  
Posts: 2,440
|
Post by dscott on Jun 15, 2017 10:12:54 GMT
It is when you have a passion for Chinese food and Lily comes from Sichuan!
They still had steam on the main lines when we met in 2004 Quite a clash.
Do I sit by the window watching for something steaming by... or come to bed!!!
David.
|
|
rrmrd66
Part of the e-furniture

Posts: 339 
|
Post by rrmrd66 on Jun 15, 2017 20:03:28 GMT
The full size ones only have 4 holes for rivets each side I tried both just one is quicker!! Then I got married again?  It is a Hobby! Oh and you will find that the Hornstays are too wide if you look at the drawing the brake rods clash! I made new 5/16 square ones and put them in the outer holes!! They make nice packing pieces?? David and Lily. Hello Dave and Lily Thanks for the tip. Had a look at drawings and i think I can see what you mean Proceed with caution and leave the top on the Loctite for the time being in case of modification, eh? cheers Malcolm PS Lily. Sichuan King prawns are my favourite. |
|
rrmrd66
Part of the e-furniture

Posts: 339 
|
Post by rrmrd66 on Jul 10, 2017 12:10:46 GMT
|
|
|
|
Post by Rex Hanman on Jul 10, 2017 12:52:24 GMT
Got this message......
Malcolm HARWOOD hasn't made any photos public yet.
|
|
barlowworks
Statesman
  Now finished my other projects, Britannia here I come
Posts: 878 
|
Post by barlowworks on Jul 10, 2017 14:29:52 GMT
Hi Malcolm
If you go to the posting photos on line thread, about the third post down by Steve( springcrocus) there is a link to posting photos from Flickr by Roger. It's step by step and works ok for me.
Mike
|
|
rrmrd66
Part of the e-furniture

Posts: 339 
|
Post by rrmrd66 on Jul 10, 2017 17:17:53 GMT
Thanks guys
I have tried via the Roger method but can't seem to make the pic's "public" as per Rex's post.
Any one explain?
Cheers
Malcolm.
|
|
rrmrd66
Part of the e-furniture

Posts: 339 
|
Post by rrmrd66 on Jul 13, 2017 6:26:50 GMT
|
|
|
|
Post by springcrocus on Jul 13, 2017 6:39:23 GMT
I don't use flickr but the link says you have yet to make your stored pictures public. This will be a setting in Flickr and I would expect that you have to log into Flickr, go to "My Account", "Settings", whatever and change your personal settings there. After that, you may have some success. Regards, Steve |
|
barlowworks
Statesman
  Now finished my other projects, Britannia here I come
Posts: 878 
|
Post by barlowworks on Jul 13, 2017 7:39:34 GMT
Hi Malcolm
When I attach pictures I have to do it from my PC and log into my account on Flickr, it does not seem to want to do it from my iPad. When I have moved my pictures onto Flickr I select them from the camera roll then enlarge them on the screen. I then select to view them with the view on photo page tab. This re-shows the image but with 5 icons on the bottom right. Select the centre one with the arrow which is share photo. This goes to the share screen. Select bbcode and copy the code that appears. This is the code that you paste into the quick reply box. When you have pasted your photos click the reply tab on the right and the pictures should appear. You can then add your text as usual. It took me a couple of tries but I eventually got there.
Mike
|
|
rrmrd66
Part of the e-furniture

Posts: 339 
|
Post by rrmrd66 on Jul 13, 2017 15:27:38 GMT
|
|
rrmrd66
Part of the e-furniture

Posts: 339 
|
Post by rrmrd66 on Jul 13, 2017 15:29:53 GMT
Hi Mike
still doing something wrong I guess
I have pressed the "public " button but nothing seems to happen.
Malcolm
|
|
 P1010068 by Malcolm HARWOOD, on Flickr
 fullsizeoutput_5c5 by Malcolm HARWOOD, on Flickr
 P1010068 by Malcolm HARWOOD, on Flickr
 fullsizeoutput_5c5 by Malcolm HARWOOD, on Flickr


