|
|
Post by ericcee on Oct 7, 2006 17:04:46 GMT
I'm back!
To cut a waffling story short, Kit 10 arrived on September 29th, just as I was about to leave for a week away from home, so I was not able to check the contents of the rather small parcel until yesterday. I wonder what's happened to Kit 9?
Anyway, Kit 10 consists of an assortment of pipes and valves together with the steam turret (what I would call the manifold?). I've polished up the turret and fitted the blower, injector and whistle valves to it, but that's about as far as I can go until the boiler is fixed to the frames - and I don't want to do that until the valve gear is sorted out. Still no news on that front since I was told by Debbie that the mods were "in production". (I'll take up Standardsteam's suggestion and start a new thread on the valve gear when the time comes.)
Meanwhile, I think I'll start painting the bits that are not likely to be knocked about during re-assembly - such as the frames, the firebox end of the boiler and the smokebox. I have some Halford's heat-resistant paint for the latter two jobs (and I've read the correspondence on this topic elsewhere on this forum). On the basis of past experience, I'll brush-paint the frames and I'm thinking of using Hammerite "smooth", straight on to the clean metal. Has anyone any experience of this paint in this context? I've certainly been impressed with its performance on exterior steelwork.
Eric C.
|
|
|
|
Post by ericcee on Jul 13, 2008 22:39:42 GMT
I think I tempted fate just a bit too much when I set up "The Home Straight" thread, so I'll continue the saga here.
To my amazement (and my wife's) I actually spent nearly three hours on the Bagnall today! I've finally got round to doing what I said I would do back in October 2006 (see post above) and have stripped the engine down to bare frames so that I can get them painted. Now, me and paint don't seem to mix very well, so I'm proceeding with a lot of caution. As I've said before, the Bagnall frames fairly bristle with nut and bolts, meaning (for me) that brush painting could be messy. On the other hand, getting an aerosol, or even a pukka spray gun, between the frames could be a challenge. In the post above, I mentioned the use of Hammerite paint - nobody responded on this, but I've used it on another job recently with some success; given the chance, it seems to dry out to quite a hard, knock resistant finish. However, I saw an advert for their new Metalmaster electrostatic painting system and, having looked at the Hammerite website, I'm now seriously considering it. I shall post something on the top level General Chat thread (to get a wider audience) to ask if anyone has experience of this system yet.
-- And I promise to get some photos posted here soon ...
E.
|
|
|
|
Post by Deleted on Jul 14, 2008 9:58:28 GMT
Ericcee,
I looked at the video on their website. It might be the ideal thing for painting a locomotive and tender chassis. I have asked Hammerite about brass fittings (axleboxes etc) and if primer is needed and if so is it available in the electrostatic format. I will let you know their response.
Regards
Jim
|
|
|
|
Post by ericcee on Jul 14, 2008 14:26:49 GMT
Jim,
I'll be interested in their response. I had understood from the instructions on their website that their "Special Metals Primer" has to be used. This is a water-based "brick-red" paint that's in either brush-on or aerosol (I think) form. I have some of the brush-on variety which I intend using on the few bits of brass that are in the Bagnall frames. We shall await developments.
Meanwhile, note the correspondence on this topic in the top-level General Chat section - you seem to be the only one so far to have a positive view!
E.
|
|
|
|
Post by ericcee on Jul 15, 2008 18:48:07 GMT
As promised (and if I can remember how to do it), I am posting here a picture of the Bagnall when I did a "trial build" - really just to see what it would look like. Here goes:- 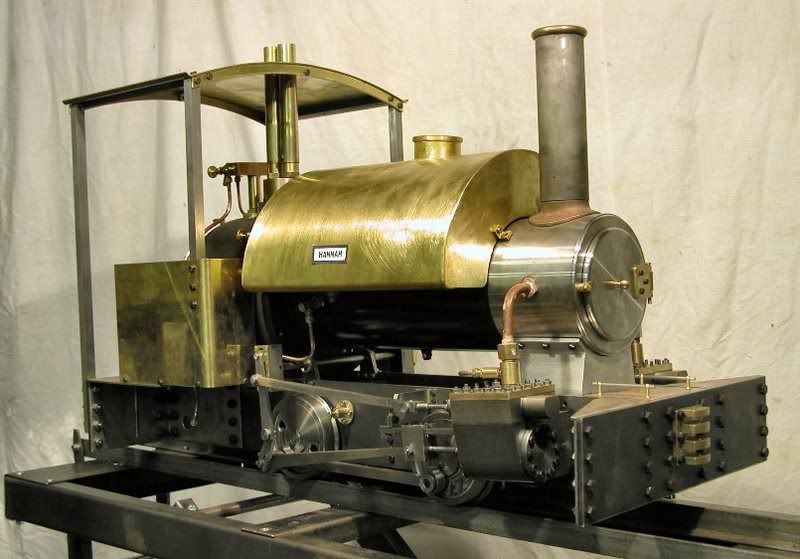 That was fairly easy! Note that there's no brakes or injector! (Because I left them off - not because MW didn't supply them.) I must take more care with what I write before I post it, then I wouldn't have to come back to edit it time and again!E. |
|
jvas
Active Member
 
Posts: 40
|
Post by jvas on Jul 17, 2008 11:24:28 GMT
Excellent. Looks good Eric. Do you have any pictures of the backhead?
I will try and take some pictures of mine over the next couple of weeks. My enthusiasm has been totally renewed by this photo as I had forgotten how good the engine looks in its finished condition.
Painting so far with the Bagnall only consists of the saddle tank, I am not totally happy with it now I have inspected it again. I did quite alot of work on the tank. Spent ages sanding it down and then filling the dents and bumps with car filler. Spraying was fairly simplistic, I used conventional aerosol (although I do have a compressor and spray gun). Firstly i etch primered it, followed by a grey primer, then a red primer and finally a gloss top coat. I am unsure as to whether to apply clear lacquer?
J.
|
|
|
|
Post by ericcee on Jul 20, 2008 23:36:40 GMT
I've used the Hammerite Metalmaster system to paint the frames and, true to form, I've bodged it! See the Metalmaster topic in the top level General Chat thread.
Jeremy - I don't have any photos of the backhead yet, but I'll see what I can do in the next week or two.
Which brings me, in a roundabout way, on to thoughts of the grate. Loose S/S (?) fire bars sitting in slots in a couple of brass (yes - brass) bars - they can't be serious, can they? Having spent this afternoon fiddling with an elderly and recalcitrant Sweet Pea at the Club (we had to take the fire out twice) I can see that the Bagnall grate will need to re-engineered significantly. I'll try to get some photos of this crazy cock-up before I bin it.
Back to painting. I shall definitely brush paint the wheels, buffer beams and other bits below the footplate, but I've decided to have the tank, cab sides and roof professionally painted (I know my limitations). I did this with my Maxitrak Jack and have not regretted it.
Nil desparandum!
Eric
|
|
|
|
Post by ericcee on Aug 17, 2008 23:10:13 GMT
I've been working on the Bagnall in fits and starts since I last posted here about my experiences with painting the frames. Yesterday, I finally completed the re-assembly of basic engine - wheels & axles, side rods, cylinders and con. rods. But not without a lot of fiddling about! This time, I was careful to check that everything was running freely (if a bit stiffly) at each step. Then when I bolted the first (LH) cylinder on and set up the con. rod, there was some serious binding. Off it all came again, this time to re-check the free movement of the piston in the cylinder. It was stiff but smooth - definitely no tight spots. I put it all back together again and it all seemed OK - no binding or tight spots, one of life's little mysteries? But the same problem occurred again when I assembled the RH cylinder; this time I knew it wasn't the piston because I'd just checked it. I thought I could see some misalignment, so I packed the cylinder out with some shims but this made it worse. So, after some serious cogitation that got me nowhere, in desperation I started to dis-assemble the RH cylinder. This time, by chance, I started by undoing the bolt that fixes the back end of the slide-bar to the "motion bracket" and immediately realised that it was much stiffer than it ought to be. When it eventually came out, the slide-bar sprung to one side by about half a millimeter. At last - I'd located the seat of the problem. The whole lot would now roll without any binding. Then I quickly realised that I had not bolted the back end of the LH slide-bar to the bracket and that was out of alignment as well. So - the problems were coming from the crossheads binding on the slide-bars. At last, I had a basic engine that could just pass muster - it rolls reasonably freely if a bit of weight is on it! Some photos:- First the whole assembly so far:  And a close-up of the slide-bar meeting with the motion bracket: 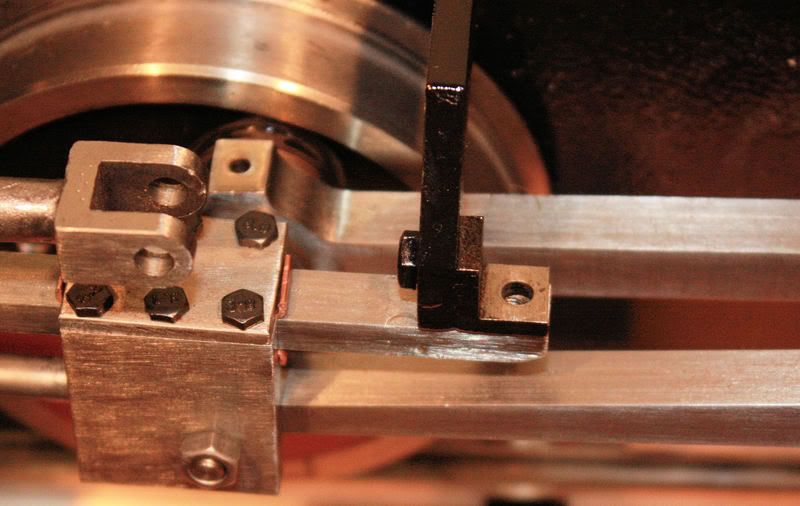 And a significant enlargement that should reveal the extent of the mis-alignment: 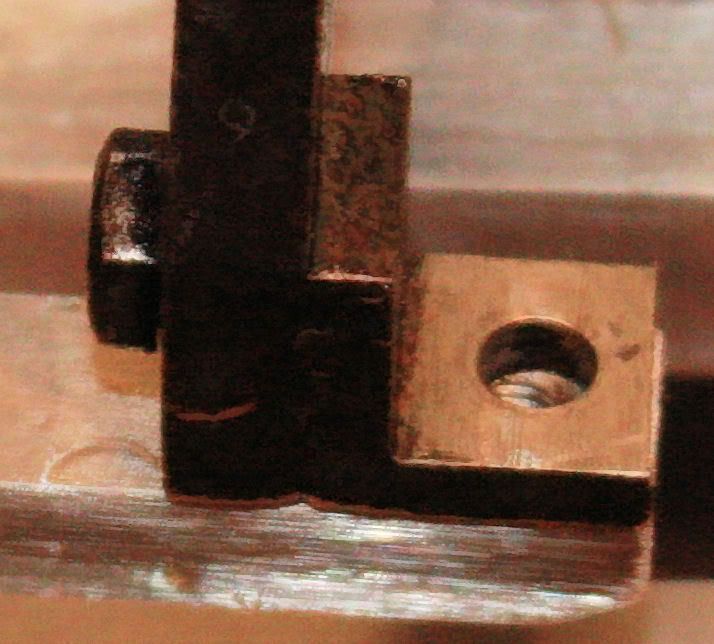 (By the way, that's not an illustration of a lousy paint-job, it's what I think they call "noise" that occurs when you over-enlarge a digital image.) I had some fun along the way with the lubricator "drive-rod" which goes from the axle pump piston end. I had to file large chunks of it away, first to clear the gland on the axle pump then to clear the drain cock "cross-rod". And the linkage to the drain-rods only just clears the hornblocks. The next photo may make this clearer: 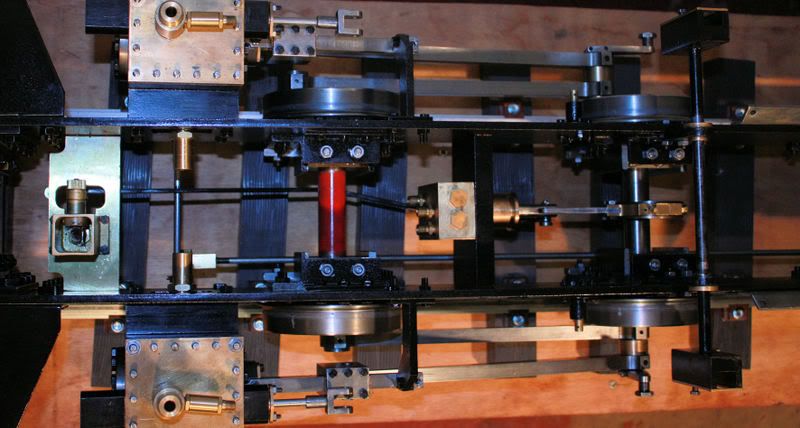 Anyway, so far, so good (I hope). Now on with the valve gear! It's good to see that JVAS (and others, no doubt) will be able to get the balance of the Bagnall components from the new owners. Eric |
|
|
|
Post by ericcee on Aug 17, 2008 23:22:49 GMT
I forgot to mention in this last post that I made another important discovery of the profoundly obvious -- these things run much better on proper rails that 3mm angle-iron!
Somewhere along the line, while I was rolling the thing backwards and forwards to check for smoothness, I decided to put it on a length of "show track" that I have, and, even though it is aluminium rail, the improvment was amazing. Obviously, the greater contact area between wheel and rail makes quite a difference.
I better shut up, shut down and go to bed!
Eric
|
|
|
|
Post by ericcee on Sept 1, 2008 10:26:31 GMT
It's about time I reported on progress again! I've assembled the valve gear and, thanks in part to a new pair of die blocks made for me by a good friend (a job beyond my current abilities), everything seems reasonably OK. I'm still not convinced that the valve settings are right, but I should soon find out as the engine is theoretically ready for air testing. In the meantime, I've done another "test build" of the upper works, following my "three steps forward and two back" approach (that way I usually know where I'm going!). In other words, I can continue to check that things fit as they should. And, as I should have expected, they didn't! The boiler has three fixing points - "expansion" brackets on each side of the firebox end, attaching it to the frames and a single (self-tapping!) screw fixing it to the smokebox (the boiler "telescopes" into the smokebox). With the screw holding the boiler hard up to the smokebox, the "expansion" brackets were 2-3 mm out of line, so I dispensed with the smokebox fixing since I reckon it is redundant, and was then able to locate the bolts in the expansion brackets. This also made it possible to fix the saddle tank correctly at the smokebox end. I've painted the smokebox, saddle and chimney with a Hammerite High Heat aerosol and I'm quite pleased with the result. After the paint had hardened, I applied black "grate polish" with a stiff boot brush and then buffed it up to arrive at a slight sheen. I should say here that the steel chimney was supplied already brazed to its brass base, but the brazing fitted where it touched. Inevitably, the two bits parted company quite quickly, but the same friend who made the new die blocks re-brazed them for me - it needed a lot of heat! The engine still rolls without any tight spots but is still quite stiff. With all the upper works in place, it needs a bit of effort to push it along, so my fingers are still crossed! I've taken a few photos to show current progress:- 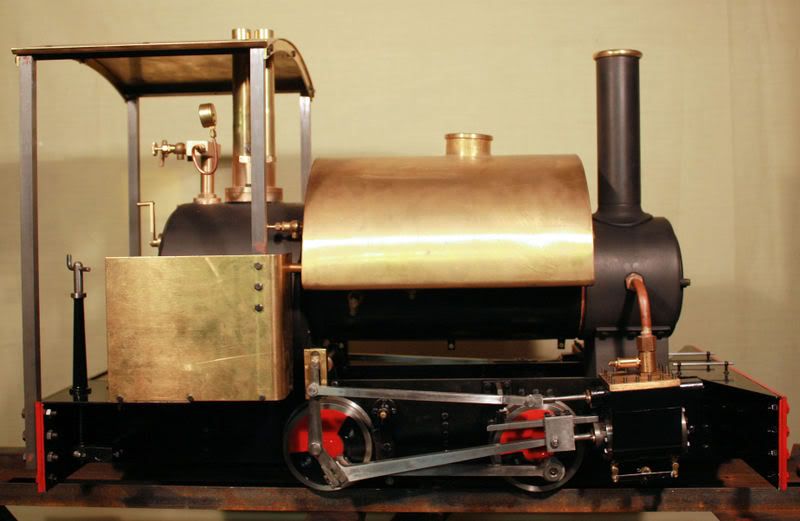 As you can see, all the pipe work is still to fit. 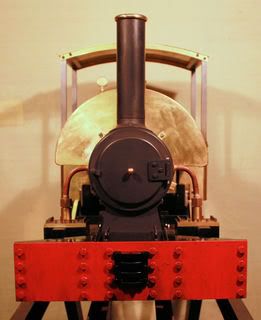 Now that it's painted, the smokebox door doesn't look too bad! 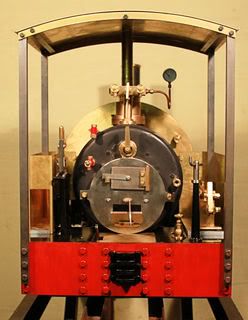 A view of the backhead ( sans plumbing) as promised to Jvas some time ago. The fitting half way down the right hand side is where the still missing check valve will go. 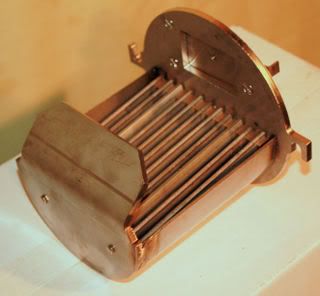 And a view of the firebox, as promised in an earlier post - just look at that crazy grate! All the fire bars are loose and sit on brass rails. I shall definitely have to do something about this! In spite of all my moans and groans, I reckon a satisfactory end is now in sight. By the way, the Sunderland MES is holding an open day this coming Sunday at their Roker Park location and I'll have the Bagnall on display. All are welcome! Eric |
|
jvas
Active Member
 
Posts: 40
|
Post by jvas on Sept 1, 2008 11:58:34 GMT
Hi Eric,
Looks brilliant, you are making fast progress on her. Are you enjoying the build?
I am back at it again myself.
At the moment I am trying to sort the boiler out. Only a few issues so far!
1. All threaded fittings didnt go together at all. Spent hours cleaning the threads off and getting all joints to screw together.
2. Boiler doesnt slide into smokebox. Started to hand grind it back to match, but I am now going to try and get our machine shop at work to do this for me as this wasnt the ideal solution to get this fitting.
3. Top feed tube into the regulator (from dome) doesnt screw tight into regulator body, is this correct? If you screw tight it jams regulator and puts the assy into the wrong position, but if its not tight then its rather loose. For the moment ive thrown plenty of PTFE tape onto the thread. What have you done Eric?
4. Regulator wouldnt close airtight, spent alot of time rubbbing and fettling to get it to seal.
|
|
|
|
Post by ericcee on Sept 1, 2008 12:30:37 GMT
Jeremy,
Don't let the pictures fool you - all the top hamper will have to come off again to get the plumbing sorted out - and for painting. As I said, I like to take three steps forward and two back!
I had (still have) the same problems with the boiler bushes - just a matter of getting hold of the right taps to clean the threads, but that's not as easy as it sounds!
I'm surprised at your problem with the boiler not fitting into the smokebox - mine's a nice sliding fit; so much so that I reckon I probably won't need to seal the joint.
I've drawn a veil over the regulator so far because I've had exactly the same experiences as you. Worst of all, though, I just cannot get it to line up with the steam pipe to the front of the boiler. You may just be able to see in the photo of the backhead that the gland nut is missing from the regulator assembly. I guess I'll have to take it all apart and start again (the regulator, I mean).
So that is my next big challenge, and is why I'm not rushing to get an air test done just yet.
Can we see some photos of your Bagnall?
I can't say that I'm enjoying the build - there are just too many problems that should not have been there. And I keep wishing that I'd gone for the Maxitrak Pearl, even though it costs half as much again. I'd have had that built and running within six months (two years ago, in other words), if my experience with their Jack is anything to go by - and that was a joy to build.
As I keep saying - nil desparandum!
Eric
|
|
|
|
Post by ericcee on Sept 25, 2008 20:35:21 GMT
Well, despite what I said last time about not rushing to an air-test, I've gone and done it - and it (sort of) works. The good friend who machined the new set of die blocks for me has made up a "bifurcated supply pipe" so that I can connect the engine to my compressor - the photo will show what I mean. 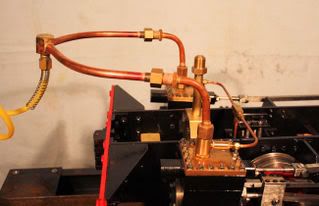 It looks weird but it works! After a bit of fiddling about, including re-checking the timing, it actually started to run  - and here's a photo to prove it. 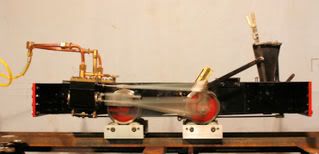 By the way, it is not running as fast as it seems - I deliberately used a slow shutter speed (1/4 sec.) to exaggerate the movement. It runs quite well in forward gear, down to about 10lbs psi (if the compressor pressure gauge is to be believed) but it limps quite badly in reverse. So it's back to the valve timing again - at least I hope it's just a timing problem and not something wrong with the valve gear geometry. Another problem is that there's a lot of air leaking through, even in mid-gear. I'm hoping that this is caused by the valves not seating properly - we shall see. Other commitments mean that I'll not have a chance to get back into the workshop (aka the garage) until early next week, but this is some sort of progress, I guess. Then the next challange will be the regulator! Eric |
|
jvas
Active Member
 
Posts: 40
|
Post by jvas on Nov 25, 2008 23:26:55 GMT
Hi Eric,
I have at last taken some pictures!!! Unfortunately i have not got any means of hosting them, never mind.
How is the build going? I have just got back into it again. After a house move and a busy summer with the re-enactment society I will hopefully have some time to work on the Bagnall! Would like to have her running on air by xmas, but i dont think i will have the bits from the engineers emporium by then.
|
|
|
|
Post by ericcee on Jan 25, 2009 21:39:44 GMT
I can't believe that it's four months since I last posted here - and since I last did any work on the Bagnall. I've not even visited this forum until today. I'll not bore you with a list of excuses - sufficient to say that life has been a bit hectic!
But I must apologise to Jvas since he was expecting a response from in his last posting.
Anyway, I finally forced myself to get on with the job earlier this week. As my September posting indicated, the valve timing needed some careful attention(!) - and that's what I've been doing. After some minute adjustments it finally ran reasonably well in reverse, but not so well as before in forward gear. To cut another long story short (I've spent about 8 hours on it in the last three days), I confirmed what I've read about Hackworth VG elsewhere - the rear axle must be fully loaded, which is exactly the opposite of what the instructions say!
I discovered this by putting my weight on the rear buffer beam and observing the difference in the valve events. Trouble is, it's difficult to lean on the back of the engine and adjust the valves at the same time, so I started to look around for some suitably heavy weights. Some time later, the obvious course of action dawned on me - the boiler! Perching this on the frames with a chock of wood under the front end (no smokebox on yet) had the effect of bottoming the rear axle springs.
Coupling up the compressor again resulted in much better running - still not good enough to my mind, but progress none the less. I reckon another hour or two's tweaking will show further improvement - to the point where it will be as good as it gets. I promise to keep you posted(!)
I take heart from the advice of a good friend - he reckons that it will be much better when it's in steam, and has even offered to set up a jury rig to run steam from my Maxitrak Jack to the Bagnall! He should know - he's on with his third marine engine, the sort that's big enough to propel 20-odd foot boats. We shall see!
By the way, Jvas, have a look at Photobucket.com - and a discussion elsewhere in these Bagnall threads and you'll discover that it's remarkably easy to include photos in your postings.
Eric
|
|
jvas
Active Member
 
Posts: 40
|
Post by jvas on Jan 26, 2009 12:54:12 GMT
Hi Eric,
Sounds excellent. Unfortunately Ive come to a grinding halt. Engineers emporium havent yet come up with the goods and so there isnt much more i can do. I am considering dumping the modelworks bits and modifying sweet pea plans to finish Bagnall valve gear off as the engine is not going anywhere at the moment. I am surprised at Engineers emporium as there must only be half a dozen of us here waiting for bits? I only need two kits (£600 approx), which is easy cash as they have the bits in stock and they are just about to loose easy money...... strange.
I will try and post some pictures of the valve train and smoke box saddless engine tonight for you.
Jeremy.
|
|
|
|
Post by ericcee on Mar 7, 2009 22:18:56 GMT
Two months later and I've finally got round to the "hour or two's tweaking" of the valve timing I mentioned in my last posting. In forward gear, it is now running quite smoothly (or as smoothly as Hackworth valve gear will allow) but it shows some reluctance to start in reverse.
Strangely enough, after I'd adjusted the valves as per the instructions (inlet ports just visible at the extremes of each stroke), I also checked that all the ports were opening to the same extent. I had to make some further "compromise" adjustments to come somewhere near this. Does this indicate some errors in the valve gear geometry? I shall have one more go at getting it right and then, if needed, it will be handed over to my friendly local expert. He will also be helping me with the regulator set-up.
I have now given myself a clear target for running it under steam - the Durham Regatta on June 13th & 14th - let's hope it can be achieved.
Jeremy - I hope that you've had some response from Engineers Emporium by now. I can imagine how frustrating it must be if you have not. Meanwhile, let's see some pictures!
Eric C.
|
|
|
|
Post by ericcee on Mar 13, 2009 22:16:09 GMT
Well - I decided to do some more tweaking of the valve timing, with the help of my "friendly local expert". After about half an hour's fiddling (unfortunately I cannot explain this in an any more sensible way!) it is now running much more sweetly. The one thing that's bothering us both is that there is still air leaking through in mid gear. My friend thinks the valves are fractionally short, but it could be that they are not seating properly. He keeps on saying that it will be a lot better when it's hot and under steam!
We then moved on to the problem of the regulator. In short, the problem is/was that I couldn't get the steam feed pipe from the front of the boiler lined up with the regulator assembly without seizing everything up. Eventually we deduced that the bush brazed into the backhead is slightly out of line and that the screw-in regulator bush and the associated gland nut are both slightly eccentric (we are guessing that they have not been bored and threaded in same operations). The net effect of these two conflicting problems is that if one follows the instructions, it's not going to work. After a lot of head-scratching and some gentle reaming, I decided to reverse to assembly process - fit the regulator assembly in the backhead and then wangle the steam feed pipe from the front of the boiler into the regulator body. With a touch of oil in all the relevant places, it now works quite smoothly. Although this may not make sense to anyone other than the Bagnall builders out there, I trust they will know what I mean. One final point on this component - the regulator lever moves through one and a half turns when I would have thought a quarter turn would be more appropriate.
I'm now moving on to the plumbing. It's proving to be quite a puzzle, given that all the pipes have been finished (with nipples and nuts) but not formed and presumably to the correct lengths; some seem too long and some seem too short. Fortunately, I've some soft copper rod which I'll use to form "templates" before I start bending the pipes, or even re-making them.
Finally - has anyone any experience of dealing with Steam Fittings of Daventry (www.steamfittings.co.uk)? They were obvously the supplier of many of the valves and other fittings used by Modelworks and I need to obtain another check valve and probably another pipe tee. I'll call them on Monday to see what the response is.
TTFN
Eric
|
|
|
|
Post by ericcee on Mar 13, 2009 23:05:44 GMT
Looking back through these postings, I've just realised that I didn't respond properly to some questions from Jvas, back in September last year. Since they relate to the regulator assembly, I should make up for it now.
The steam collector pipe screws into the regulator "body" and, as Jvas said, as supplied, this interfered with the regulator valve (jams it up, in other words). Being a bit of a bodger, I simply reduced the length at the threaded end. Now, when it is screwed tight into the regulator body and fixed to the inside top of the dome, the whole assembly is pulled out of line - again, everything seizes up. I've solved this by first fixing the collector pipe to the dome (this obviously has to be a good fit to resist boiler pressure - I've used plenty of Foliac) then screw the collector pipe/dome assembly into the regulator body with a good dollop of Foliac on the thread. This is a bit of a fiddle as there's a gasket between dome and boiler which needs to be lined up, as does the dome itself, so that the safety valves will be truly fore and aft. Remember that there's no pressure differential at the bottom end of the collector pipe, but the joint must be reasonably steam and water tight - we don't want to collect steam from there - I trust the Foliac will see to that!
I also skipped over the fiddle to centralise the collector pipe with the dome. With the collector pipe removed from the regulator body, I was able to turn it with the aid of a pair of long nose pliers until the location for the collector pipe was central. Another bodge, but it seems to have succeeded.
Again, this must all seem like so much gobbledegook to anyone not building the MW Bagnall, but I hope it helps those who are.
Eric
|
|
jvas
Active Member
 
Posts: 40
|
Post by jvas on Mar 17, 2009 12:42:03 GMT
Hi Eric,
Cor nice work. All of the above will help amazingly. Thanks for putting the time into help.
When I get ten minutes away from work I will write something a little more worthy of what you have written above!!!!
Still have nothing from Engineers Emporium, kind of given up on that now will give them one last chance and if not, then I will get the bits made myself.
Eric - Any idea how many MW Bagnall builders there are now? I think there might only be about four of us?
Jeremy.
|
|