|
|
Post by ericcee on May 18, 2009 21:31:00 GMT
I've not been idle these last few weeks and, believe it or not, the Bagnall is virtually complete, ready for testing and the final paint job! Some photos follow:- 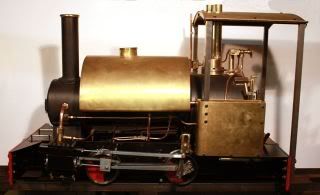 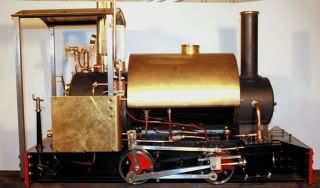 and the backhead:- 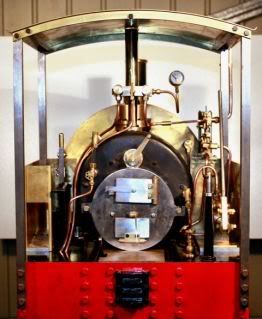 As you can see, I've fitted a steam pump rather than an injector - I've yet to see if it will work. I bought the pump from Bruce Engineering at the Harrogate show two years ago with this in mind. A couple of closer shots follow:- 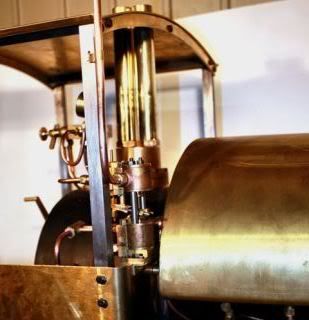 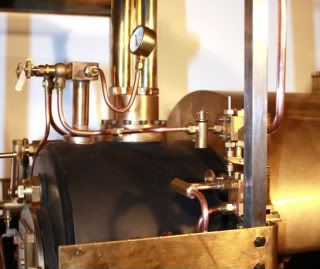 As you can also see, I'm not very good at pipe-bending, but I'm getting a lot better at silver soldering. My "friendly local expert" gave it a fairly detailed going over earlier today and he reckoned that if he were in my shoes he wouldn't be able to wait to steam it! He advised me to do a mini-hydraulic test to check for leaks and then, if all is well, to light the fire and get some steam through it - all in the privacy of my workshop, of course. This way, I'll be able to sort out any problems before I take it for its official tests. I might just do this. It is now almost three years, and a lot if hard work, since I ordered the first kit - I built my Maxitrak engine in six months! Finally, I can recommend Steam Fittings of Daventry (see my previous posts) - I've placed two orders with them and the response was excellent, and I do like the quality of their fittings. I'll be back soon to report on the results of my unofficial testing. Eric |
|
|
|
Post by baggo on May 18, 2009 23:08:25 GMT
Hi Eric, It's good to see that you've got there in the end  Hope the steam test goes well. John |
|
|
|
Post by ericcee on May 21, 2009 22:51:33 GMT
This evening, I decided to put some water in the tank and start to fill the boiler - mainly to check that all the plumbing was OK - in preparation for the "unofficial testing" tomorrow. I was just a little unhappy to find that there were a couple of leaks in the pipework alterations that I've made but they shouldn't be dfficult to fix. But I was amazed and highly dischuffed to discover a couple of leaks from one of the tank seams.  You may remember me describing in an earlier posting how, in their original plans, MW had expected us to assemble the tank from the formed sheets with Araldite, but they thought better of it and assembled it themselves by brazing. They obvlously did not test the result! And this was the last place I would have expected problems. It will be something of a challenge to locate the exact location of these leaks - and I trust I'll be able to cure them with some ordinary soft solder. I'm certainly glad that I've done this "testing" at this stage, as I had had every intention of getting the plate-work and tank painted before going any further. |
|
|
|
Post by banburykev on Jun 19, 2009 12:27:14 GMT
Hi Eric,
My first post on this subject, but have been following for a while. Good to see you are on the last lap.
My own is not far behind you. I need to make the blanking plugs for the safety valves and remake a few pipes before I can pump up the boiler for a hydraulic check before taking it for the club test. Only other job is to fit the drain cocks and sort the operating lever - I am going to crank the lever left above the frame so the grate assy can be removed without hitting the lever.
I suppose I should declare my interest as I am the designer of this engine. The design was done almost 10 years ago shortly after MW took over from Winson and a lot of the ideas and principles were those of the Winson approach. I had designed the L&Y Pug for Winson & the German P8 that was never produced - 2 prototypes were built. It was several years before the kits were actually made and during that time ideas had changed - for the better - but the design was used without chance to re-look at it. The problem with the slide bars/crossheads came from being told to do it one way to keep costs down. The new lead designer also changed a few things like the exhaust steam block? and the redesigned axle pump - much better than the old Winson unit. Also the steam fittings were much better, but the piping was never updated to the new parts.
Hope there will be 2 Bagnalls on the track this summer then.
Kevin West
|
|
|
|
Post by banburykev on Jun 23, 2009 21:36:13 GMT
Hi again,
I have had a good few days on the engine and finally got all the plumbing fitted yesterday evening. So took loco outside and did at hydraulic test to make rectify the regular leaks. Only a few issues to be sorted, so eventually got up to 140psi with only a small leak from the regulator.
Tonight on way home picked up some carcoal and coal from the local garage - what he though I needed coal for on a day like today?
Soaked carcoal while I had dinner then prepared engine and lit the fire. With 3/4 glass of water gauge came off the pin after 7-8 mins. steadily built up pressure to 60psi then checked hand pump worked ok, then injector. Could not get it to pick up clean, but pressure dropped back and water rose in glass so working well.
Let pressure rise to check safety valves, both blew just under 90psi.
Only have about 8 feet of wooden track but managed a couple of proving runs up and down, ran very 'wet', but may have been due to hydraulic test from yesterday - water still in the system.
Satisfactory first steaming.
Have some pics, but not sure how to link here.
Kevin West
|
|
|
|
Post by jgb7573 on Jun 24, 2009 9:29:11 GMT
Great news. You must be "right chuffed".
|
|
|
|
Post by banburykev on Jun 30, 2009 15:53:34 GMT
Hi all, Hope this works - should be a pic of the first test steaming.  Regards Kevin |
|
|
|
Post by ericcee on Jul 2, 2009 21:48:12 GMT
Wow, Kevin - where is all that steam coming from?
If this is not an incentive to get on with the final stages of my Bagnall, I don't know what is. With a little bit of luck, I should be able to get on with it through next week - here's hoping!
Eric
|
|
|
|
Post by banburykev on Jul 6, 2009 12:28:28 GMT
Hi Eric,
I know pic look dramatic.
Steam is only coming from safety valves - they are lifting at bit early and then not fully shutting off, so just whisping.
Also the drain cocks on both side are leaking.
Took loco to club track on sat and had it towed round by an electric loco to check the lubricator was pumping - which it isn't, so that has to come off and be checked.
Hope to get club hydraulic and steam tests done later this week so can start track trials.
Kevin
|
|
jvas
Active Member
 
Posts: 40
|
Post by jvas on Jul 21, 2009 12:09:59 GMT
Hi Guys,
Got the kit from engineers emporium that I've been so desperate for. Will be able to get down to it now and get this engine closer to being finished.
J.
|
|
|
|
Post by ericcee on Jul 21, 2009 15:22:02 GMT
Great news, Jeremy - I take back what I've been saying about Engineer's Emporium!
It's been a tale of two steps forward and three back for me over the last few weeks. After sorting out the tank leaks, I filled the boiler, thinking that I could do an unofficial hydraulic test, only to discover a leak from the big fixing in the steam pipe at the front tube plate. To get at this means stripping off all the top-hamper to get the boiler off. I nipped the bolt up a bit further (I'm paranoid about stripping threads!) and put it all back together again, but it was still leaking. Anyway, to cut a rambling story short, it's all apart again, the leak fixed and tested before re-assembly but this time it's obvious that the regulator is leaking - only slightly, but a leak none the less. It probably has been leaking all the time, but the other leaks (and accidently leaving it open) had been disguising it. It would seem that the steel "spindle" is not bedding fully in the brass body of the regulator - it could be just a speck of muck getting in the way!
So - Jeremy - I wish I had checked this like you did, before I put it all in the boiler.
The question is - how important is such a small leak? Will normal working temprature and pressure resolve it? I remember the regulator on my Maxitrak engine leaked during the hydraulic test, but has not been any problem since.
I am extremely reluctant to take it all apart, yet again, so I am tempted to chance it.
Eric
|
|
|
|
Post by banburykev on Jul 23, 2009 9:16:19 GMT
Hi all,
The regulator on my loco also did not seat fully when I first tested it at home, but seams to have beded in now and seals ok.
I finally managed to get a boiler test for my loco last night at my club. Full hydraulic and steam test were passed with no problems.
The steam test did show a problem with an air gap between the boiler and the grate backplate which need to be reduced/eliminated. I will make some new location spigots to hold the grate in the correct position.
Also the lubricartor does not appear to be working, probably something simple like the system needs to be primed by hand as not been tested before or that I have fitted the oil check valves the wrong way!
Kevin
|
|
|
|
Post by banburykev on Jul 24, 2009 7:42:42 GMT
Hi again, Got in from office last night and started working on loco straight away. Managed to sort gap between boiler and grate backplate - had to file a little from top of backplate at it was fouling on the bottom of the regulator fittings. The lubricator oil pipes were disconnected from the check valves and I hand pumped the lubricator until oil came through both pipes, then reconnected it all. I did also check that the check valves were the correct way round! Finally tighened the bolts on the exhaust block under the smokebox, they were all a little loose. Then did another steam test, the difference from wednesday was a huge increase in steaming rate due to no top air over the fire. The engine was blocked up and ran for a good 10 mins on about 1/4 regulator. It has a very sharp exhaust was making steam against the axle pump, so had to put injector on as well! Still not to sure about lubricator output, need to get clutch on drive set better. Track tests again over the weeekend. Here's a pic from wednesday track test - hope more after the weekend.  Kevin |
|
|
|
Post by banburykev on Jul 25, 2009 7:27:12 GMT
Picture upload did not work last time so here's another go.  Off to Rugby track this morning for another test. Kevin |
|
jvas
Active Member
 
Posts: 40
|
Post by jvas on Sept 15, 2009 12:19:59 GMT
Kev,
How is it going with the engine now? Anymore pictures?
Would love to see it running at your local track, as I am not too far away (i live over in Buckingham).
J.
|
|
|
|
Post by banburykev on Oct 26, 2009 16:43:06 GMT
Hi all,
Had a bit of a quiet time with engine over last few weeks. I took loco to a friends private line and had a gauge glass break just as got up to 80psi which was interesting!
Have had a couple more steam-ups at the club but had continual problems with the lubricator not pumping, so I bought a replacement larger rachet type from Poly Models (Bruce Engineering) at the exhibition last week and fitted it during the week. Had a steam up on saturday at club with track to myself so could run and stop whenever I liked without holding anyone else up. Lubrication now fine and managed about 6 laps in total. Getting use to how engine likes to be fired and driven. Pressure was dropping when on the run so yesterday I modified the blast pipe cap - I made 3 new nozzles to screw into top of existing nozzle. As supplied was 1/4" dia I now have 7/32", 15/64" and 1/4" caps which can be changed in a couple of mins. I did a static test at home with the 7/32 nozzle and steaming was much better holding pressure against the axlepump!
I have found the engine needs a big fire and 75psi plus to run well, but have not played with notching up reverser yet!
Have another visit to my friends on saturday will post progress and hopefully some pics after.
Kevin
|
|
jvas
Active Member
 
Posts: 40
|
Post by jvas on Oct 26, 2009 18:21:19 GMT
Guys,
I spoke to Adrian (engineers emporium) at the exhibition. It sounds like they have some interesting bits coming through the pipeline to try and improve the engine. I have no idea on price, but he did inform me that he has engine running properly now.
Mods include a new grate and mounts, respringing and some pipe re-arrangement. He promises to keep me informed and let me know how progress is coming with these parts.
I am looking at doing a redesign of the steam dome to try and make it closer to prototype if anyone is interested?
Jeremy.
|
|
|
|
Post by banburykev on Oct 27, 2009 8:54:47 GMT
I also spoke to Adrian and he told me about the grate. I will try one as it is lower at the back to allow a deeper fire close to the door. At present it is easy to get a hole in the hole at the back which affects steaming. Think cost is about £50 for grate and brackets.
Kevin
|
|
jvas
Active Member
 
Posts: 40
|
Post by jvas on Dec 2, 2009 14:06:38 GMT
Hi Kev,
Just wondering if you ever got that private mail I sent you.
Regards
Jeremy.
|
|
|
|
Post by banburykev on Jan 19, 2010 16:35:44 GMT
Hi Jeremy,
Sorry its taken so long to reply, been so busy at work not had any chance to get on this site or in the workshop!
Yes I did get your mail and thought I had replied. Cant get access to my private mail here (at work) will check tonight and mail you back.
I have arranged to look at Engineering Emporium's modified grate at the London Show this weekend, may purchase one if looks good, will let you know what I decide.
Kevin
|
|