|
|
Post by Deleted on Jan 19, 2014 12:24:43 GMT
Hi Jim I remember you doing your hoses.. very clever and look perfect, not that we would expect anything else from your workmanship....  Pete |
|
|
|
Post by Jim on Jan 22, 2014 8:06:26 GMT
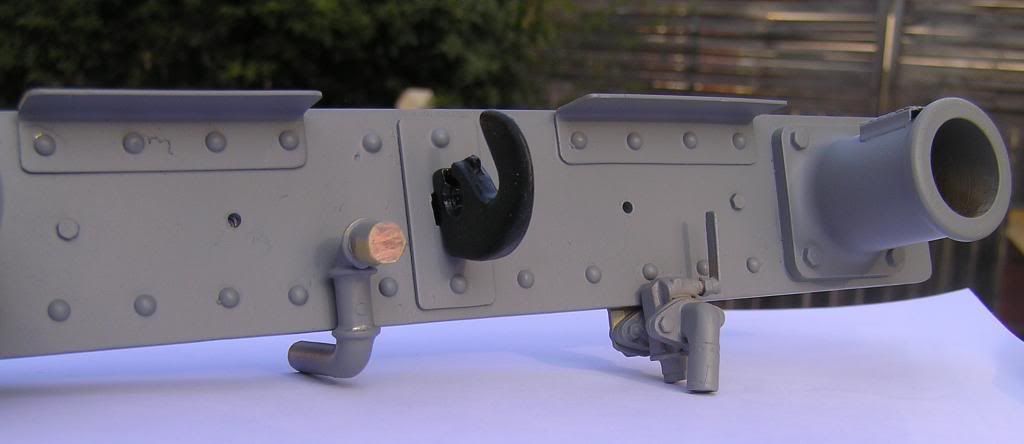
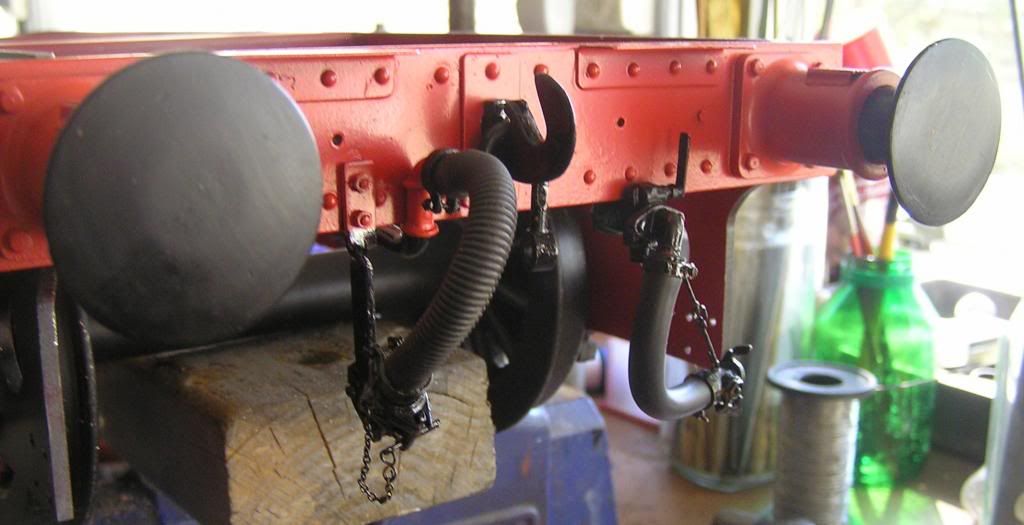
Thanks Pete, there's nothing wrong with your memory that's for sure. The last couple of days have been cooler so I got back to work on the rear buffer beam on the tender, fitting the steam heating castings and fabricating a low connection for the vacuum pipe. The first fabricated connection turned into a nightmare and ended in the bin. The second effort was still not right so it too ended up in the bin and a start was made on MKIII. While it does not bear close comparisons with the full size version with its cast elbows. I'm happy with this one and once the hose is connected along with the arm for securing the pipe when not in use, the visual effect will be what I'm looking for........says he with fingers crossed. Once the cooler weather returns, supposedly in a week's time, I will get back to completing the boiler. I'm actually looking forward to getting back to it, amazing given all my moans about burned fingers and errant silver solder. Like a lot of things in this great hobby, you just get the hang of it as you finish the project. Another boiler for that beautiful MR 4-4-0? I'll ask father time. Now for a soothing ale  Jim  |
|
|
|
Post by Jim on Jan 29, 2014 6:22:53 GMT
It ain't arf hot lads. At 40C or 104F in the shade boiler work is sadly still on hold until the cooler weather arrives. In the meantime I've finished the rear buffer beam on the tender, a job that could be done in slightly cooler workshop, the next job will be the front beam. For anyone following Perrier's plans it's worth checking the length of the coupling link on the hook to see if it will swing freely when the turn buckle is fitted. I had to make a new link when I found Perrier's dimensions were too short. The cast off link is the one I've put on the tender's hook to check the gedge width. Ill salvage the eyes on the link for use on the the new longer model. Well that's it from the 'Turkish bath' now it's time for a coldie  Jim  |
|
|
|
Post by Deleted on Jan 29, 2014 8:22:24 GMT
Love the beam Jim... for some reason the buffer beams are one of my favourite parts... could be the splash of red that does it...perhaps my head associates red with speed after all it's a well known fact that red cars are faster...  love it Pete |
|
Andrew C
Part of the e-furniture

Posts: 447
|
Post by Andrew C on Jan 29, 2014 8:36:40 GMT
That's looking good Jim Shame the boiler work is on hold it would be half way heated if you could stand to work in the sun! I'll have to come over and give you a hand. The last time we were in OZ it was only 18c in Melbourne that was in january 11  Keep cool Andrew |
|
|
|
Post by Roger on Jan 29, 2014 9:34:32 GMT
Hi Jim, that's a great build you're doing, I'm enjoying reading the thread.
I was wondering what that protective blue paint is that you use, I was thinking that I ought to be doing something like that to protect my bare metalwork.
Roger
|
|
|
|
Post by Jim on Jan 29, 2014 13:15:27 GMT
G'day Pete, Andrew and Roger, Just hope the red 'go fast buffer beams' don't speed away from the loco Pete.  Andrew your assistance with the boiler would be more than welcome .I'd even supply the drinks.  Thanks Roger, glad you've found Boadicea's progress interesting, as to the blue paint it is actually a standard automotive grey etch primer from any Halford's type store. Out here I favour Repco for paint as they don't lock the cans up behind glass doors, forcing you to hunt around for an assistant to get the paint out for you. I've noticed too that the auto shops are now featuring paint matching and mixing services which can be very handy. Following Geoff's suggestion in Clan Build, I made up a drag beam located behind the buffer beam to take any actual load such as myself and a couple of passengers. The last thing I want is to see is Boadicea tootle off leaving me with the buffer beam and a horrified look. Jim |
|
|
|
Post by Roger on Jan 29, 2014 14:09:22 GMT
Thanks Jim, I'll get some of that then, it gives a semi finished look to it and a hint of how it might look with some of my many blemishes hidden.
Roger
|
|
|
|
Post by Geoff (Carlisle) on Jan 29, 2014 19:52:26 GMT
If i didn't know any different i would say its a full size buffer beam----- brilliant.
Geoff (Carlisle).
|
|
|
|
Post by Jim on Jan 29, 2014 21:18:23 GMT
Thanks Geoff, you're far too kind though, it's the Hewson castings that do the trick.
Jim
|
|
|
|
Post by runner42 on Jan 30, 2014 4:37:10 GMT
Hi Jim, I'll like to add my congratulations to a job well done. Painting is obviously something you have mastered along with your other skills. The earlier part of this thread shows more exacting painting skills, however painting the drag beams isn't a walk in the park. Having just come in from the shed after starting painting Doris (the paint instructions say don't use above 30 deg C it's 37 deg C) I can see that you are able to provide an even coat even though the paint area contain rivet heads, etc. You must have a steady hand to spray paint with an areosol can to provide that finish. Do you do any surface preparation before and between coats and any post painting processes such as oven baking? Drag beams are not subject to heat as such but other parts that you intend to paint are and need to be heat resistant.
Brian
|
|
|
|
Post by Jim on Jan 30, 2014 9:26:47 GMT
Thanks for the kind comments Brian. In answer to your questions I use off the rack cans of automotive spray paint for the majority of my paint work which I apply over a grey etch primer as the base coat. This includes the BR green which I had made up from a colour sample by a local automotive paint supplier. The exception is on the areas subjected to heat, such as the smoke box and chimney, where I use a Hi Temp gloss black engine enamel applied directly to the metal. It was on a 5km road run with my Burrell SCC Traction Engine that I found the Hi Temp gloss black that I'd sprayed on over a grey etch primer had started to bubble and then flake off. Having a chimney that looked like it had been through a bush fire was not a good look in the final engine line up I must say.  As it happened a member of our club was a former paint technician who explained that the problem lay with the primer which contained chalks and it was the chalk that had given way with the heat. The solution he said was to spray the engine black directly onto the metal. I followed his advice and gave the Burrell's chimney 2 coats of Hi Temp Engine enamel and have had a lovely heat resistant deep gloss chimney ever since....bliss.  In using the spray cans I apply a series of light coats and work at the job from different angles to ensure every nook and cranny is covered. The beauty of painting is that if you make a blue or aren't satisfied you can strip the paint off and start again. Boadicea's smoke box has been repainted after I stripped it to remove the etch primer that had caused the Burrell's paint to peel, I didn't want the good lady's face looking like she had a bad case peeling sun burn.  As a word of caution I would avoid at all costs mixing automotive spray paints with spray enamels from the hardware stores as the auto paints will cause the enamel to crinkle. For the same reason I'm ultra careful when using Humbrol enamels for lining that any clear satin or gloss final coat is not going to cause the lining to crinkle. As a final comment, I find painting is a very personal activity and the techniques I use are ones that work for me. Others I'm sure will have their own methods and techniques, try them all and you will find a method you're comfortable with. Jim. |
|
|
|
Post by fostergp6nhp on Jan 30, 2014 20:00:06 GMT
Cremated paint on the chimney and smokebox shows that its a working engine not just a water boiler.
|
|
|
|
Post by Jim on Jan 30, 2014 20:34:00 GMT
|
|
|
|
Post by runner42 on Jan 31, 2014 3:33:27 GMT
Thanks Jim, that's good info. Etched Primer, I had to look it up, it's a paint with acid in it so it eats into the metal and forms a bond between the metal and paint, which makes it much more durable. It comes in two forms, either a one part where the acid is already added or a two part where the acid is added when required. The former is shelf lifed and usually carries a best before date. Jim I know you already know this, it's just my way of saying that I haven't used an etched primer on the painting I have done so far, I've used www.whiteknightpaints.com.au/specialty-paints/metal/rust-guard/primer/metal-primer. I've looked for etched pimer and it appears that they are recommended for use on Aluminium, Copper, Brass and Stainless Steel. Should I start again with an etched primer on the steel frames and other steel items? Brian |
|
|
|
Post by Roger on Jan 31, 2014 8:47:11 GMT
Talking of Etch Primers, has anyone experimented with using a 'Soda Blaster' to mechanically prepare a surface for painting before priming?
|
|
|
|
Post by RGR 60130 on Jan 31, 2014 9:08:47 GMT
Talking of Etch Primers, has anyone experimented with using a 'Soda Blaster' to mechanically prepare a surface for painting before priming? Roger, If you search this forum for soda blasting you will find the thread I kicked off a long time ago. Reg |
|
|
|
Post by Roger on Jan 31, 2014 9:12:53 GMT
Thanks Reg, I'll do that.
|
|
|
|
Post by Jim on Jan 31, 2014 10:51:55 GMT
I haven't tried soda blasting but have used a small sand blaster with good effect for cleaning up flux residue after silver soldering.
Brian I'd leave things as they are but be wary of mixing types of paints without prior testing. Personally I try to keep to the one type ie an automotive primer with automotive top coat.
Jim
|
|
|
|
Post by runner42 on Feb 1, 2014 2:24:01 GMT
Jim, yes good surface preparation is essential so I am told and locomotive painting requires either sand blasting or soda blasting particularly on brass items. You may be interested in this link www.homemodelenginemachinist.com/f31/rob-roy-8800/index2.html, assuming it's not bad manners to link another company's blog here. For you it's probably a re-iteration but for some it maybe the first exposure. Oops I just noticed that Reg's soda blasting thread has been resurrected. Brian |
|