|
|
Post by Jim on Nov 29, 2014 12:12:50 GMT
As I fretted away in the workshop a pile of discarded cleading patterns beside me, I was be beginning to question whether I was really cut out for this cleading caper? Now, thanks to your comments fellas I feel much happier knowing that the fact that nether parts of the boiler could be quite naked will remain a well kept secret and there will be no peeping under Boadicea's skirts  Jim |
|
stan
Seasoned Member

Posts: 110 
|
Post by stan on Nov 29, 2014 22:45:41 GMT
Hi Jim
I feel the same about cleading my 9F which is about the same as your Brit, I am ankle deep in patterns and scrap brass and copper so I have gone to zintec and fabricating by brazing bits together. I even thought about covering the boiler in P38 body filler and rubbing it to shape (much easier) but I don't think Julian would approve.
Stan
|
|
Andrew C
Part of the e-furniture

Posts: 447
|
Post by Andrew C on Nov 30, 2014 10:24:29 GMT
Hi Jim
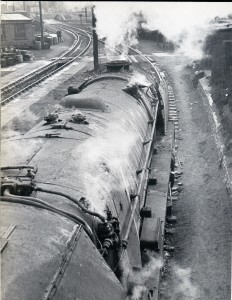
I have just been looking through my copy of the Bradford Barton Britannia Pacific's. Do you have a copy? There is a photo taken from the cab roof of 70047 showing the buckles on the top of the boiler bands on the firebox. also there is only a single row of bolts joining the two sheets together.
I need to re install my scanner when I do I'll Upload a copy of the photo.
Regards,
Jim
|
|
|
|
Post by Deleted on Nov 30, 2014 17:15:02 GMT
Quote}---"showing the buckles on the top of the boiler bands on the firebox." ......This is /was quite a common practice on full size, and the same on the boiler barrel as well ( You don't want those brackets digging into you back when underneath and oiling-up for example............  ........................................................................  ......................................................................  |
|
Andrew C
Part of the e-furniture

Posts: 447
|
Post by Andrew C on Nov 30, 2014 18:08:00 GMT
|
|
|
|
Post by Jim on Nov 30, 2014 20:39:15 GMT
Thank you Andrew and Allen for posting those great photos. In answer to your question Andrew I don't have the Bradford Barton Britannia Pacifics so your kindly scanned photo of 70047's boiler top is very, very handy not only for me but the other Britannia/Clan builders on this site. It gives a very clear view too of how the much of the safety valves are visible along with what appears to be an over centre latch to the boiler band at the front of the fire box...so much detail you rarely see. Hopefully today I'll get the time to sort out the curves and intersections that go into creating the lower underside of the fire box front. Once that's sorted things should become a bit more straight forward. I shouldn't say that as nothing in this hobby is ever 'straight forward'  Thanks again Andrew and Allen Jim |
|
|
|
Post by Deleted on Nov 30, 2014 22:11:52 GMT
No probs. Jim.......... that photo of the GWR Manor came out much smaller on the forum than on my PC screen, where you can quite clearly see the small joining clasp midway between the chimney and the safety valve..........
|
|
|
|
Post by Jim on Nov 30, 2014 23:30:00 GMT
Thanks Alan, As you say the boiler band joining clasp is quite distinctly visible on the Manor. I also had a look at Andrew's link and in the larger photo you can clearly see that what I thought was an off centre style clamp is actually a simple screw toggle. It's a funny old world, once I only saw photos steam locomotives in books but now all I see is sheets of cleading with constraining bands, toggle clamps, tricky sheet metal work and for some reason smoke coming out of one end. I hope it will pass.  Thanks again Alan for going to all that trouble. Jim |
|
Andrew C
Part of the e-furniture

Posts: 447
|
Post by Andrew C on Dec 1, 2014 4:14:12 GMT
Hi Jim No problem. Here is another picture, of one 70053 Moray Firth in which the first band on the barrel is also done up at the top. There is also and extra connection coming from the valve right hand front valve on the manifold which I think went to the coal pusher that was in some of the later tenders  parksiderailway.co.uk/wp-content/uploads/2014/12/TopBoilerView002.jpg parksiderailway.co.uk/wp-content/uploads/2014/12/TopBoilerView002.jpgThe Bradford Barton is ISBN 0 85153 1954 Its official title is 'BR Standard Britannia Pacifics' When new was £3.50.  I think the company has been gone for 30 years? but you can still pick one up on the Internet. That's where I got mine. the wash out plugs and top mud hole doors are quite prominent as are the others in the barrel towards the smokebox. Mud hole doors are not their proper name they are only that around the foundation ring. Regards, Andrew parksiderailway.co.uk/?page_id=320 Will get you to the page I have just started for any Photos I can find that might be useful. as I come across any of either 70006 or 700036 I'll pop them in there. |
|
|
|
Post by Jim on Dec 1, 2014 9:50:50 GMT
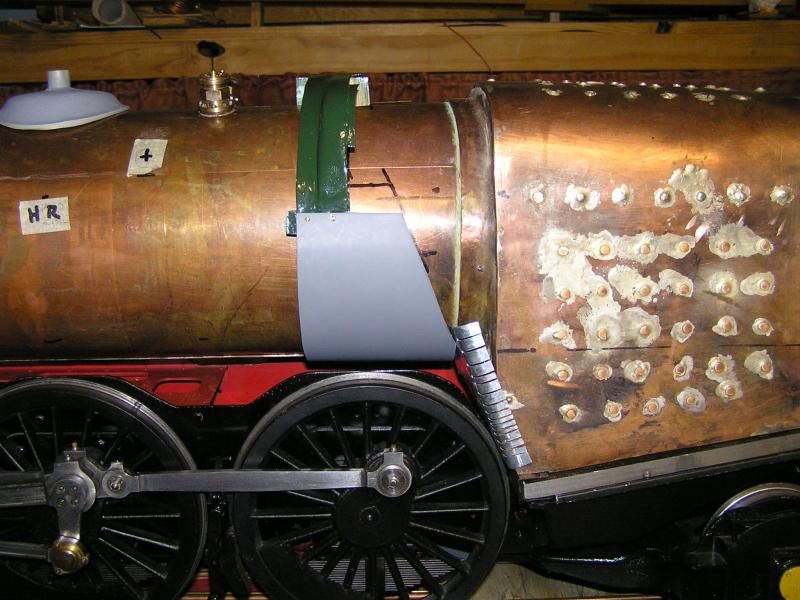
There's some great detail there Andrew, I must keep an eye out for that book. I have Clarke's, Riddles class 6/7 Standard Pacifics & Derry's Book of the Britannia Pacifics and the photographic accompaniment for it. I also have a series of articles published in M E from memory, detailing the various mods that Britannias underwent over time. Of course the problem always seems to be that the detail you're looking for is never in any of the books you have. Today I made up the the bottom half of the fire box/barrel cleading as shown in the photo along with a scrap test piece to see how the throat plate cleading will fit. From the photos the cleading seems to be secured with hex headed screws. My guess is that they would be about 14BA scale wise but at present I'm using 10BA round head screws to hold things in position. Things are progressing thanks to all the detailed photos that have been shared.  Jim |
|
Andrew C
Part of the e-furniture

Posts: 447
|
Post by Andrew C on Dec 1, 2014 16:26:46 GMT
Hi Jim 'Of course the problem always seems to be that the detail you're looking for is never in any of the books you have' doesn't Mr Murphy have a law about that?  I had forgotten you built the boiler with a vertical throat plate. The location for the front of the belpaire is just about visible in the images in Locomotives in detail at bottom of pages 74,75 and in the diagram on page 90 and a quick line (with the edge of a sheet of paper) on the images and on screen looks to me that you are not far out. It's taking shape nicely. Andrew |
|
|
|
Post by Jim on Dec 15, 2014 5:06:04 GMT
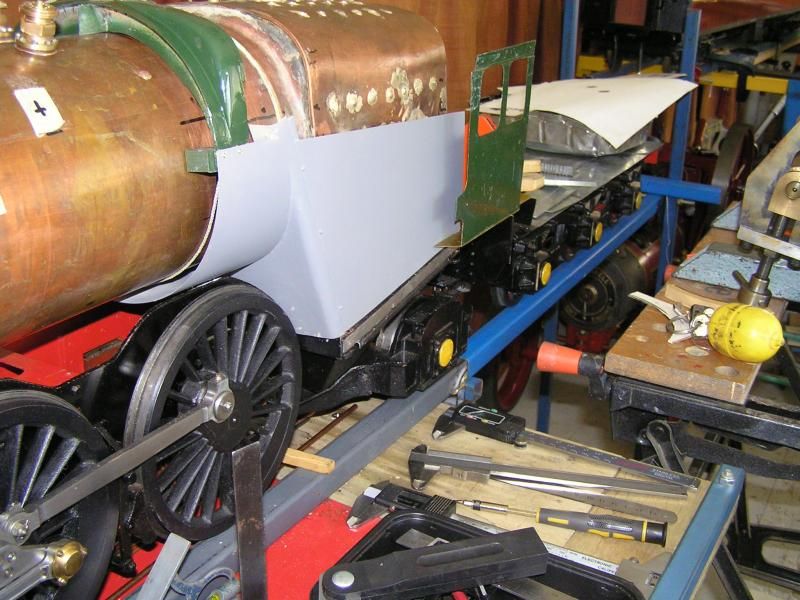
Things have been pretty busy of late but at last after a lot of snipping and tucking I've completed the lower panel of cleading for the firebox. The first photo shows the completed unit, the side panel along the fire box can be removed much as in the prototype.  The second photo shows the panels in place and with a trial cab side on the footplate to check how all the components relate to one another.  Once the fireman's side is done work will start on drawing up a pattern for the crown of the fire box. Jim |
|
|
|
Post by joanlluch on Dec 15, 2014 7:26:52 GMT
Hi Jim. Since this is all new to me I want to ask a simple question. I noticed that the side panel is slightly bended (i.e not flat) in order to adopt the final shape. Did you do it by hand, or is there a particular technique? Thanks
|
|
|
|
Post by Deleted on Dec 15, 2014 7:56:36 GMT
Once the fireman's side is done work will start on drawing up a pattern for the crown of the fire box. Jim That's very neat Jim. As you know I did mine one the vertical axis instead of the way you have done it: I suspect your way is easier! John |
|
|
|
Post by Jim on Dec 15, 2014 10:52:47 GMT
Thanks John but to be honest I was only just thinking I should have done it in one piece as you and JJ have done. Interestingly I have had the same problem you had with the projection on the cab that connects to the foot plates being too high. As the side in the photo is only a template I just cut the projection off and soldered it back on lower down and at the correct height. There's a problem with the drawings but I haven't worked out where.  Jim |
|
|
|
Post by Jim on Dec 15, 2014 11:05:54 GMT
Hi Jim. Since this is all new to me I want to ask a simple question. I noticed that the side panel is slightly bended (i.e not flat) in order to adopt the final shape. Did you do it by hand, or is there a particular technique? Thanks Hi Joan, I looked again at the side panel to check the bend you mention and realised it's an optical illusion created by the fact that the far end had not been cut as a straight line but on a curve as I haven't settled on the final method of fixing the backhead and the strong points needed to locate the frame for the firebox doors and the pivot for the regulator lever. I must say I'm impressed with the work you've done to date on you freelance locomotive. That's a real challenge! Jim |
|
|
|
Post by Deleted on Dec 15, 2014 11:10:09 GMT
Looking great Jim... she's coming on leaps and bounds.... will soon be sitting there all Brit like.  ...great work... Pete |
|
|
|
Post by Jim on Dec 15, 2014 11:18:54 GMT
Thanks Pete,
As the cleading goes on and the final shape starts to appear the urge to crack really starts to build. A couple of times I even thought I heard the gentle hiss of steam.
Jim
|
|
Andrew C
Part of the e-furniture

Posts: 447
|
Post by Andrew C on Dec 15, 2014 22:40:44 GMT
Hi Jim
No I think you are right to build it as per prototype. Getting a single sheet bent properly and all in the right places is a nightmare ! At least your way you have only one curve to cope and then can adjust the edge of the flat sheet to move it to the correct position.
Both JJ and myself had a preformed pice of firebox cladding to attempt to make fit not easy
Yours is the better way I am sure
Andrew
|
|
|
|
Post by Jim on Dec 15, 2014 23:22:30 GMT
Thanks Andrew. I must say working out the various shapes and how they fit together is an interesting exercise.
Jim
|
|