don9f
Statesman
 Les Warnett 9F, Martin Evans “Jinty”, a part built “Austin 7” and now a part built Springbok B1.
Posts: 960 
|
Post by don9f on Jun 22, 2020 19:50:18 GMT
Hi Alan. Thanks for posting that photo of the mudhole doors. I've been trying to find one for ages. There isn't a drawing of them, available from the NRM. What is the thread size? From that I can work out the approx dimensions. Bob. I used to order spare joints for these on 92214, from memory I think the “ellipse” was 2 1/2” x 3 1/2” and the thread was 7/8” Whit. If required I can verify this with a phone call. Don |
|
|
|
Post by Roger on Jun 23, 2020 9:44:00 GMT
Again, this is not a precision setup, I'm just getting the mandrel for the boiler barrel somewhere close to being true. The back edge of the rotary table gets the axis close to the X-axis of the table...  20200622_220440 20200622_220440 by The train Man, on Flickr ... and this puts the spindle on that axis...  20200622_220728 20200622_220728 by The train Man, on Flickr ... while this sets the flat on the mandrel so it's orientated to the right angle.  20200622_220911 20200622_220911 by The train Man, on Flickr This is a quick check of the runout, tapping the mandrel to get it somewhere near true. It's better than 0.1mm now, so that's good enough.  20200622_221224 20200622_221224 by The train Man, on Flickr I've marked the positions of the washouts with pencil while the whole assembly was on the locomotive with the Smokebox and Pannier Tanks in place. Those are ultimately what decides the actual angle I'm using either side of centre. I've used a pointer in the chuck and moved the cladding round so that it lines up with the dummy bolts on the centre line.  20200623_091417 20200623_091417 by The train Man, on Flickr The bands are holding this surprisingly firmly, I don't want this to move while I'm drilling the holes. I first drilled them with a 1.8mm PCB drill, then 6mm and finally 6.6mm for the washout. 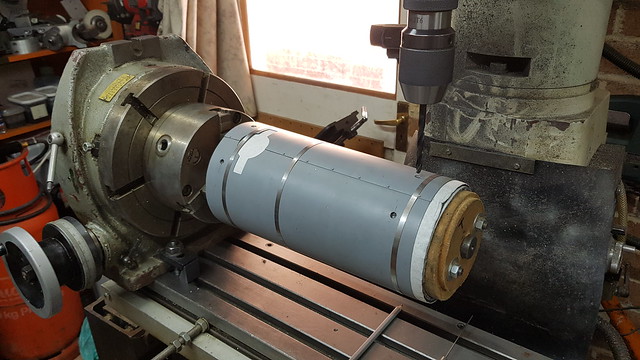 20200623_095315 20200623_095315 by The train Man, on Flickr They were a little under size, so I've tidied them up with a needle file.  20200623_101435 20200623_101435 by The train Man, on Flickr One of the concerns was whether there would be enough depth under the cladding to accommodate the washout, even though I made them as compact as possible. I needn't have worried, as you can see there's actually plenty of room.  20200623_102134 20200623_102134 by The train Man, on Flickr |
|
|
|
Post by delaplume on Jun 23, 2020 15:58:51 GMT
If you’ve ever experienced one of the upper mudhole doors (some call them “mid feather doors”) accidentally being dropped down inside the water space, you’d know they can be very difficult to extricate, especially on bigger boilers! Having a tapped hole in the end allows a handle or such to be attached to help stop that happening during washouts/inspections etc. Don Yes---spot-on there matey !!...........As you say, they are a P-A-I-N to extricate if dropped............ I appreciate that several good folk in this thread have offered alternative names based on their own experiences ( I'm Ex-RN Engine Room for example ) but my original comment was to do with the GWR's original nomenclature which is just "Mudhole Door"....... regardless of physical location.. Good guy that Roger is, I think we must now draw a line under this matter and concentrate on his superb 15xx build........Thank you all...Alan |
|
|
|
Post by 92220 on Jun 23, 2020 18:10:46 GMT
Hi Alan. Thanks for posting that photo of the mudhole doors. I've been trying to find one for ages. There isn't a drawing of them, available from the NRM. What is the thread size? From that I can work out the approx dimensions. Bob. I used to order spare joints for these on 92214, from memory I think the “ellipse” was 2 1/2” x 3 1/2” and the thread was 7/8” Whit. If required I can verify this with a phone call. Don Hi Don. Thanks for that info. I've not been able to find that anywhere else. If you are able to confirm the length and height that would be great. Bob. |
|
|
|
Post by delaplume on Jun 23, 2020 20:57:53 GMT
Hello Don and Bob...
Back in the early days at Bridgnorth we used to cast our own lead joints from 2 steel halves with a semi-circle sectioned ellipse machined in....
Alas almost all of my contacts have passed on BUT I'm still in touch with John Robinson, who was shedmaster there for many years and a regular volunteer for some time earlier............ Currently I'm refurbishing an early John Ellis Simplex boiler for his son Alex and I'm due to give a condition report so I'll ask Alex to see if John would phone me ( I don't have his number ) and hopefully he might remember....OK ??.......
If he doesn't know then he might have some contact names.......
|
|
|
|
Post by Roger on Jun 23, 2020 21:57:45 GMT
Sorry about the mess on the bench, I can hardly move for bits of Hydrovane Compressor at the moment. This is the second of the Cab Doors being attached to the hinges. I've had to file the edge back enough to be able to withdraw the hinge pin so I can get the door on and off. It's actually bolted on 1501, but that wouldn't be very strong because the bolts would be M0.8 Brass. I'd rather use 0.8mm Steel Rivets and know it's more rugged. Holding it in place for riveting is a pain though. I used a Steel Rule along the outside to hold the heads of the rivets in place while supporting the door with Bluetac. Then it was just a matter of carefully positioning the rivet press without disturbing anything. The heads are almost flush on the rear, so they need to be just standing proud when squashing the head with the flat anvil.  20200623_221410 20200623_221410 by The train Man, on Flickr The outside two rivets on each hinge were done first and then the middle ones added. I've done it this way with the hinge pin in place because it would be easy to have the hinge at a slight angle or even out of position. That would be a real pain to correct, so it's easier to do it in the assembled state. Anyway, that's another fiddly job ticked off while I'm waiting for the compressor parts to arrive.  20200623_224822 20200623_224822 by The train Man, on Flickr |
|
|
|
Post by Roger on Jun 24, 2020 16:36:04 GMT
The M6 x 140mm Stainless Allen Cap screws arrived today so it could all go together again. I made a punch to add the clearance hole in the 75micron Mylar gasket and cut the rest out with a scalpel. Only the inside detail matters, I left a little around the outside like there was on the original. Although this is slightly thicker than the original gasket, I suspect the original one was made from this and it's just become compressed. I cleaned off the very thin layer of blue sealant with Methylated Spirits. I also added a smear or the new oil onto each of the insides of the vanes and on the outside of the housing and the White bearing.  20200623_160010 20200623_160010 by The train Man, on Flickr I added a very thin smear of Loctite 574 Flange Sealant to both faces and just refitted the other part with the existing gasket which was a chunky type and undamaged.  20200623_160531 20200623_160531 by The train Man, on Flickr So I've run this up for 5 minutes at 50Hz at which point the frequency converter had had enough and shut down. I'd need a bigger one if I wanted to run this flat out, but in reality it's more than capable of doing what I need at 30Hz. It's happy to run all day at that, but it will also run at 40Hz, albeit with a warning of an impending trip on the frequency converter that never materialises. Still, it's not good to run it like that, so I won't. The leak I could hear turned out to be a pin hole in an external hose, so I've stuck some Superglue in that and ordered a length of hose to replace it. So it's happy days, I can now get back to whatever I was doing before this needed attention.  20200624_171758 20200624_171758 by The train Man, on Flickr |
|
|
|
Post by Roger on Jun 24, 2020 20:06:14 GMT
It's been far too hot to do much today, but I have managed a little cardboard origami this evening to finish off the spray booth. I've got a roll of paper that I'll probably use along the bottom on top of the cardboard which can be thrown away after each spraying session. The spray mask has now arrived, so I'm running out of excuses for not diving in and actually doing some painting. 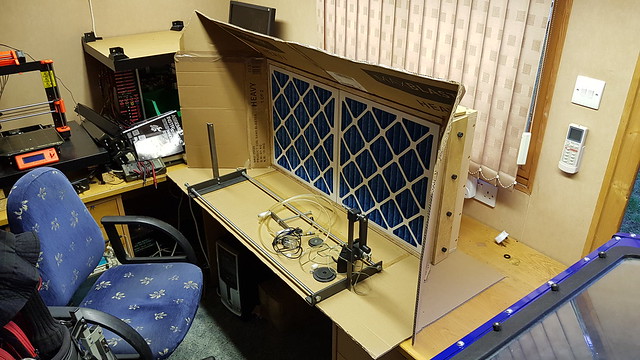 20200624_205313 20200624_205313 by The train Man, on Flickr |
|
dscott
Elder Statesman

Posts: 2,438
|
Post by dscott on Jun 25, 2020 1:59:35 GMT
ibb.co/VpFt2LQI had one of my Days Off? You know when the gas man is due between.... Or you have to engage in Shopping of the Non Steel variety. So caught up on making some rail for the display track. Nice bit of Flat Bottomed of course. So thus inspired did a continue onto some RSJ for another Project. Did a precision file of an 8mm slot drill to a nice radius and set off turning often to avoid curving. The hard way as we are not up to motorised feeds just yet. Another day off may have it adapted and fitted. Some filing and sanding and a quick Halfords grey got one to this. ibb.co/B2bZvjkibb.co/bRLDwm4Having all the right equipment certainly makes this a more pleasurable hobby! David and Lily.
|
|
|
|
Post by 92220 on Jun 25, 2020 8:22:55 GMT
Hi Roger.
I like your spray booth!! Just one suggestion if I may: Don't do any painting in this hot weather. Wait for it to cool down a bit. The paint can dry too quickly and then won't flow out easily. That can give you orange peal effect on the surface. It can also cause 'dry spraying' if sprayed at the max distance. The ideal temp for painting is as near 60F (15C) as practical.
Bob.
|
|
|
|
Post by Roger on Jun 25, 2020 10:48:13 GMT
Hi Roger. I like your spray booth!! Just one suggestion if I may: Don't do any painting in this hot weather. Wait for it to cool down a bit. The paint can dry too quickly and then won't flow out easily. That can give you orange peal effect on the surface. It can also cause 'dry spraying' if sprayed at the max distance. The ideal temp for painting is as near 60F (15C) as practical. Bob. Hi Bob, Thanks for that, I was wondering if the extreme heat might cause problems. I'll wait until it's cooler. Presumably once it's started drying if won't matter if it gets much warmer? |
|
|
|
Post by 92220 on Jun 25, 2020 16:35:53 GMT
Hi Roger.
That's right. It's the temperature during application that is critical to flowing out of the coating, and preventing dry spraying where the spray has started to dry before it gets to the surface. Once the coating is on and starts to dry, as you thought, applying a higher temperature will then help to speed up further drying.
Bob.
|
|
|
|
Post by Roger on Jun 25, 2020 19:38:50 GMT
I'm just working my way through some of the parts that will need painting, and some of them lend themselves to a 3D printed mount. So here's the first of them, it's an M20 x 1.5mm (fine thread) which was already modelled and just needed copying and the data entered from the chart. I used 0.2mm under size for the tolerance. The knurled part is just a triangular cut, repeated round the edge. The centre is the tapping size for M8. The whole thing took about 5 minutes to design from start to finish.  20200625_125017 20200625_125017 by The train Man, on Flickr  20200625_125847 20200625_125847 by The train Man, on Flickr The thread fits a treat, and this can go on the standard M8 mount.  20200625_125909 20200625_125909 by The train Man, on Flickr Here's another one for the smokebox door retainer (doubtless it has an official name). This took even less time to design.  20200625_162936 20200625_162936 by The train Man, on Flickr And this one is for the smallest of the boiler bands, again it will have an M8 tap run through it.  20200625_172031 20200625_172031 by The train Man, on Flickr The insides will be primed first and allowed to dry. Then they can be mounted like this and the visible parts and a little of the back can be sprayed. The width of the mount is a couple of millimetres less than the band.  20200625_202434 20200625_202434 by The train Man, on Flickr And here's one final one for today. I've made two, the other being for the front Pannier Tank bridge. There are two 1.6mm posts and two holes for M1.6 screws  20200625_214844 20200625_214844 by The train Man, on Flickr All of these take very little time and material to make and will hopefully make life much easier. |
|
|
|
Post by chris vine on Jun 25, 2020 21:32:39 GMT
Hi Roger,
Now you have to make a board (bits of reject kitchen worktop are ideal) with 100s of holes in the top. These are for you to drop all your paint-sticks into ready for painting. Then you need another board with empty holes to put the painted items in. If you try to put them back in the original board you will end up bashing them together - of course you know how I know that!!
If you can get a couple of cupboards (ex kitchen again) you can put the boards inside them to keep the dust off while they wait to be painted and while they dry.
Chris.
|
|
|
|
Post by Roger on Jun 25, 2020 22:32:03 GMT
Hi Roger, Now you have to make a board (bits of reject kitchen worktop are ideal) with 100s of holes in the top. These are for you to drop all your paint-sticks into ready for painting. Then you need another board with empty holes to put the painted items in. If you try to put them back in the original board you will end up bashing them together - of course you know how I know that!! If you can get a couple of cupboards (ex kitchen again) you can put the boards inside them to keep the dust off while they wait to be painted and while they dry. Chris. Hi Chris, Are there really that many parts to paint? I guess you do as much as possible in one session so it might get a bit crowded. I don't have a huge amount of space available, so I might have to do them in smaller batches. We'll see. I'm wondering if you risk raising dust just by moving the boards about? Oh for a proper 'clean room'! |
|
dscott
Elder Statesman
Posts: 2,438
|
Post by dscott on Jun 25, 2020 23:53:14 GMT
Hi Roger. I like your spray booth!! Just one suggestion if I may: Don't do any painting in this hot weather. Wait for it to cool down a bit. The paint can dry too quickly and then won't flow out easily. That can give you orange peal effect on the surface. It can also cause 'dry spraying' if sprayed at the max distance. The ideal temp for painting is as near 60F (15C) as practical. Bob. Yes far too hot to paint at the moment except for the high temperature stuff. The RSJ just painted in Halfords best for the photo had no sticking power. Just long enough for the photo. It has its uses for protection while awaiting assembly. ibb.co/cy8tX71Shows prima about 12 years old just sprayed onto the Hunslet Smokebox sort of temporary. I just turned a new ring for the bigger boiler. Saving the old one as it was turned by Friend Brian Porter? Co founder of XYZ machine tools. Our old wives came from the same set of Islands. David and Lily. |
|
|
|
Post by delaplume on Jun 26, 2020 0:43:46 GMT
Hello Roger, Quote}--- "Here's another one for the smokebox door retainer (doubtless it has an official name)" Tut-tut, dear friend ------ of course it has....A quick look in the booklet that I've mentioned several times previously ( GWR 2-Cylinder Piston valve steam locomotives by E.J.Nutty ) on page 40 refers to the Smokebox Door that was "Secured shut by a Dart and Cross-Bar"... So the part you are about to paint is the smokebox cross-bar.. Best regards and hope to see you & 1501 "In action" soon Alan  [/url ) [/url )
 |
|
|
|
Post by ettingtonliam on Jun 26, 2020 7:25:10 GMT
Just curious, but are you proposing to paint the exhaust manifold and the smokebox door crossbar? If so, why? I'm sure Swindon never did!
|
|
|
|
Post by Roger on Jun 26, 2020 8:01:27 GMT
Just curious, but are you proposing to paint the exhaust manifold and the smokebox door crossbar? If so, why? I'm sure Swindon never did! I thought I'd paint the crossbar to protect it from rusting. It probably will only get a coat of primer, but I might finish it with a flash of black for good measure. The inside of the Smokebox will get the same treatment for the same reason. The exhaust really doesn't need painting, but I thought I'd do it for completeness. |
|
|
|
Post by chris vine on Jun 26, 2020 10:37:40 GMT
Also, painting these little simple parts (especially if they won't be seen or covered in ash and oil) make excellent practice pieces!!
C
|
|


