uuu
Elder Statesman
 your message here...
Posts: 2,808
|
Post by uuu on Jul 6, 2020 10:37:29 GMT
There's the story of the builders who were denied tax relief on their tights. So they invited the tax man up the scaffolding on a cold day and won the case.
Wilf
|
|
|
|
Post by Roger on Jul 6, 2020 22:16:34 GMT
In the end I decided to motorise this one too since it was such a simple change to the existing motor mount model. The motor is faster than the other one, so I'm running it at 6 volts and at a lower ratio to get a sensible speed. So this is the first test of mixing paints to take the edge off the full gloss finish. I've mixed up a mere 10mL of paint consisting of 10% Matt to 90% Gloss then thinning that to give 25% thinners. This still looks pretty glossy, but I can live with that.  20200706_210941 20200706_210941 by The train Man, on Flickr This is a bit blurry I'm afraid, but it's the only shot I've got. This doesn't look as glossy, probably because I didn't get as much paint on.  20200706_213515 20200706_213515 by The train Man, on Flickr Don't take any notice of the horrible finish in the middle, it was a rusty piece of metal just wiped off with thinners so I could see how Matt this turns out when it's fully dry. I'm thinking that this is going to be acceptable for the frames, and possibly the outside too. I'll decide how glossy the tanks etc will be when I've got a bit more of this done in these proportions.  20200706_215349 20200706_215349 by The train Man, on Flickr |
|
|
|
Post by chris vine on Jul 6, 2020 22:28:20 GMT
Hi Roger,
Yes, it is difficult to tell how glossy or matt it is in the picture. However, instead of messing about mixing them up, I think you might love the Trimite Machinery enamel. It is available as a "Semi Gloss" and is lovely stuff and sprays beautifully.
As always these things are difficult to photograph, but on p 125 of my book you can see close ups of this paint on the tender chassis. Also on P 138 you can see the reverser. It has a good lustre without being reflective.
Sometimes photos show faults in a perfect coat of paint, other times a photo will make a dreadful paint finish look wonderful!!
Hope that helps,
Chris.
|
|
|
|
Post by Roger on Jul 7, 2020 7:18:15 GMT
Hi Roger, Yes, it is difficult to tell how glossy or matt it is in the picture. However, instead of messing about mixing them up, I think you might love the Trimite Machinery enamel. It is available as a "Semi Gloss" and is lovely stuff and sprays beautifully. As always these things are difficult to photograph, but on p 125 of my book you can see close ups of this paint on the tender chassis. Also on P 138 you can see the reverser. It has a good lustre without being reflective. Sometimes photos show faults in a perfect coat of paint, other times a photo will make a dreadful paint finish look wonderful!! Hope that helps, Chris. Hi Chris, If I was starting from scratch, I might do that, but I've already got all the paint I need so it seems crazy to waste it when it will do the job. So far I think it looks like it will be fine. I'll do the frames and other parts that are less visible first and make sure I'm happy with it before moving on. |
|
|
|
Post by delaplume on Jul 7, 2020 11:13:17 GMT
Hi Andy.......when I were knee-high 't grass-hopper I built and raced 250 and 500 Grass Track bikes and spent "much-moola" at Alf Hagon's old place at Leytonstone, N. London.........I also had a brief venture into Speedway at the then Reading Racers track.... but didn't like that concrete wall at 60 mph !! Is that a Weslake engine ??.......we were using the Jawa-Eso 500 or the older JAP 5-stud engine on straight methanol... |
|
|
|
Post by delaplume on Jul 7, 2020 11:41:36 GMT
Hi Roger,
That's looking good so far.........The trick with paintwork is to not rush it at any stage especially if you see a run developing, or a fish-eye forming.....you just have to let it dry in the normal time frame before rectifying it....and that can take a lot of patience !!
I'm loving your various "turn-over" stands, especially built using 3D printing.....a sensible use of a modern process..
Regarding final gloss and lining}--- I think the lads at the SVR have a Full-Gloss Black finish overall with a British Railways passenger lining on their loco........If you follow that you should be ok I would have thought....
Keep up the good work !!
Alan
|
|
|
|
Post by Roger on Jul 7, 2020 12:19:15 GMT
Hi Roger, That's looking good so far.........The trick with paintwork is to not rush it at any stage especially if you see a run developing, or a fish-eye forming.....you just have to let it dry in the normal time frame before rectifying it....and that can take a lot of patience !! I'm loving your various "turn-over" stands, especially built using 3D printing.....a sensible use of a modern process.. Regarding final gloss and lining}--- I think the lads at the SVR have a Full-Gloss Black finish overall with a British Railways passenger lining on their loco........If you follow that you should be ok I would have thought.... Keep up the good work !! Alan Hi Alan, Thanks for that. I'm sure you're right about the full gloss at the SVR, the early shots after restoration look very reflective. I'm in no hurry over the painting, I don't mind waiting for it to cure before rectifying any issues. As long as I'm making progress it's all good. I just don't have the immense patience and perseverance of Chris Vine, let as alone the skill and experience. |
|
|
|
Post by andyhigham on Jul 7, 2020 12:51:17 GMT
|
|
|
|
Post by Roger on Jul 7, 2020 15:23:22 GMT
This is the first of the gussets getting the top coat. Actually, I might give them another since the paint is pretty thin. We'll see. It's been sprayed with 25% thinners, so maybe that doesn't give enough depth for a lasting coat?  20200707_124217 20200707_124217 by Roger Froud, on Flickr I set up the tripod and attempted to get it to an angle where I could capture at least some of the process of painting the gussets. Unfortunately, I really needed a short tripod that could sit on the bench so my hand wasn't in the way so much. Anyway, you'll get the general idea of how I'm going about these things. I'm doing this all with 20PSI because it takes time to mess about with the pressure and I can get enough paint delivered on the outside by just opening the needle a bit more. The first part sets up a really fine spray that takes a couple of seconds to cover an area if you get in close. I'm getting the nozzle right in tight else it's going to pool on the edges instead of reaching the bottom of the very narrow space. I have to look at this from all angles and make sure that I spray it from the angle where I can see the primer. The 'dog bone' shape of the plates means that the spray is almost at 90 degrees to the plates before it can reach. Once the inside is done, the needle is quickly wound out a couple of turns and the outside is finished, keeping it on the move so nothing runs. The motor is already running, so I just tension the belt at the end to keep it on the move. Simple enough, but you have to get cracking else it won't get wet. I still managed to miss a bit on the edge, so I quickly gave that a shot when I spotted it. (Click on the photo to run the video)  20200707_125344 20200707_125344 by Roger Froud, on Flickr I gave the Gear Frame a coat of black, and the brake pull rods had a second coat because that seemed a bit thin to me and there were a few dust spots that I needed to tidy up with very fine wet and dry. I think the gear frame is going to get another coat too. The paint is thin, so it shows every last imperfection in the metalwork.  20200707_132052 20200707_132052 by Roger Froud, on Flickr |
|
|
|
Post by Roger on Jul 7, 2020 21:12:53 GMT
I found these Lint free Nail wipes on eBay, the ones they use in Nail bars. They're just the right size for handling thing, cleaning up little jars and the outside of the AirBrush. I'll be getting some more of these as they're really handy.  20200707_220405 20200707_220405 by Roger Froud, on Flickr I had a bit of primer left over, so I thought I'd have a go at the smokebox.  20200707_215840 20200707_215840 by Roger Froud, on Flickr I'm going to have to increase the pressure and open up the nozzle a bit more when I do this in black since the coverage wasn't quite big enough. I might give the riveted edges and hand rails a quick go with the smaller spray pattern to get around those parts a bit more slowly, then open it up and finish it off. Lots still to learn about doing this!  20200707_215852 20200707_215852 by Roger Froud, on Flickr I'm loving the way these thinner coats leave such lovely definition around the rivets. They were horrible on the buffers when I used a spray can all those years ago, with big sunken areas around every rivet head like a moat. You simply don't get that with an AirbBrush.  20200707_215913 20200707_215913 by Roger Froud, on Flickr |
|
weary
Part of the e-furniture

Posts: 290
|
Post by weary on Jul 7, 2020 21:56:12 GMT
Hello Roger,
as well as your lint-free wipes you might want to try-out 'tack cloths'. I don't recall seeing you mention them, maybe you have tried them and didn't like them; but if not, they are a tacky wiping cloth specifically designed to lift dust etc. from surfaces to be painted or photo-etched etc. They could also be a substitute for your using duct tape to lift dust that you referred to earlier on. They can be cut into suitable sized pieces and are freely available on ebay and from builders merchants and motor factors etc. They are not necessarily single use and can be used a number of times if kept in an airtight, dry, dust-free, sealed bag or container.
Regards,
Phil
|
|
|
|
Post by Roger on Jul 8, 2020 6:23:35 GMT
Hello Roger, as well as your lint-free wipes you might want to try-out 'tack cloths'. I don't recall seeing you mention them, maybe you have tried them and didn't like them; but if not, they are a tacky wiping cloth specifically designed to lift dust etc. from surfaces to be painted or photo-etched etc. They could also be a substitute for your using duct tape to lift dust that you referred to earlier on. They can be cut into suitable sized pieces and are freely available on ebay and from builders merchants and motor factors etc. They are not necessarily single use and can be used a number of times if kept in an airtight, dry, dust-free, sealed bag or container. Regards, Phil Hi Phil, I bought something that sounds like that from eBay some time ago, but I was a bit worried that they would leave a greasy deposit behind. They're lint free, extremely hard to tear and feel really tacky to the touch. Maybe I should try them out? |
|
weary
Part of the e-furniture
Posts: 290
|
Post by weary on Jul 8, 2020 7:42:06 GMT
Hello Roger,
I use 'tack-cloths' in painting preparation and have found that they do not appear to leave any kind of deposit that affects the paintwork. I don't know how this is achieved, but it works for me - I too had reservations initially. I get mine from motor-factors for motor-car etc., paintwork so I don't know if there are different degrees of 'tackiness', certainly I would not classify those that I use as "really tacky to the touch".
Regards,
Phil
|
|
|
|
Post by Roger on Jul 8, 2020 8:03:42 GMT
Hello Roger, I use 'tack-cloths' in painting preparation and have found that they do not appear to leave any kind of deposit that affects the paintwork. I don't know how this is achieved, but it works for me - I too had reservations initially. I get mine from motor-factors for motor-car etc., paintwork so I don't know if there are different degrees of 'tackiness', certainly I would not classify those that I use as "really tacky to the touch". Regards, Phil Hi Phil, Thanks for that, I'll give them a try. Maybe any deposits left behind are volatile enough to just evaporate. Mine smell a bit like White Spirit, so maybe that's how they work. It's certainly handy to have something to wipe over larger areas with. I've been using the AirBrush without the paint reservoir attached as a gentle blow gun to wash it over with air before painting. |
|
|
|
Post by 92220 on Jul 8, 2020 8:12:26 GMT
No. Tac Cloths (trade name. Note the Tac) don't leave a deposit. I would guess all 'tack' cloths, whoever makes them, would work in exactly the same way. They were originally designed for the car refinishing trade, to be the last process before applying the paint, so buying from a motor factor will guarantee you get a product that will do the job without the possibility of leaving any deposit.
Bob/
|
|
|
|
Post by Roger on Jul 8, 2020 16:13:51 GMT
So this is the setup for shot blasting the Steel boiler bands. You can see the cable ties holding the fixture down.  20200708_143710 20200708_143710 by Roger Froud, on Flickr That worked really well, but it did release enough tension on the surface for it to bend. I could make another fixture to do the back, but I thought I'd just straighten them out in the vice. It's not perfectly flat, but I'll paint it and see what it looks like. I remember someone telling me that Rolls Royce radiators were made with a slightly convex surface so that they looked flat. Apparently if they were made dead flat, they looked concave.  20200708_154303 20200708_154303 by Roger Froud, on Flickr I fired up the Shot Blaster today and prepared these for painting. 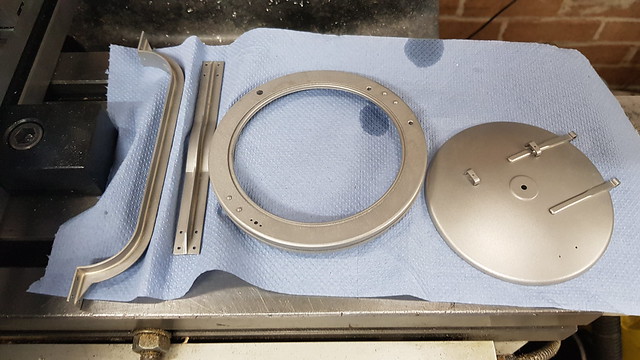 20200708_154005 20200708_154005 by Roger Froud, on Flickr I decided to strip off the paint from the gear frame (again) because there are a few dings in the metal on the outside faces that really get highlighted when the Black paint goes on. They don't look much, but paint is never going to fill them by spraying over them.  20200708_152215 20200708_152215 by Roger Froud, on Flickr So I've used the point of a piece of wire to drop some primer onto the points I'm unhappy with. Then I can play around to my heart's content until I'm satisfied they won't show.  20200708_153632 20200708_153632 by Roger Froud, on Flickr So here are the Pannier Tank top bridge supports being held in a couple of saw cuts in a piece of wood while the Smokebox Door and Surround have their backs primed. Those will get mounted on a shaft to prime the fronts and sides. The Bridges have a 3D printed mount I can put those on when they're dry. 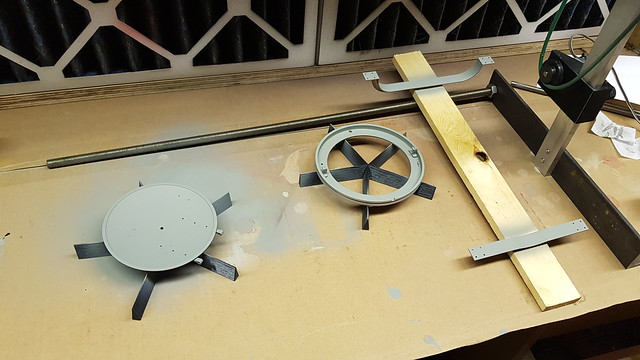 20200708_164229 20200708_164229 by Roger Froud, on Flickr In the meantime, I've designed the mount for the Boiler Barrel Cladding. This one is to support the inside at the smokebox end...  20200707_220035 20200707_220035 by Roger Froud, on Flickr ... and this one clamps to the opening for the Safety Valve Bonnet...  20200708_163819 20200708_163819 by Roger Froud, on Flickr ... here. There's a slightly raised section which engages with the wide slot, and the clamp part overlaps that by 1.5mm so it can't move. This is the end that drives it round on the spit. The two parts are held together with an M3 Allen bolt that self taps into the inside part. There's a clearance hole in the clamp. It's not massively strong, but then it doesn't have to be.  20200708_164547 20200708_164547 by Roger Froud, on Flickr |
|
|
|
Post by Roger on Jul 10, 2020 16:10:53 GMT
I decided to give the buffers another coat to make them more durable. The inside can stay as it is. It takes a lot of effort to mask that up, and it's not really visible anyway.  20200710_113620 20200710_113620 by Roger Froud, on Flickr That seems to have gone fairly well. You'll notice that this end has had a short link added to the bracket that's supporting the end so that the pivot point is slightly higher. The frame was quite a bit out of balance, and that was making it hard to move around and for the motor to turn. It's not lined up with the other end, but it works well enough because of the flexibility in the arrangement. Adding a similar link to the other end made it out of balance in the other direction, so I left that one off. 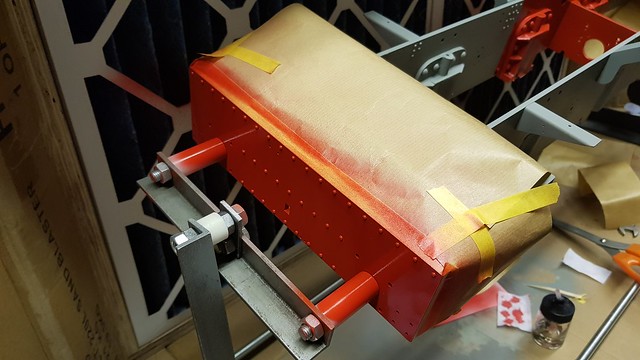 20200710_115434 20200710_115434 by Roger Froud, on Flickr I'll spray the rest of this black as soon as the Red paint is fully hardened. 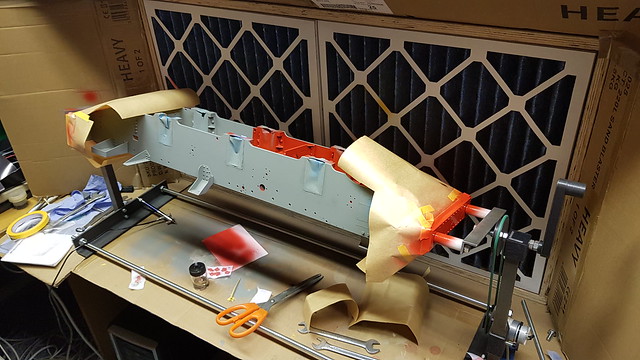 20200710_115443 20200710_115443 by Roger Froud, on Flickr This have come out much better for having filled those small imperfections in the metalwork.  20200710_142622 20200710_142622 by Roger Froud, on Flickr  20200710_142633 20200710_142633 by Roger Froud, on Flickr I was going to put these on the 3D printed supports but I realised that the overlapping part wouldn't get primer on it if I did that. I'll put them on there for the top coats though, probably with something to lift the overlapping part to allow paint to get under there. That doens't have to be perfect, it's mostly tucked away out of sight.  20200710_142644 20200710_142644 by Roger Froud, on Flickr This is the first attempt at painting something big. Some of it came out better than others, I think I should have used a slightly higher pressure to get the paint down more quickly. I sprayed the handrails first, then sprayed the rest while it was turning with the motor. I think it's probably better to turn it by hand. It's almost certainly going to need another coat, but until it's dried I don't know what I've got.  20200710_152000 20200710_152000 by Roger Froud, on Flickr The Smokebox Door came out much better. I've only sprayed this side. That back can just have primer.  20200710_152759 20200710_152759 by Roger Froud, on Flickr I've mixed up a decent amount of Black with 10% Matt so I can do all the Smokebox parts and the gear frame.  20200710_153143 20200710_153143 by Roger Froud, on Flickr I thought I'd paint the Pannier Tank Bridges too. I'm going to stick with the 10% Matt, even though to my eyes it looks more like Gloss. 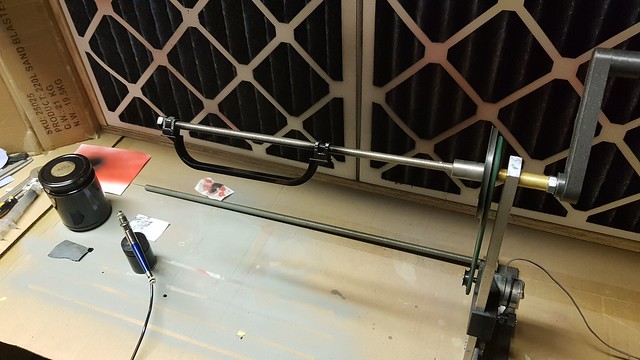 20200710_153452 20200710_153452 by Roger Froud, on Flickr I kept this in the move for some time since it was pretty wet. This video shows it running pretty fast to make sure there are no runs.  20200710_153459 20200710_153459 by Roger Froud, on Flickr The same thing goes for this one.  20200710_154155 20200710_154155 by Roger Froud, on Flickr This is the second and hopefully last coat for the buffer gussets.  20200710_154724 20200710_154724 by Roger Froud, on Flickr So this is where I am at the moment. I could have given the Buffer Stocks another coat, but they look about as good as I'll ever get them, and the paint looks thick, even if it probably isn't. I can always take those off at a later date if they prove to be unsatisfactory.  20200710_161617 20200710_161617 by Roger Froud, on Flickr |
|
JonL
Elder Statesman
WWSME (Wiltshire)
Posts: 2,907
|
Post by JonL on Jul 11, 2020 12:58:10 GMT
Fantastic
|
|
|
|
Post by Roger on Jul 11, 2020 14:09:39 GMT
Ok, that's mostly been successful, with the exception of the Smokebox. I've tried to lay down too much paint in one coat, also not with the right technique. Some parts of it looked great, while others definitely not. The rivets were showing some of that 'moat' effect I mentioned before when describing my woes painting with a spray can. Anyway, it was an experiment to see what I could and couldn't do, and now I think I know at least some of those answers.  20200711_102026 20200711_102026 by Roger Froud, on Flickr So that went back into the Shot Blasting Cabinet and here those parts are again, with the primer on the parts that are going to be mated together. The ring is a press fit in the Smokebox rear, so I just want a flash of primer to protect those parts from rusting. They will be pressed together next, and will have to come out again when it's finished being painted. It's not ideal, but I need to be able to screw the handrail stanchions in later, and that means I need to get to the nuts on the back which are covered by the ring. So the ring will be pulled out for that and replaced. Obviously that's not going to do the paint much good inside the Smokebox, but it doesn't matter in there so I won't fret about it.  20200711_145830 20200711_145830 by Roger Froud, on Flickr |
|
pault
Elder Statesman
Posts: 1,496
|
Post by pault on Jul 11, 2020 19:58:25 GMT
I think there is a danger of putting on layers that are too thick when you have something turning while you paint it, because you know it won’t run
I painted a 7 ¼” smokebox whilst it was slowly turning in the lathe. After a small number of steaming’s the paint started to craze and crack. My conclusion was that the paint was too thick
|
|


