|
|
Post by Roger on Jul 11, 2020 21:09:51 GMT
I think there is a danger of putting on layers that are too thick when you have something turning while you paint it, because you know it won’t run I painted a 7 ¼” smokebox whilst it was slowly turning in the lathe. After a small number of steaming’s the paint started to craze and crack. My conclusion was that the paint was too thick Hi Paul, I think you're right. I'm also of the opinion that doing it in a spiral fashion was a mistake. I need to go back and forth across the full axial length and be happy with the amount then turn it a bit and keep repeating. I'll have another go and see how it turns out. I'll definitely aim to just cover it with the first coat, rather than get a glossy sheen. I think wet is good enough. |
|
|
|
Post by delaplume on Jul 11, 2020 22:55:22 GMT
It's like a good firing technique--------- several thin layers with time in between to allow it to establish itself.......
|
|
|
|
Post by 92220 on Jul 12, 2020 7:53:29 GMT
I think there is a danger of putting on layers that are too thick when you have something turning while you paint it, because you know it won’t run I painted a 7 ¼” smokebox whilst it was slowly turning in the lathe. After a small number of steaming’s the paint started to craze and crack. My conclusion was that the paint was too thick Hi Paul, I think you're right. I'm also of the opinion that doing it in a spiral fashion was a mistake. I need to go back and forth across the full axial length and be happy with the amount then turn it a bit and keep repeating. I'll have another go and see how it turns out. I'll definitely aim to just cover it with the first coat, rather than get a glossy sheen. I think wet is good enough. Hi Roger. You are right. Paint along the length, then turn a bit. Paint another bit, and turn. but don't be too long between the painting strokes. An even coat down the length of the item is the best technique, where possible. Once all is covered to a uniform finish, then rotate constantly, if you think it necessary, to prevent runs. Bob. |
|
|
|
Post by Roger on Jul 12, 2020 8:28:21 GMT
Hi Paul, I think you're right. I'm also of the opinion that doing it in a spiral fashion was a mistake. I need to go back and forth across the full axial length and be happy with the amount then turn it a bit and keep repeating. I'll have another go and see how it turns out. I'll definitely aim to just cover it with the first coat, rather than get a glossy sheen. I think wet is good enough. Hi Roger. You are right. Paint along the length, then turn a bit. Paint another bit, and turn. but don't be too long between the painting strokes. An even coat down the length of the item is the best technique, where possible. Once all is covered to a uniform finish, then rotate constantly, if you think it necessary, to prevent runs. Bob. Hi Bob, Ok, that confirms it then. I can also see how you can get more or less of a gloss finish by how much paint you apply in one coat. |
|
oldnorton
Statesman
 5" gauge LMS enthusiast
Posts: 696
|
Post by oldnorton on Jul 12, 2020 9:14:18 GMT
A small, manual turntable (8" disc on bearings) is very handy to reposition the job. But I'm not sure about the 'help' given by a motor driven BBQ spit ;-)
|
|
|
|
Post by silverfox on Jul 12, 2020 11:46:58 GMT
A small, manual turntable (8" disc on bearings) is very handy to reposition the job. But I'm not sure about the 'help' given by a motor driven BBQ spit ;-) Would it not be better gto wait until the coals have got cold, before painting? Plus who want a Brunswick Green steak? |
|
|
|
Post by Roger on Jul 12, 2020 11:54:41 GMT
A small, manual turntable (8" disc on bearings) is very handy to reposition the job. But I'm not sure about the 'help' given by a motor driven BBQ spit ;-) The motor is just to keep it on the move when the painting is finished, it was never intended to be used when applying paint. I only tried it with the smokebox as an experiment. That's clearly not the way to do it. The spit is absolutely invaluable for quickly positioning the job at any angle. Without a 3D printer, attaching things easily to it isn't easy though. |
|
|
|
Post by Roger on Jul 12, 2020 16:37:55 GMT
A small, manual turntable (8" disc on bearings) is very handy to reposition the job. But I'm not sure about the 'help' given by a motor driven BBQ spit ;-) The motor is just to keep it on the move when the painting is finished, it was never intended to be used when applying paint. I only tried it with the smokebox as an experiment. That's clearly not the way to do it. The spit is absolutely invaluable for quickly positioning the job at any angle. Without a 3D printer, attaching things easily to it isn't easy though. |
|
|
|
Post by chris vine on Jul 12, 2020 20:23:32 GMT
Hi Roger,
if you do the first coat of black not too thick, then it will stay on the corners and edges. If you go to heavy, it will flow so easily that it will pull across the corners/edges and the grey undercoat will show through as lines.
Once you have colour on, you can let it dry and do a heavier coat next day. You still have to balance getting it to flow out flat without going all horrible round rivets etc.
some people have a skill where they put on a light colour coat and let it go tacky or touch dry, then lay on a heavy coat on top. The idea is that it flows by then stays still as it attaches to the previous (not really dry) coat. The trouble is that you can end up with a sticky mess and horrible orange peel. You would have to experiment - I never mastered that technique and maybe it doesn't really work too well with these enamel paints.
I found a good system was to paint all over, at a known rate. IE, gun set up in a known way and then to pass over the part, say 2 or 3 times. Then I would wait for, say, 1 minute and repeat. Maybe doing this a few times. This way you can build up a suffient coat of paint without it all going gloopy.
Don't put too much thinner in to make it flow out - the risk is that you get the paint on nicely (and it probably won't run with the turning machine) but it will reduce in coat thickness, as it dries, so much that you may end up seeing your previous rubbing down marks!
Hope that helps,
Chris.
|
|
barlowworks
Statesman
Now finished my other projects, Britannia here I come
Posts: 874 
|
Post by barlowworks on Jul 12, 2020 20:34:00 GMT
One of the best loco painters I have seen, Ian Rathbone, advocates that you mix enamel and cellulose thinners 50/50 and use that to thin enamel paint. I suppose the cellulose flashes off quickly to leave the enamel where you want it while the enamel thinner dries. It certainly seems to work.
Mike
|
|
|
|
Post by Roger on Jul 12, 2020 20:47:17 GMT
Hi Roger, if you do the first coat of black not too thick, then it will stay on the corners and edges. If you go to heavy, it will flow so easily that it will pull across the corners/edges and the grey undercoat will show through as lines. Once you have colour on, you can let it dry and do a heavier coat next day. You still have to balance getting it to flow out flat without going all horrible round rivets etc. some people have a skill where they put on a light colour coat and let it go tacky or touch dry, then lay on a heavy coat on top. The idea is that it flows by then stays still as it attaches to the previous (not really dry) coat. The trouble is that you can end up with a sticky mess and horrible orange peel. You would have to experiment - I never mastered that technique and maybe it doesn't really work too well with these enamel paints. I found a good system was to paint all over, at a known rate. IE, gun set up in a known way and then to pass over the part, say 2 or 3 times. Then I would wait for, say, 1 minute and repeat. Maybe doing this a few times. This way you can build up a suffient coat of paint without it all going gloopy. Don't put too much thinner in to make it flow out - the risk is that you get the paint on nicely (and it probably won't run with the turning machine) but it will reduce in coat thickness, as it dries, so much that you may end up seeing your previous rubbing down marks! Hope that helps, Chris. Hi Chris, Thanks for that, I'll give it a try. Actually, that's what I've pretty much had to do on things like the Gear Frame, because there's no way you could lay on a lot of paint in one pass with all of those nooks and crannies to get into. I imagined that I'd get away with being a lot bolder with the bigger surfaces, but that's not the case. All interesting and I'm certainly making rapid progress. In the end, you just have to give it a go and practice. I don't mind stripping it off and starting again, that's not a big problem. |
|
|
|
Post by Roger on Jul 12, 2020 20:49:47 GMT
One of the best loco painters I have seen, Ian Rathbone, advocates that you mix enamel and cellulose thinners 50/50 and use that to thin enamel paint. I suppose the cellulose flashes off quickly to leave the enamel where you want it while the enamel thinner dries. It certainly seems to work. Mike Hi Mike, I'm currently using 25% thinners, and that goes on pretty thinly. I'm not sure what you would gain by having it thinner, other than showing every imperfection in the surface you're painting. I suppose you'll get the best possible definition, but I think the preparation and filling would have to be nearly perfect to get a good end result. |
|
barlowworks
Statesman
Now finished my other projects, Britannia here I come
Posts: 874
|
Post by barlowworks on Jul 12, 2020 22:12:04 GMT
Hi Roger
You would still use 25% thinners to paint, it would just be a 50% enamel and 50% cellulose mix. If you are getting good results doing what you are doing, stick with it. I have used this thinners mix for a couple of years now and it works for me. I just thought I would share the information, you pick and chose what you are happy with.
All the best
Mike
|
|
|
|
Post by Roger on Jul 13, 2020 6:27:56 GMT
Hi Roger You would still use 25% thinners to paint, it would just be a 50% enamel and 50% cellulose mix. If you are getting good results doing what you are doing, stick with it. I have used this thinners mix for a couple of years now and it works for me. I just thought I would share the information, you pick and chose what you are happy with. All the best Mike Hi Mike, Ok, I didn't understand what you were saying. So just to clarify, you're mixing two types of thinners, enamel and cellulose, then using that as the paint thinners? |
|
barlowworks
Statesman
Now finished my other projects, Britannia here I come
Posts: 874
|
Post by barlowworks on Jul 13, 2020 15:09:45 GMT
👍
Mike
|
|
|
|
Post by Roger on Jul 13, 2020 20:37:50 GMT
I 3D printed a batch of mounts that have an M8 Male thread so they can be attached to the spit. Obviously this would be prohibitively expensive or time consuming to make conventionally or even with CNC, but as a 3D printed part it takes next to no material and is almost as quick to print as a cylinder of the same size. This is where you have to stand back and look at how these new technologies can make life easier, and it's counter intuitive at times. Once designed, you can make as many as you like. Nine pieces took 2-1/2 hours, not that the printing time is of much consequence when you don't have to be there. The idea was to make a small hole in the front with enough wall thickness to allow it to be drilled and tapped anywhere from M1 to M2.5 I have other solutions involving threaded rod for larger diameters. The inside is hollowed out so that I can scew in a tiny Cap screw, courtesy of eBay. I just bought the longest ones they sell. 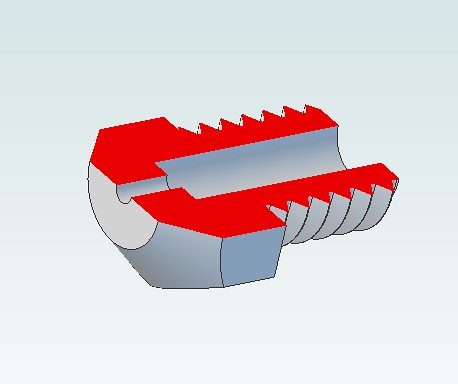 20200503_104451 20200503_104451 by Roger Froud, on Flickr So here is a motly collection of odds and ends that need painting having just been shot blasted. I've been very gentle with them, holding the gun a fair way away and just flashing over them enough to give them a quick clean. I was concerned that the thin Steel Sheet would bend like boiler bands did, so I did them very lightly, turning them over so that any stresses were relieved on both sides. Anyway, that seems to have worked out fine. I'll paint them in the morning when it's cooler in the Garden Office.  20200713_211622 20200713_211622 by Roger Froud, on Flickr I did spray the Gear Frame and the Smokebox this morning, with mixed results. I found that my finger kept blocking the air hole, and that's something I'll have to look into. I might be able to turn the tube round so that can't happen. When it's all dry, I'll put up some pictures. The coat was fairly thin, so it will definitely need more. I think it will need a very light touch with very fine Wet & Dry before I carry on, but ought to be ok. |
|
|
|
Post by Roger on Jul 14, 2020 10:31:39 GMT
As promised, here are the photos of yesterday's Black spraying. This one doesn't look too bad, but it all needs another coat.  20200714_105624 20200714_105624 by Roger Froud, on Flickr I can take photos of this to make it look fantastic or appalling, depending on the lighting. It's actually somewhere in between. I'll let it harden fully and see if I'm happy with how it looks after a gentle going over with very fine Wet & Dry. At least this time the rivets look great. I've added a second air hole in the top of the AirBrush reservoir cap so I don't have the problem with me covering the hole with a finger again.  20200714_093113 20200714_093113 by Roger Froud, on Flickr This morning I've primed the parts I prepared yesterday.  20200714_100701 20200714_100701 by Roger Froud, on Flickr  20200714_100714 20200714_100714 by Roger Froud, on Flickr  20200714_102147 20200714_102147 by Roger Froud, on Flickr 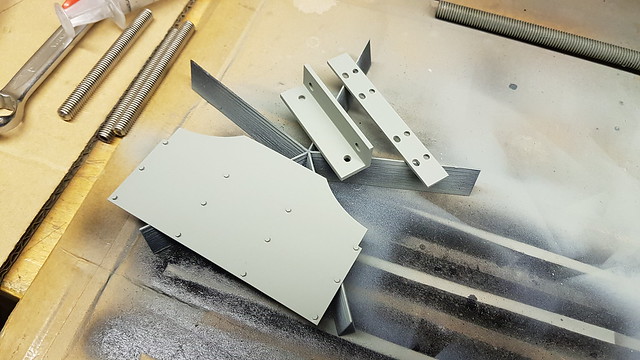 20200714_102152 20200714_102152 by Roger Froud, on Flickr  20200714_102156 20200714_102156 by Roger Froud, on Flickr  20200714_102825 20200714_102825 by Roger Froud, on Flickr I've got some more tiny long Cap Screws coming for mounting some more of the small parts. |
|
|
|
Post by Roger on Jul 14, 2020 21:01:59 GMT
These are the mounts for anti-roll bar mounts. To be honest, the bar isn't really stiff enough to make a noticeable difference, but I might find a way to improve that so I'm going to fit it anyway. Now that I've got several of these mount styles designed, it's dead easy to copy the closest design to the part I need and just modify it to suit. It only takes a few minutes.  20200714_190125 20200714_190125 by Roger Froud, on Flickr So here are a few more mounted parts. In the end, I decided to mount the stanchions into the M8 mounts that were only intended for the smaller sizes. I'm using a lot of those, so I'm printing out another 30 overnight.  20200714_214935 20200714_214935 by Roger Froud, on Flickr I'd originally decided to bolt these infill pieces through the frames and pick up the ones on the outside. On reflection, that was completely unnecessary and adding complication, so I've cut down six M1.6 bolts to 2mm long and Loctited them in the holes after drilling out the paint.  20200714_163353 20200714_163353 by Roger Froud, on Flickr I'll shot blast these and paint the whole thing again.  20200714_215054 20200714_215054 by Roger Froud, on Flickr I've got several other mounts designed and queueing up for the printer, so I'll show those when they're attached to their respective parts. At this point I'm just picking up parts that are finished and getting those ready. Some won't get fitted for ages, but that's not important. The more I can get done at each spraying session the better. |
|
|
|
Post by delaplume on Jul 15, 2020 10:27:28 GMT
Hi Roger..........
great progress there and you seem to be enjoying yourself as well......I think you're right about getting as many items done at each session ... It reduces the amount of initial "set-up" and then afterwards cleaning-down times for one thing, but more importantly it means you should be consistant with the paint's batch and thus shade as well........although with Black you'd think there wouldn't be any variation, would you ??....
Onwards and upwards !!
|
|
|
|
Post by Roger on Jul 15, 2020 11:23:01 GMT
Hi Roger.......... great progress there and you seem to be enjoying yourself as well......I think you're right about getting as many items done at each session ... It reduces the amount of initial "set-up" and then afterwards cleaning-down times for one thing, but more importantly it means you should be consistant with the paint's batch and thus shade as well........although with Black you'd think there wouldn't be any variation, would you ??.... Onwards and upwards !! Hi Alan, Steady progress, learning all the time as usual. Cleaning down is certainly time consuming, so the less I do of that the better. Another way to get more done in each session is being able to paint all over a part in one go by mounting them so they can be turned over. Putting them on a mount also means you can easily put the mount elsewhere for drying without taking up space where you're spraying. I think there's more of an issue with technique when it comes to getting the same finish rather than in the batch mixing of the paint. There can be a big difference between two items done at different settings and in different temperatures. That might be a headache when I do the Pannier Tanks because I'll have to do those in separate sessions. Hopefully by the time I do those, I'll be better at it! |
|


