|
|
Post by Roger on Mar 12, 2021 14:17:50 GMT
Hi Rodger, Just talked to Dad & he says it’s 30 weight....he’s old school so hope this makes sense! He did say yes you could go a bit heavier but the 30 works fine! Another comment he made was he gave up using tubing to get the oil to the eccentrics from the oil boxes & uses pipe cleaners, they are nice & flexible & stay were you put them & they regulate the oil flow as a bonus! I like your crow foot spanners! Another idea if you take a ring spanner & cut a section that’s a bit bigger than the tube it fits over work a treat in tight spots. Cheers Kerrin Hi Kerrin, That's not particularly thick then, more like a heavy motor oil. That's a clever idea for feeding from a reservoir with pipe cleaners. I guess if they're close by that's a reasonable solution. I decided to store the oil at the axleboxes and eccentric themselves. That way you don't have to worry about regulating the flow or wonder if it's getting through. Cutting open a ring spanner sounds like a useful trick. I could get it red hot and bend the end over at 90 degrees too. |
|
|
|
Post by Roger on Mar 12, 2021 14:23:02 GMT
Hi Roger, I have used Stihl Chainsaw oil for a few years now in my locomotives. The reason for switching to this is that it has an anti fling property to it. It is sort of stringy. While this may not be the best possible oil for the bearings (it might be of course), my view is that if it stays in the bearing then some oil in situ is better than the best possible oil sitting on the trackbed!! Mind you, the last batch of stihl chainsaw oil doesn't seem to be as stringy as the last lot. Arghh!!... What I should have done is to always oil one side of the engine with normal oil and the other side with the chain oil. Then I could have seen the difference, if any. Chris. Hi Chris, I bought some chainsaw oil, and found the same as you. It seems way too thin for what I want it for. I definitely like the idea of a thick oil in the 600+ range. That might be a bit thick if you have a remote reservoir and pipes, but if you can put it where it's needed, such as at the axle box, I think it's a good option. Left for days, it will eventually drain through the bearings and onto the bench, so you can see that it does flow even when the gaps are tiny. |
|
Gary L
Elder Statesman

Posts: 1,208
|
Post by Gary L on Mar 12, 2021 14:57:30 GMT
Hi Roger, I have used Stihl Chainsaw oil for a few years now in my locomotives. The reason for switching to this is that it has an anti fling property to it. It is sort of stringy. While this may not be the best possible oil for the bearings (it might be of course), my view is that if it stays in the bearing then some oil in situ is better than the best possible oil sitting on the trackbed!! Mind you, the last batch of stihl chainsaw oil doesn't seem to be as stringy as the last lot. Arghh!!... What I should have done is to always oil one side of the engine with normal oil and the other side with the chain oil. Then I could have seen the difference, if any. Chris. Hi Chris, I bought some chainsaw oil, and found the same as you. It seems way too thin for what I want it for. I definitely like the idea of a thick oil in the 600+ range. That might be a bit thick if you have a remote reservoir and pipes, but if you can put it where it's needed, such as at the axle box, I think it's a good option. Left for days, it will eventually drain through the bearings and onto the bench, so you can see that it does flow even when the gaps are tiny. Me, I use a 50:50 blend of heavy steam oil and stringy chainsaw oil for motion and bearings. But there is no way of knowing if this is any better than using one or the other separately. It flows down narrow pipes from a remote reservoir, but very slowly if cold. That seems to be about what is needed. The one thing I’ve been taught never to use is motor oil, because the detergents in it cause it to emulsify in the presence of water. Gary |
|
|
|
Post by delaplume on Mar 12, 2021 17:30:11 GMT
Again,just for interest sake...... a typical, GWR locomotive cast steel main axle bearing is of the white metal, journal type that runs on the top of a polished axle surface.....The oil is held in a reservoir below the axle and applied via a sprung-loaded felt pad.....This method works ok with loads in the order of 10 tons approx....Note}--- there are other, smaller ones as well to lube the wheel boss for example.. On this weight diagrame for a Castle notice the whole axle weight is given....divide that by 2 for the weight acting on the box.....  |
|
|
|
Post by delaplume on Mar 12, 2021 17:39:10 GMT
Hello all,
I use steam oil throughout at the moment ( only one oil needed in the tool box when at the track )... but am considering changing to an OEP oil for all bar the cylinders due to costs.....Note}-- OEP is a gear oil designed for Hypoid drives mainly, not a Motor Oil as correctly mentioned by Gary...
|
|
|
|
Post by Roger on Mar 12, 2021 17:49:05 GMT
Hi Chris, I bought some chainsaw oil, and found the same as you. It seems way too thin for what I want it for. I definitely like the idea of a thick oil in the 600+ range. That might be a bit thick if you have a remote reservoir and pipes, but if you can put it where it's needed, such as at the axle box, I think it's a good option. Left for days, it will eventually drain through the bearings and onto the bench, so you can see that it does flow even when the gaps are tiny. Me, I use a 50:50 blend of heavy steam oil and stringy chainsaw oil for motion and bearings. But there is no way of knowing if this is any better than using one or the other separately. It flows down narrow pipes from a remote reservoir, but very slowly if cold. That seems to be about what is needed. The one thing I’ve been taught never to use is motor oil, because the detergents in it cause it to emulsify in the presence of water. Gary Hi Gary, From what you say, I'd suggest that the Steam Oil is probably about 1000 grade, and the Chainsaw Oils I've looked at are mostly around 100 grade. Mixed 50:50 to a simple approximation should make that about 550 grade. I'm of the opinion that this is the sort of thickness that's ideal, in as much as it can get into the bearings without too much difficulty, yet is sticky enough to hang around for a significant time. Thick oil will presumably form a thicker coating while it's in the bearing too. My concern about thin oil is that it will soon be expelled from the bearings and they will end up running almost dry. We're spending vast amounts of time, money and energy in creating these Locomotive, so it makes sense to protect them as well as we possibly can. |
|
|
|
Post by andyhigham on Mar 12, 2021 19:05:41 GMT
I wonder if motorcycle chain lube aerosol would work. The lubricant is thin when it leaves the can in order to penetrate the chain links and rollers. It then becomes thick and sticky to avoid being flung off at speeds up to 200mph
|
|
|
|
Post by Roger on Mar 12, 2021 19:10:25 GMT
I wonder if motorcycle chain lube aerosol would work. The lubricant is thin when it leaves the can in order to penetrate the chain links and rollers. It then becomes thick and sticky to avoid being flung off at speeds up to 200mph I can't see why not, although it's a bit messy. For motion work it might be handy, it's a kind of grease if I recall. I used to buy that chain lube where you rolled up the chain and immersed it in the round can, then put it on the hob when Mum was out at the shops. |
|
JonL
Elder Statesman
WWSME (Wiltshire)
Posts: 2,911
|
Post by JonL on Mar 12, 2021 19:41:46 GMT
The chainsaw oil I bought was quite thick, and very stringy. I would say its certainly more viscous than a 20w50 lubricant for example. I think it was Kettenoel.
|
|
|
|
Post by Roger on Mar 12, 2021 19:57:07 GMT
The chainsaw oil I bought was quite thick, and very stringy. I would say its certainly more viscous than a 20w50 lubricant for example. I think it was Kettenoel. Some certainly seems to be stringy. However, most seem to be about 100W if you google them. I think you're better off with 500W+, in which case you don't need to rely on modifiers to make it stringy. |
|
|
|
Post by andyhigham on Mar 12, 2021 20:32:29 GMT
The chain lube has a consistency and stickiness not unlike evostik after it has thickened up. The spray can usually has a straw so it can be directed to where needed
|
|
Gary L
Elder Statesman
Posts: 1,208
|
Post by Gary L on Mar 12, 2021 21:22:14 GMT
The chain lube has a consistency and stickiness not unlike evostik after it has thickened up. The spray can usually has a straw so it can be directed to where needed My concern would be, if you apply this sort of (thixotropic probably) non-flowing lubricant, it had better be blooming good, because there is no going back, short of a thorough clean up with solvent, including poking through all the oilways. Oil has a certain cleaning effect, which grease doesn’t Gary |
|
|
|
Post by andyhigham on Mar 12, 2021 21:28:23 GMT
Ideally we would fit seals to keep the lubricant inside the bearings
Full size didn't use seals because a lot of locos used a lubrication system to supply oil to axle boxes etc
|
|
|
|
Post by andyhigham on Mar 12, 2021 21:30:12 GMT
I suppose a cylinder lubricator could be adapted to supply oil to chassis bearings via flexible pipes
|
|
|
|
Post by Roger on Mar 12, 2021 22:11:08 GMT
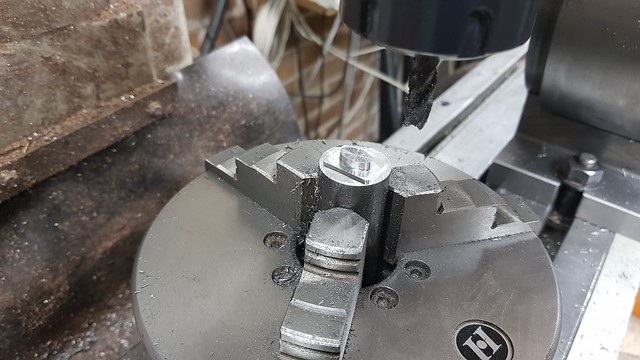
This is one of five Stainless Steel pins that are required for the Byass and Transfer Valve links. They're made form 2.4mm diameter rod with a body diameter of 1.6mm Here the full 2.4mm diameter is being drilled almost all the way through with a 0.6mm drill It's easier to drill them while they're still strong and won't deflect under the drill.  20210312_123842 20210312_123842 by Georgia Montgomery, on Flickr The then got turned down to 1.8mm in one pass, followed by finishing on the grinder. They then got brought back her to sharpen up the inside corner at the head before parting off and finishing to length. I can't hold something as small as 1.6mm in the chuck, so I had to use a pin chuck too.  20210312_153145 20210312_153145 by Georgia Montgomery, on Flickr The washers are fiddly to make, but suprisingly I didn't lose any this time.  20210312_171901 20210312_171901 by Georgia Montgomery, on Flickr  20210312_171918 20210312_171918 by Georgia Montgomery, on Flickr You can't buy split pins this small, so my mangle and Florist's wire was used to create the necessary 'D' shaped wire.  20210312_173206 20210312_173206 by Georgia Montgomery, on Flickr The heads are formed around a pin with a pair of electronic pliers to nip them up closer to the pin.  20210312_175247 20210312_175247 by Georgia Montgomery, on Flickr Those easily fit through the 0.6mm hole.  20210312_200539 20210312_200539 by Georgia Montgomery, on Flickr 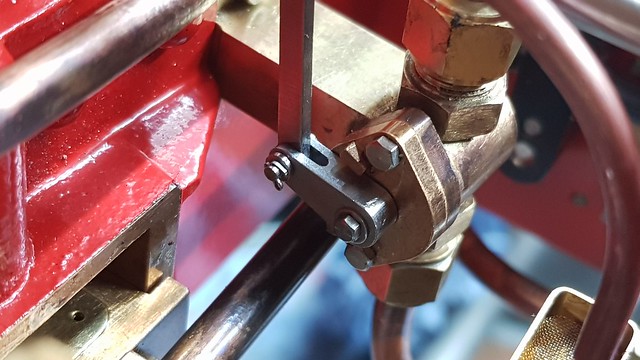 20210312_215417 20210312_215417 by Georgia Montgomery, on Flickr I cut a load of M2 Steel bolts to length and then chemically blacked them. However, I forgot to Black the two that hold the retaining bars on. Those are in the degreaser now, so I'll get them done tomorrow.  20210312_210200 20210312_210200 by Georgia Montgomery, on Flickr Anyway, here's the first one in place. I ought to get some washers for the nuts on the inside of the frames. At the moment there are just nuts straight onto the paint. I'll add them to the list of parts I need from Knupfer. 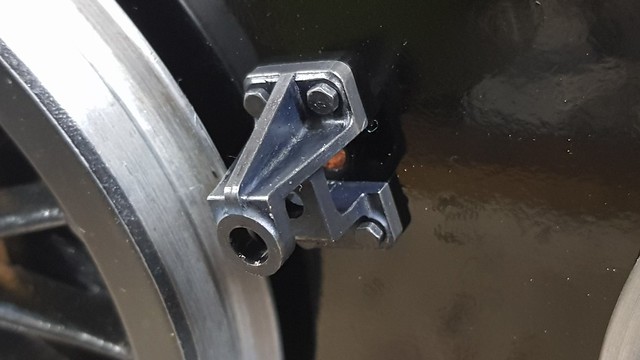 20210312_213443 20210312_213443 by Georgia Montgomery, on Flickr |
|
|
|
Post by Roger on Mar 13, 2021 21:31:46 GMT
Slow but steady progress today. I've treated the bare metal ends of the Brake Stretcher with Fertan, chamfered the insides of the 10 bolts and blacked them so I could fit this. 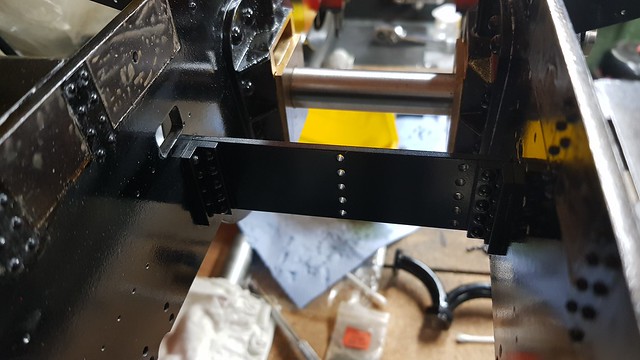 20210313_205537 20210313_205537 by Georgia Montgomery, on Flickr As it happens, you can't see the heads anyway, but I'll know it's not right if I don't go the extra mile and do it properly. The Sand Boxes go here, so it's all completely hidden. 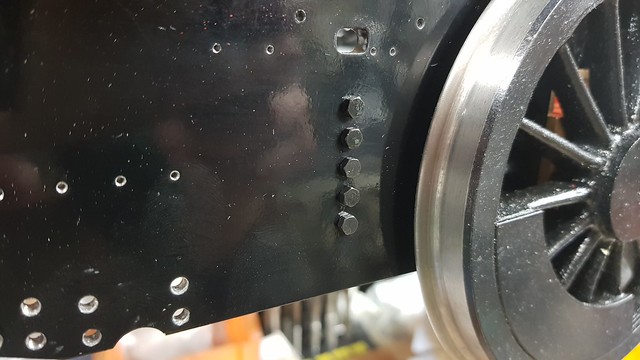 20210313_211930 20210313_211930 by Georgia Montgomery, on Flickr I gave the same treatment to the Smokebox Saddle and I'm pleased with how that came out. I wasn't completely sure whether masking off the mating surfaces and spraying the frames would give a neat edge, but it seems to have done. It's certainly easier to paint the parts separately.  20210313_205545 20210313_205545 by Georgia Montgomery, on Flickr While I've been turning the chassis this way and that, the height adjustment mechanism has been a nuisance because it won't stay up out of the way. I should have incorporated a detent or some such mechanism to make sure it stayed up when I lifted it up. Anyway, a simple solution occurred to me in the form of a magnet. I'd got some 2.5mm diameter x 7mm long magnets so I've modified the 3D model to incorporate one in the top face of the coupling so that it's centred on the outer race of the ball bearing.  20210313_203303 20210313_203303 by Georgia Montgomery, on Flickr This now sits nicely in the up position...  20210313_204637 20210313_204637 by Georgia Montgomery, on Flickr ... but easily drops down when it's needed.  20210313_204701 20210313_204701 by Georgia Montgomery, on Flickr Happy days! why didn't I think of that in the first place!  20210313_204708 20210313_204708 by Georgia Montgomery, on Flickr |
|
|
|
Post by Roger on Mar 14, 2021 22:11:10 GMT
|
|
JonL
Elder Statesman
WWSME (Wiltshire)
Posts: 2,911
|
Post by JonL on Mar 15, 2021 21:28:08 GMT
I need to embrace this part on a stick technique. I also need to build up a stock of metals!
|
|
|
|
Post by Roger on Mar 15, 2021 22:16:07 GMT
The front Sand Boxes sit between the frames with just the neck poking out over the side so they can be filled. I've got the Works Drawings for these, so I made them to scale anyway. They're solid Steel, so they make for useful ballast. The extra weight is probably more useful than trying to make them deliver sand.  Front filler arrangement Front filler arrangement by Georgia Montgomery, on Flickr This is all you can see of it, so it's not important what they look like really.  20140204_112609 20140204_112609 by Georgia Montgomery, on Flickr The curved pipe is a bit of a pain to make. I could have bent a piece of bar, but since it's only a small piece, I decided to just machine it from a piece of 16mm Mild Steel bar.  20210314_165817 20210314_165817 by Georgia Montgomery, on Flickr  20210314_175609 20210314_175609 by Georgia Montgomery, on Flickr  20210314_203839 20210314_203839 by Georgia Montgomery, on Flickr 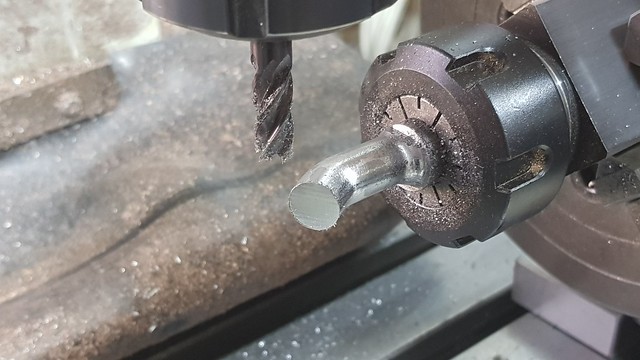 20210315_091621 20210315_091621 by Georgia Montgomery, on Flickr Machining the tapered part with a flat was a step too far though. This is a location pocket to attach that piece separately.  20210315_094421 20210315_094421 by Georgia Montgomery, on Flickr  20210315_202019 20210315_202019 by Georgia Montgomery, on Flickr I'm using a couple of 1mm pins to locate this on the side of the Sand Box, so they need to be put in accurately. There's not enough room to get the wobbler in there, so I'm using a known diameter and a feeler guage to find the edge.  20210315_205324 20210315_205324 by Georgia Montgomery, on Flickr  20210315_212153 20210315_212153 by Georgia Montgomery, on Flickr I need to figure out the right angle for these and then attach them. I'll probably tack the conical parts on with the TIG welder. I'm not sure how I'm going to fix them permanently to the Sand Boxes. I might Silver Solder them, We'll see.  20210315_215234 20210315_215234 by Georgia Montgomery, on Flickr |
|
|
|
Post by delaplume on Mar 15, 2021 22:22:33 GMT
I need to embrace this part on a stick technique. I also need to build up a stock of metals! You'll also need to stock-up on these little rascals}-------------- ££££££££££ ------ LoL !! |
|