|
|
Post by Roger on Mar 6, 2021 11:04:07 GMT
Adam is already making 10x injector castings and surely they can be used to house the one piece cone design if wanted, so that does enable Adam to benefit already from the new design surely? I myself am humbled by Rogers work in making these changes to a quite frankly a sometimes very stayed hobby and showing “another way” of doing things and to be fair if he enjoys what he does which to me is obviously the case then all the best to him. I for one am learning an awful lot about building my speedy thanks to this thread. Hi Doug, Adam has his own solution for the cones, but he'd be welcome to use this idea if it ends up being easier. At the moment, his design doesn't use the overflow valve bolted on to the bottom of the 10x injector, that would have to be made a functioning item before the One Piece Cone design could be used. There's also the issue of adjustment. It's easier to set the regulation with a conventional cone setup, that's why I've made mine with movable steam cones. That's not really a commercial solution, it's too complicated and expensive. There are other solutions to this, but they have to be developed. With a little more development, I think it would be a good solution, but it all takes time, and it's probably easier to just run with what he knows works already. |
|
|
|
Post by Roger on Mar 6, 2021 23:00:53 GMT
I've posted an update on the non-scale injector experiment on the Designing Injectors thread since it's not related to the 1501 locomotive. I'm going to try to quickly bring that to a conclusion so I can get on with the painting and finally start building the locomotive. |
|
|
|
Post by delaplume on Mar 7, 2021 2:24:41 GMT
I've posted an update on the non-scale injector experiment on the Designing Injectors thread since it's not related to the 1501 locomotive. I'm going to try to quickly bring that to a conclusion so I can get on with the painting and finally start building the locomotive. Yes please, Roger.......... I feel Paddington terminus drawing ever nigh and I'd love to be able to join in with the others from this Forum when you eventually run it........ Up and attem !! Alan |
|
|
|
Post by Roger on Mar 7, 2021 19:57:31 GMT
Ok, one last post added to the Desgning Injectors thread. Barring sorting out the drawings, I think that's gone as far as I need to go. Time to do something different, I'm all Injectored out! |
|
|
|
Post by delaplume on Mar 7, 2021 21:10:54 GMT
Ok, one last post added to the Desgning Injectors thread. Barring sorting out the drawings, I think that's gone as far as I need to go. Time to do something different, I'm all Injectored out! Always under pressure-----eh ??.....lol |
|
|
|
Post by Roger on Mar 8, 2021 21:00:39 GMT
When I left this, I'd just managed to finish spraying the Red paint, then realised that I hadn't masked it off anywhere near well enough, and there were tiny dots of Red paint all over it! So today I've carefully gone over it with T-Cut to remove the Red spots and have a good look at what I've got. There were a few places where the paint hadn't quite got into some of the corners, and a few edges that were rubbed through to show the Grey primer. It's not enough to spray, although there was one side of the rear step bracket that needed repainting. So I've masked up the corners and used a small brush to touch it all up. The overall finish of the frames isn't the best, but it's good enough. At least it's had plenty of time to really harden off, that will be helpful as I start adding things. I've got a commercial job to do tomorrow, so it can have all night and tomorrow to dry before final inspection and readying for its return to the workshop and the turning frame.  20210308_195321 20210308_195321 by Georgia Montgomery, on Flickr |
|
|
|
Post by Roger on Mar 9, 2021 22:08:40 GMT
I'd left the centre of the buffer stock slightly too long so that the back plate wasn't sitting quite flush with the buffer beam. Here it's getting trimmed back, and the final length of the threaded part finalised. It can't be too long because it has to fit into a pocket in the corner gusset.  20210309_201510 20210309_201510 by Georgia Montgomery, on Flickr I need to buy some bolts for the flange, but I won't order those until I've put together a list of other fixings I'm sure to need. I've given the bare steel parts a coating of Fertan to make sure they don't rust.  20210309_215836 20210309_215836 by Georgia Montgomery, on Flickr It feels good to get it back in the workshop with the prospect of assembling things for good. |
|
|
|
Post by Roger on Mar 10, 2021 23:21:02 GMT
It's taken quite a few hours, but I've cleared out every tapped and untapped hole in both of the frames and managed to get the drive axle installed with its anti-roll bar and axle driven pump.  20210310_230758 20210310_230758 by Georgia Montgomery, on Flickr I also fitted the oiling tubes. I'll probably cut a piece of felt to fit in the eccentric trough, or at least a piece of gauze. The pipe is always over the trough, regardless of the position of the eccentric.  20210310_230805 20210310_230805 by Georgia Montgomery, on Flickr The axleboxes have generous reservoirs machined in the top of them, and it's easy enough to oil them through the spokes without having to go to the trouble of any piping.  20210310_230857 20210310_230857 by Georgia Montgomery, on Flickr The reservoirs have a piece of Brass gauze in them, and the cover has a couple of spots of Loctite to stop them from coming off. The holes in the corners are to let air escape. I found that the oil didn't want to go into the hole without them. Hopefully they will hold enough for an afternoon's run.  20210310_230957 20210310_230957 by Georgia Montgomery, on Flickr |
|
|
|
Post by steamer5 on Mar 11, 2021 0:16:46 GMT
Hi Rodger,
Looking good!
On my loco the oil reservoir has a piece of felt in the recess, with a cover over, were you have gauze, to stop the grot getting in, a couple of squires with the nozzle hard on the felt a couple of times during a running session seems to work fine
Cheers Kerrin
|
|
|
|
Post by Roger on Mar 11, 2021 0:27:51 GMT
Hi Rodger, Looking good! On my loco the oil reservoir has a piece of felt in the recess, with a cover over, were you have gauze, to stop the grot getting in, a couple of squires with the nozzle hard on the felt a couple of times during a running session seems to work fine Cheers Kerrin Hi Kerrin, Do you find that the felt retains a lot of oil? I'm tempted to just go for the gauze so I can see what oil is left in the trough. If I do that, I can just use the pipe to fill it. |
|
|
|
Post by steamer5 on Mar 11, 2021 2:57:18 GMT
Hi Rodger,
I just make sure I give it plenty.....it’s not a very big reservoir, once the felt is soaked it holds a reasonable amount I guess!
As per your photo, with the axel box behind the wheel it’s very hard to see into the reservoir,
On a running day, I oil up before going on the track, keep an eye on the lubricator each round or so....dependant on the track, my home track in on 200 m....another I go to is closer to 2000...topping it up as required & then over say a 4 hour play go around the axels a couple of times....easier read on a elevated track than a ground level.
A guy that used to come & visit nick name is Peter the Oiler, you can guess why! Not an issue except for the oil dripping on the track! My home club has a rather steep section on a couple of curves which sorts drivers out very quickly & in the middle of the straight is the turntable to come on / off the track, freshly oiled trains leave a lovely calling card!
Cheers Kerrin
|
|
JonL
Elder Statesman
 WWSME (Wiltshire)
Posts: 2,907
|
Post by JonL on Mar 11, 2021 6:48:23 GMT
I like the trough on the eccentric, certainly the hardest part to get at in the steaming bay for me.
|
|
|
|
Post by Roger on Mar 11, 2021 8:54:19 GMT
Hi Rodger, I just make sure I give it plenty.....it’s not a very big reservoir, once the felt is soaked it holds a reasonable amount I guess! As per your photo, with the axel box behind the wheel it’s very hard to see into the reservoir, On a running day, I oil up before going on the track, keep an eye on the lubricator each round or so....dependant on the track, my home track in on 200 m....another I go to is closer to 2000...topping it up as required & then over say a 4 hour play go around the axels a couple of times....easier read on a elevated track than a ground level. A guy that used to come & visit nick name is Peter the Oiler, you can guess why! Not an issue except for the oil dripping on the track! My home club has a rather steep section on a couple of curves which sorts drivers out very quickly & in the middle of the straight is the turntable to come on / off the track, freshly oiled trains leave a lovely calling card! Cheers Kerrin Hi Kerrin, Thanks for that, it's useful to know what happens in practice. I'm using a pretty thick oil, 600 grade from memory, with WS2 Tungsten Disulphide Solid Lubricant. My static tests show that this combination takes ages to find its way through the bearings and onto the bench, but dynamic running will doubtless make that process happen more quickly. I want to make sure it doesn't run dry, but equally well, I don't want it to be awash with oil. |
|
|
|
Post by steamer5 on Mar 11, 2021 20:51:13 GMT
Hi Rodger,
I can’t remember what oil we use, but it isn’t as thick as that. In my early days I used a thin oil thinking it would be better as it would get in......from memory a gas turbine lubricating oil jumps to mind. I found this way to thin as it all but ran through, so changed up to a lubricating oil, I’ll see if I can find out what we, dad & I, are using & let you know.
The specs on the oil you are looking at are pretty impressive.
Cheers Kerrin
|
|
|
|
Post by Roger on Mar 11, 2021 21:19:07 GMT
Hi Rodger, I can’t remember what oil we use, but it isn’t as thick as that. In my early days I used a thin oil thinking it would be better as it would get in......from memory a gas turbine lubricating oil jumps to mind. I found this way to thin as it all but ran through, so changed up to a lubricating oil, I’ll see if I can find out what we, dad & I, are using & let you know. The specs on the oil you are looking at are pretty impressive. Cheers Kerrin Hi Kerrin, I'd be interested to hear what you're using. I've listened to a lot of different opinions on this, and not many people have tried different grades over long periods of time to discover what works better than others. Someone who has done this is Ross (SuctionHose), and his conclusion is that a Rock drill oil plus additive gives very long life compared to other formulations. I couldn't find the grade he uses, but found a GX680 oil that I believe is similar. This seems like a logical solution to me, because if the oil in the small reservoir runs dry, you're into Boundary Lubrication, and that's where the Solid Lubricant comes into its own. What you've found makes sense, in that the oil quickly ends up flowing through and out of the bearings unless it's pretty thick. Obvsiously if it's too thick, it will starve the bearing of oil too, but I'd wager that slightly too thick is preferable to anything that's too thin. Yes, the specs on the WS2-E are impressive, but then so is the price! Still, if it makes it last longer, what's a few quid on oil? |
|
|
|
Post by Roger on Mar 11, 2021 22:17:22 GMT
In the end, I decided to just cut a rectangular piece of Brass gauze for the eccentric troughs. That way I can see how much oil is left in there. I'm concerned that felt will just absorb a lot of oil that it doesn't feed on into the bearing, in which case it's not doing anything to help. The oil is thick enough that it shoudn't get thrown everywhere.  20210311_215233 20210311_215233 by Georgia Montgomery, on Flickr I've fitted the Transfer Valve and the Bypass Valves but I need to made the clevis pins for those. the actuating shaft is in position for the Transfer Valve, but the Bypass Valve one will have to wait. That's attached to a long thin acutating rod which will get bent if I fit that now. 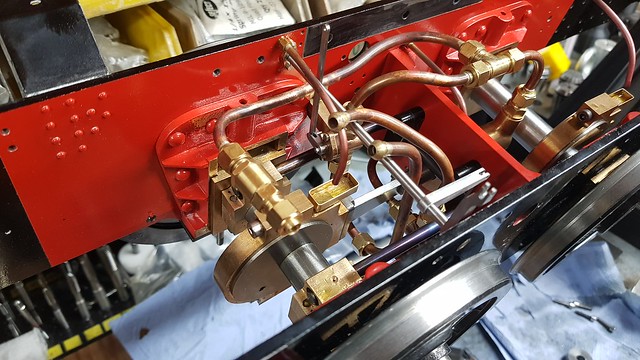 20210311_215242 20210311_215242 by Georgia Montgomery, on Flickr Just to recap on this Transfer Valve business. The idea is that the axle pump can draw water either from the balance pipe, or from the riding car. The problem I have is that the Injectors are fed directly from the Pannier Tanks. That makes it impractical to feed them from the riding car. This simply allows a lever in the cab to switch over partially or fully to the riding car so that the pump maintains the level in the Pannier Tanks or just fills them up. This opens up many options for managing the water. You can just forget the axle pump altogether and just use the Injectors from the Pannier Tanks. You can also forget the injectors and run off the axle pump. You can do either and balance the water you need from the riding car so you don't need to fill the Pannier Tanks. Alternatively, you can run down the Pannier Tanks then refill them from the riding car. It's a totally flexible and simple system that overcomes the problem. If you're exclusively using the Injectors, the water is always drawn from the Pannier Tanks which are well insulated. Since it all comes from the tanks, it won't get the chance to get that hot anyway... at least that's the theory. We'll see how it works out in practice. Anyway, I like the idea of having plenty of controls to play with and think about, it will stop me from being bored! 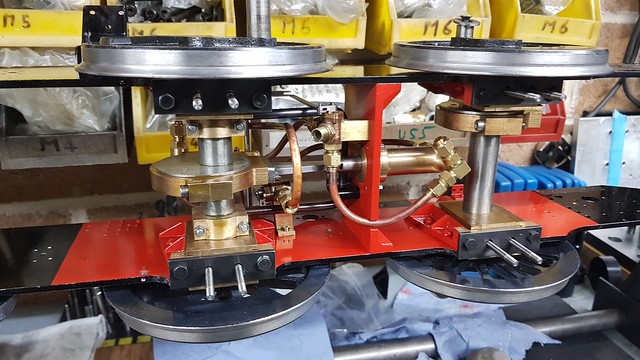 20210311_215301 20210311_215301 by Georgia Montgomery, on Flickr Some of those Union Nuts are really awkward to get a spanner on to. That's when I have the option of reaching from the top and the bottom. When the boiler is in place, it's going to be mighty difficult to service them without rounding off the corners of the nuts. To address that issue, I've designed a compact 'Crow's Foot' style of spanner to use with the 1/4" drive socket set. I'll see how this fits in the available space and maybe make another more slender one if it's still tricky. It's only made from Mild Stee because the forces are pretty small. This has just been roughed out with a 5.5mm 3-flute Carbide cutter, and it's currently being finished with a 2mm one.  20210311_214749 20210311_214749 by Georgia Montgomery, on Flickr |
|
|
|
Post by steamer5 on Mar 12, 2021 2:16:49 GMT
Hi Rodger,
Just talked to Dad & he says it’s 30 weight....he’s old school so hope this makes sense! He did say yes you could go a bit heavier but the 30 works fine! Another comment he made was he gave up using tubing to get the oil to the eccentrics from the oil boxes & uses pipe cleaners, they are nice & flexible & stay were you put them & they regulate the oil flow as a bonus!
I like your crow foot spanners! Another idea if you take a ring spanner & cut a section that’s a bit bigger than the tube it fits over work a treat in tight spots.
Cheers Kerrin
|
|
|
|
Post by delaplume on Mar 12, 2021 12:44:51 GMT
Just for interest------- the GWR oil pots also used a wicking system rather than direct feed.....
|
|
|
|
Post by andyhigham on Mar 12, 2021 13:12:16 GMT
I served my apprenticeship at Wm Wadsworth Lifts. The guide shoes on the lift car that locate on the guide rails that run the length of the shaft were lubricated by pipe cleaner. The top shoe on each guide had an oil pot with a hole above the level connected to a drilling in the bronze bearing (effectively a stand pipe). A hairpin bent pipe cleaner was inserted in the hole and fed the oil to the guide. The bottom guides picked oil up from the top guide during use. A pot of oil about 40mm x 40mm x 40mm was adequate to last between annual services
|
|
|
|
Post by chris vine on Mar 12, 2021 13:20:59 GMT
Hi Roger,
I have used Stihl Chainsaw oil for a few years now in my locomotives. The reason for switching to this is that it has an anti fling property to it. It is sort of stringy.
While this may not be the best possible oil for the bearings (it might be of course), my view is that if it stays in the bearing then some oil in situ is better than the best possible oil sitting on the trackbed!!
Mind you, the last batch of stihl chainsaw oil doesn't seem to be as stringy as the last lot. Arghh!!...
What I should have done is to always oil one side of the engine with normal oil and the other side with the chain oil. Then I could have seen the difference, if any.
Chris.
|
|


