|
|
Post by Roger on Jan 8, 2023 21:14:24 GMT
I'm just assembling the Regulator parts, and that includes bearings that ideally need lubrication. Obviously Steam Oil isn't any good, it would just run out. I was wondering if I could use Silicone Grease which doesn't melt? What do people normally do on mechanisms that are inside the Boiler?
The materials in question are Stainless Steel against Phosphor Bronze.
|
|
|
|
Post by chris vine on Jan 8, 2023 21:54:01 GMT
Hi Roger
I think I would let the saturated and wet steam do the job of lubricant here. Of course I would put a drop of steam oil on as an assembly lube and it will fall off!
Some small marine engines ran with only the saturated steam as lubricant so they didn’t need to use an oil separator or risk contamination of the condenser. That is a much tougher job than the occasional movement of a regulator.
C
|
|
mbrown
Elder Statesman

Posts: 1,719
|
Post by mbrown on Jan 8, 2023 22:04:49 GMT
I find that Rocol graphite grease is good and lasts a reasonable length of time, but no lubricant in a boiler will last all that long.
Malcolm
|
|
|
|
Post by Roger on Jan 8, 2023 22:47:14 GMT
Ok, thanks for that. It's not going to get a lot of wear and tear, the forces shouldn't be that great with a PTFE face valve for the Regulator. This is the regulator element which is currently being pushed forwards by a Stainless Steel Coil spring. The PTFE element is located on three pegs on the Stainless Steel piece. The whole outer cartridge can be withdrawn from the deep fitting that's Silver Soldered into the Boiler. There are threaded jacking points at the top and bottom. else this would be a nightmare to remove. There are two large section 'O' rings that seal the part on the boiler.  PXL_20230108_211831511 PXL_20230108_211831511 by Timothy Froud, on Flickr This is what that insert looks like in the Boiler. The Steam passes the bearing through a series of holes. 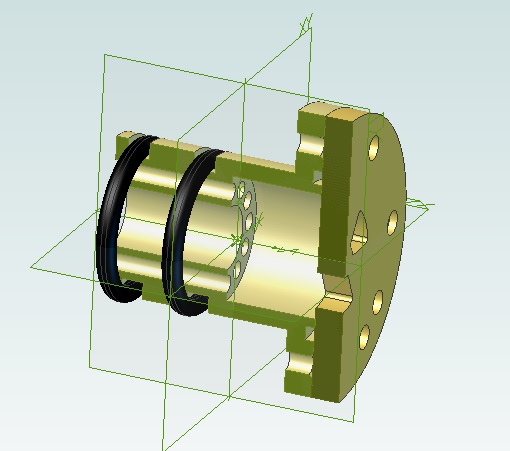 Regulator cartridge Regulator cartridge by Timothy Froud, on Flickr Originally I had hex bolts on this, but it makes more sense to use Cap heads since it's not seen anyway. 1501 doesn't even have Superheaters! 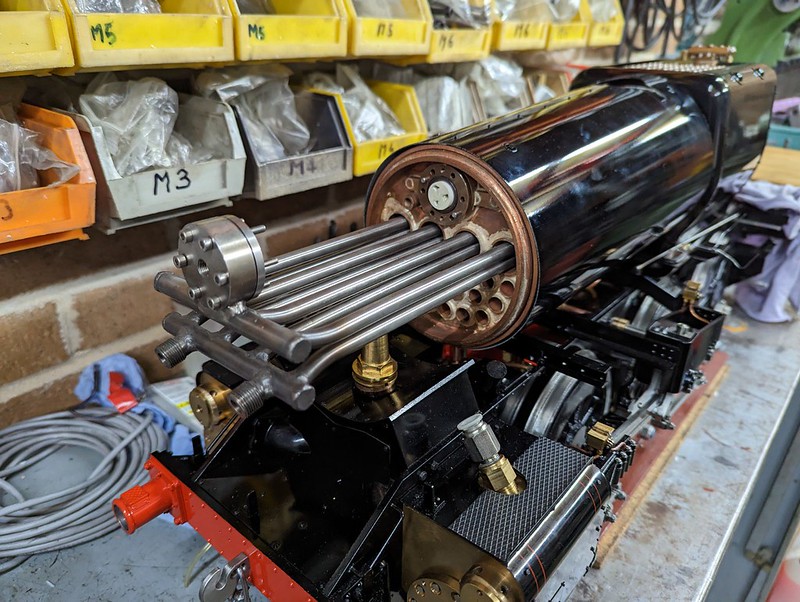 PXL_20230108_220228270 PXL_20230108_220228270 by Timothy Froud, on Flickr This is the Stainless Steel valve element which was gound flat. You can see pockets around two of the bolts that allowed it to be screwed down to a fixture for that process.  PXL_20230108_220238231 PXL_20230108_220238231 by Timothy Froud, on Flickr  PXL_20230108_221522864 PXL_20230108_221522864 by Timothy Froud, on Flickr The screws are slightly too long, so I used washers to take care of that. I don't think that's a good solution, the Snifting Valve body just touches the bottom ones. I'll shorten the screws by a millimeter to overcome that. You have to release the Snifting Valve Banjo to be able to remove this or the Smokebox. The Snifting Valve uses a Silicon Nitride ball inside the Banjo, and the pipe just goes through the Smokebox wall with a Spherical Seal and out to atmosphere. 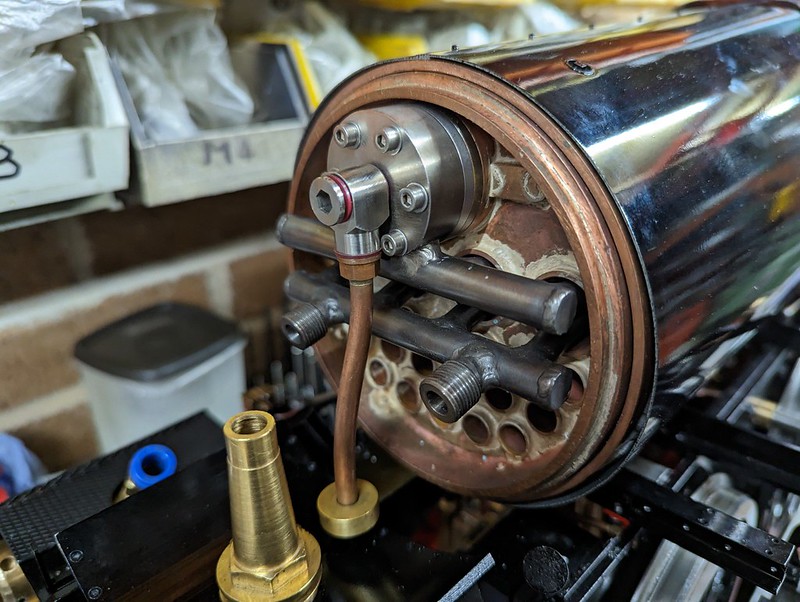 PXL_20230108_222411191 PXL_20230108_222411191 by Timothy Froud, on Flickr |
|
|
|
Post by Roger on Jan 9, 2023 17:27:12 GMT
Here's the completed Regulator/Superheater arrangement with the feeds to the Cylinders added as a sanity check. The Cap heads just miss the Snifting Valve Banjo now, but it's mighty close. I might slightly increase the clearance. The Smokebox will raise the boiler slightly, but I won't put that on until the Boiler Bands are in place,  PXL_20230109_170841674 PXL_20230109_170841674 by Timothy Froud, on Flickr I also gingerly tapped the M1 holes to take the dummy fixing bolts around the skirt. This is finally ready for painting.  PXL_20230109_171712141 PXL_20230109_171712141 by Timothy Froud, on Flickr |
|
|
|
Post by Roger on Jan 11, 2023 22:40:14 GMT
Here's a quick 3D print of the angle iron cosmetic cover between the Firebox Cladding, Pannier Tanks and Cab.  PXL_20230111_155330972 PXL_20230111_155330972 by Timothy Froud, on Flickr This is what it looks like on 1501... 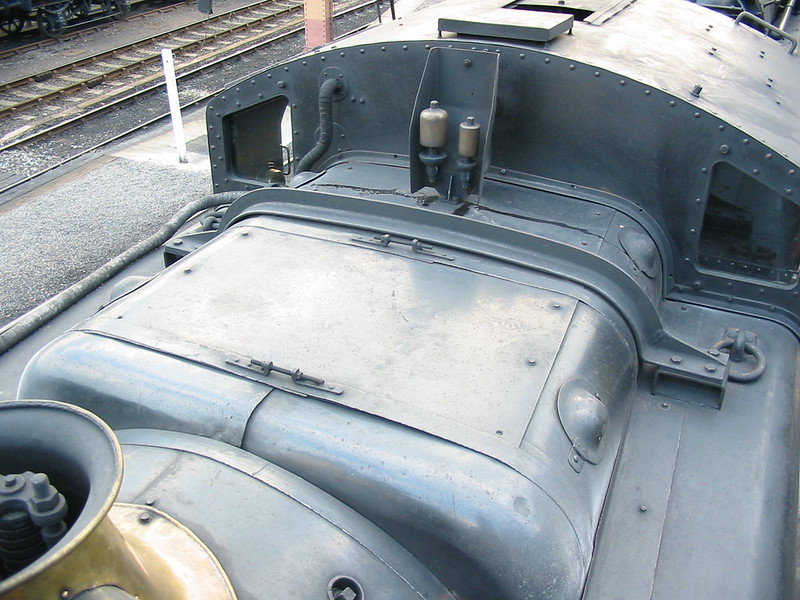 IMG_1415 IMG_1415 by Timothy Froud, on Flickr ... it's a long way from the Pannier Tank!  20180110_134030 20180110_134030 by Timothy Froud, on Flickr Anyway, this is it just to see if it's anywhere near right. I can't really go any further until the Pannier Tanks are on. This will be made from Steel, probably as a complete flat piece for the back with tags and a folded strip for the bottom. We'll see.  PXL_20230111_155323159 PXL_20230111_155323159 by Timothy Froud, on Flickr I wanted to put the Blower Valve on, but there's one last detail that needs adding first. This is what it looks like on 1501...  139608285_3806341122763201_3190215107385059865_o 139608285_3806341122763201_3190215107385059865_o by Timothy Froud, on Flickr ... with an auxiliary valve sticking out at 45 degrees on the bottom RH side. It's added the boss, but it hadn't got the tapped hole in it to mount anything. It's just a dummy, so M2 will do for that. Here I'm sighting up a piece of HSS resting on the top of the flat face so I can inch the 4th Axis round to the right angle. 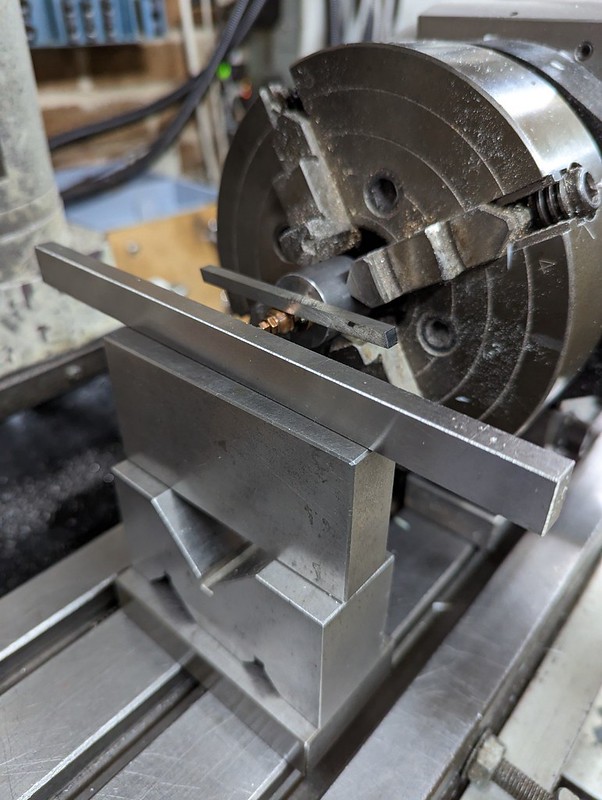 PXL_20230111_175128290 PXL_20230111_175128290 by Timothy Froud, on Flickr I'm using my standard M5 x 0.5 (fine) threaded mount for this.  PXL_20230111_175147658 PXL_20230111_175147658 by Timothy Froud, on Flickr Then it was just a matter of drilling that 1.6mm...  PXL_20230111_213330066 PXL_20230111_213330066 by Timothy Froud, on Flickr ... and tapping it.  PXL_20230111_214243198 PXL_20230111_214243198 by Timothy Froud, on Flickr It's pretty tight in the boiler to get it lined up, but fortunately I'd already made a spanner to help with that. I did have to saw the handle away on one side before I could get it on though.  PXL_20230111_221036871 PXL_20230111_221036871 by Timothy Froud, on Flickr Now comest the tricky part, getting the M1.4 nuts on those two studs. These are functional parts that hold on the extended arm for the Brake Valve. More of that later.  PXL_20230111_222233081 PXL_20230111_222233081 by Timothy Froud, on Flickr |
|
|
|
Post by Roger on Jan 15, 2023 21:39:00 GMT
Just below the Brake Valve is the Hydrostatic Lubricator...  139608285_3806341122763201_3190215107385059865_o 139608285_3806341122763201_3190215107385059865_o by Timothy Froud, on Flickr ... here's a closer view of that. 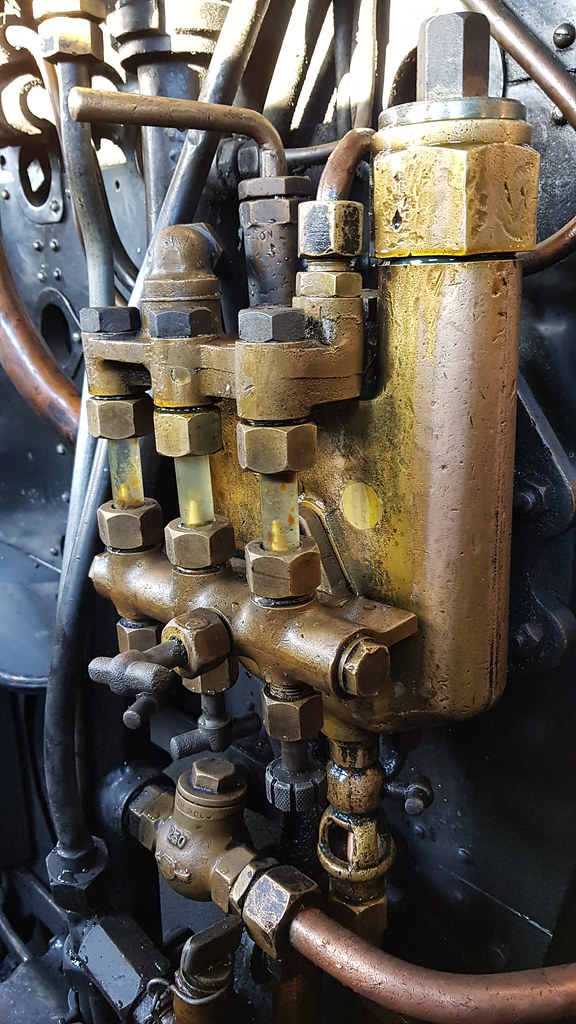 20180110_110352 20180110_110352 by Timothy Froud, on Flickr Fortunately, I do have the Works Drawings for that, because it would be a nightmare to try to guess what it looks like and what the sizes are if i didn't. I started this years ago, modelling most of the body. However, I thought I'd have a go at modelling the top and bottom castings that support the tubes. It's not physically possible to machine between the large bosses on the top casting and the others, so those will probably be made separately and Silver Soldered into place. It's going to be an interesting challenge to machine these.  Hydrostatic lubricator assembly Hydrostatic lubricator assembly by Timothy Froud, on Flickr |
|
choochooenthusiast
Involved Member
 Building a 3D printed Crab 13065. A wagon (or a few) in the works.
Posts: 70
|
Post by choochooenthusiast on Jan 16, 2023 11:02:42 GMT
Truly amazing work, lots of attention to detail!
|
|
jma1009
Elder Statesman
Posts: 5,901
|
Post by jma1009 on Jan 16, 2023 22:25:52 GMT
I am sorry to hear about Roger's eyesight issues.
I ponder upon why a 'fake' GWR hydrostatic lubricator is to be fitted in the cab when there is a mechanical lubricator at the front of this particular loco? If we go to this level of 'fake' detail, when in my view a hydrostatic lubricator could have been used anyway, I would simply omit the 'fake' GWR hydrostatic lubricator full stop.
Just if course my own opinion.
Cheers,
Julian
|
|
|
|
Post by Roger on Jan 17, 2023 12:56:16 GMT
I am sorry to hear about Roger's eyesight issues. I ponder upon why a 'fake' GWR hydrostatic lubricator is to be fitted in the cab when there is a mechanical lubricator at the front of this particular loco? If we go to this level of 'fake' detail, when in my view a hydrostatic lubricator could have been used anyway, I would simply omit the 'fake' GWR hydrostatic lubricator full stop. Just if course my own opinion. Cheers, Julian Hi Julian, Hopefully my eyesight will be better soon. The left eye has become blurry, even though it was fine post surgery. I'm getting that checked out on Friday to see what's going on. I really like the idea of being able to see the oil flowing drop by drop. However, that's not possible in a scale unit, because the glasses are only 1.7mm diameter. In the end, I opted for what I think is the most convenient, fit and forget, mechanical pump arrangement. Personally, I think the addition of a dummy lubricator will make the backhead look a lot more authentic. It's fairly prominent, and all the rest of the detail will be there, so to me it makes sense. |
|
|
|
Post by chris vine on Jan 17, 2023 14:47:50 GMT
If we were to remove all non-functioning detail on our models they would be much the poorer.
No cab, because there is no need to keep the weather off the driver for example?
No miniature lamps on the front/rear or to illuminate the water gauge
No vacuum brake hoses
No whistle on top of the boiler
No lovely lines of little rivets when the tender/smokebox etc has been soldered
etc etc
What is special about Roger's model is that so many of the blobs and gadgets are not only to scale, but they will work. (Until a microscopic bit of scale wedges itself in a micron sized hole!!)
Chris.
|
|
|
|
Post by Roger on Jan 17, 2023 17:28:22 GMT
If we were to remove all non-functioning detail on our models they would be much the poorer. No cab, because there is no need to keep the weather off the driver for example? No miniature lamps on the front/rear or to illuminate the water gauge No vacuum brake hoses No whistle on top of the boiler No lovely lines of little rivets when the tender/smokebox etc has been soldered etc etc What is special about Roger's model is that so many of the blobs and gadgets are not only to scale, but they will work. (Until a microscopic bit of scale wedges itself in a micron sized hole!!) Chris. Thanks Chris. Although some of the fittings look fragile, they're mostly made from Phophor Bronze, with any levers being made from Gauge plate. The internals are much bigger than you would guess from the outside, so they're not just scaled down. Almost all of the tiny bolts are cosmetic, so hopefully they will be just as reliable as the more conventional non-scale fittings. |
|
|
|
Post by chris vine on Jan 17, 2023 21:05:55 GMT
Hi Roger,
One thing which you could do for when you start running:
I have dehumidifiers in the workshop, and collect all the water from them in 5 gallon plastic agricultural containers. I then use this "distilled" water for running the engine.
I think that for you, with small fittings, this would be useful for avoiding any scale and detritus which might block things up.
Even better, this water is free - apart from the electricity to run the dehumidifiers. And, they use much less than heating the workshop to just above the dew point...
Chris
|
|
|
|
Post by Roger on Jan 17, 2023 22:48:57 GMT
Hi Roger, One thing which you could do for when you start running: I have dehumidifiers in the workshop, and collect all the water from them in 5 gallon plastic agricultural containers. I then use this "distilled" water for running the engine. I think that for you, with small fittings, this would be useful for avoiding any scale and detritus which might block things up. Even better, this water is free - apart from the electricity to run the dehumidifiers. And, they use much less than heating the workshop to just above the dew point... Chris Hi Chris, I'm fortunate enough not to need dehumidifiers because my workshop is heated 24/7 unless it's the Summer time. I can't stand working in the cold, and I often spend a lot of time out there on some commercial jobs. I might buy one of those reverse osmosis filter arrangements though, they're pretty cheap. As long as it could fill a 5 gallon plastic drum in a week, that would probably be enough. The fittings aren't that fine inside, no different to any other locomotive, even though they might give the impression that they're tiny. Using Phosphor Bronze means you can use really thin sections while retaining decent strength. The throats of the injectors are the smallest bores that will see any water, so avoiding dissolved solids getting in there is definitely worth thinking about. We're in a hard water area, so tap water isn't ideal. |
|
|
|
Post by Roger on Jan 17, 2023 22:54:30 GMT
Sorry if some of the photos aren't as well in focus as usual, I still can't see as crisply as I used to be able to. I bought some more Syringe needles the next two sizes up to make the lines a little wider. You can see from the next two photos that the lines are not only a little too narrow, but they have a slightly orange hue to them, probably due to the paint not completely blocking out the Black background. 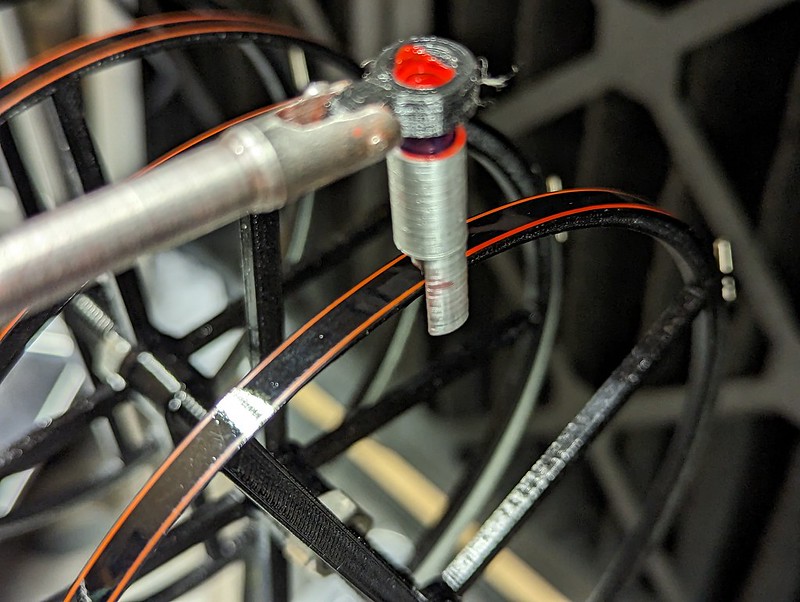 PXL_20230117_204429814 PXL_20230117_204429814 by Timothy Froud, on Flickr The one on the right has been overpainted, the LH line of the RH one is original.  PXL_20230117_204916056 PXL_20230117_204916056 by Timothy Froud, on Flickr Anyway, it's far from perfect, but it's good enough. I really want to get these finished so I can get on with assembling the Smokebox end. 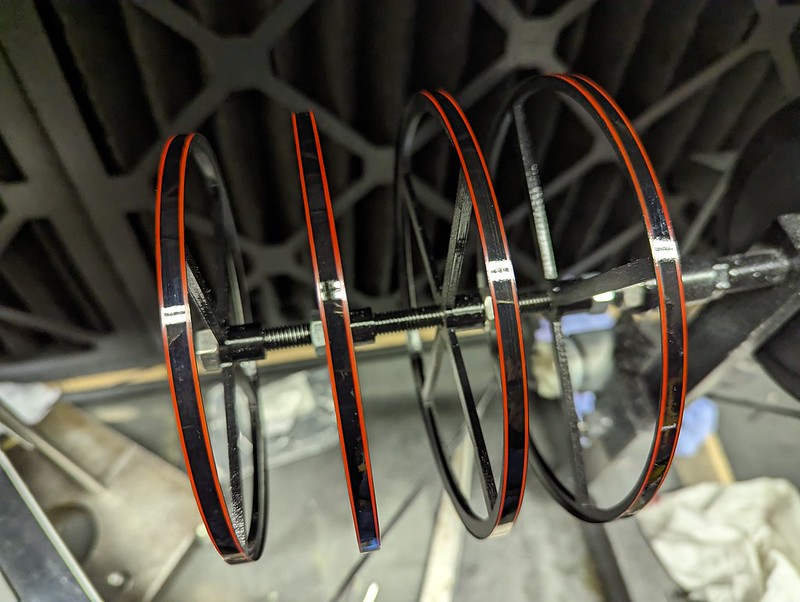 PXL_20230117_220556077 PXL_20230117_220556077 by Timothy Froud, on Flickr |
|
jma1009
Elder Statesman
Posts: 5,901
|
Post by jma1009 on Jan 17, 2023 22:56:16 GMT
Hi Roger,
I did try and edit my last post to remove my
comment about the GWR hydrostatic lubricator but my iPhone froze. So my apologies for this.
Cheers,
Julian
|
|
|
|
Post by Roger on Jan 18, 2023 7:08:23 GMT
Hi Roger, I did try and edit my last post to remove my comment about the GWR hydrostatic lubricator but my iPhone froze. So my apologies for this. Cheers, Julian No need to apologise Julian, it's a perfectly reasonable point of view. I just don't happen to agree. |
|
JonL
Elder Statesman
WWSME (Wiltshire)
Posts: 2,909
|
Post by JonL on Jan 18, 2023 21:29:03 GMT
Hi Roger, I did try and edit my last post to remove my comment about the GWR hydrostatic lubricator but my iPhone froze. So my apologies for this. Cheers, Julian I don't think there is anything wrong with expressing an opinion, especially when diplomatically put. As for the water comments, I use either the club rainwater or dehumidifier water. However I usually fill up using a 5L container with a small caravan pump connected to a length of hose and a fuel filter. That keeps the grit and crud out of the water supply and so far I've not had any issues along this line with William. My caveat is I don't have an injector. |
|
|
|
Post by Roger on Jan 21, 2023 7:55:22 GMT
Ok, so I've finally got the Boiler Bands on in roughly the right places. Those can be tightened more when the Smokebox is on. I can see why they added these lines, because it makes a huge difference to the way it looks. Obviously you won't see anywhere near as much of this when the Pannier Tanks are on. 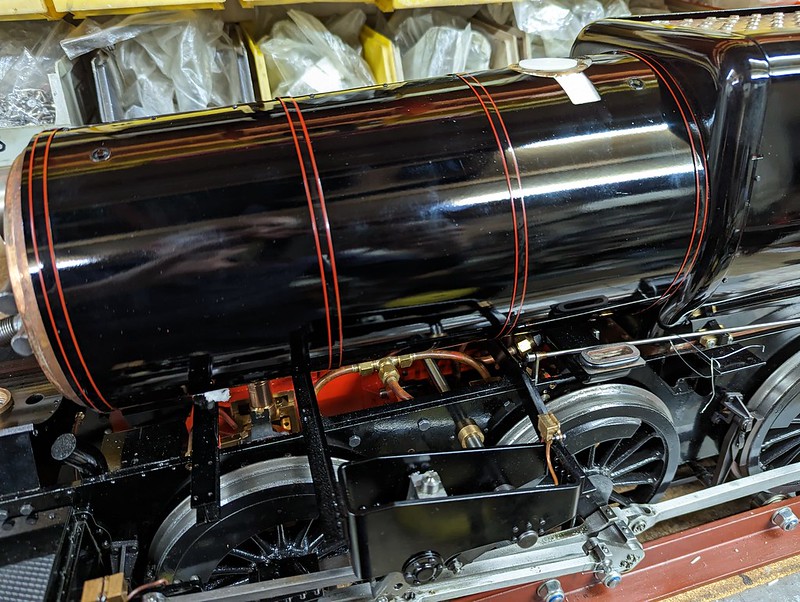 PXL_20230120_205017466 PXL_20230120_205017466 by Timothy Froud, on Flickr |
|
|
|
Post by Shawki Shlemon on Jan 22, 2023 6:26:05 GMT
That is fantastic .
|
|


