|
|
Post by ejparrott on Dec 19, 2014 15:41:02 GMT
Quite big I think, will go and look... found it... The maximum build area of this machine is 1500 x 750 x 700mm and a tolerance of CT10-11 is achievable. We are able to produce castings from this method in as little as 3 days from receipt of final CAD data. www.newbyfoundries.co.uk/nrc/newbyrapidcast_processes.htm |
|
|
|
Post by Cro on Dec 20, 2014 0:21:12 GMT
Thanks for that, good to know and will have a better look at them in the morning, someone was interested in reproducing a full size one so this could be a possibility for them.
Just left the workshop, spent today working on the vacuum valve side, good progress and I left the workshop with 4 out of 96, No. 78 (0.4mm) holes that I was drilling in the valve disc that has the handle attached to it. Will crack on in the morning and post a photo with progress and the set up with the myford dividing head, which is a new way of doing things for me.
Cro
|
|
|
|
Post by Cro on Dec 20, 2014 23:37:09 GMT
So almost 24 hours later and I have managed to drill the first ring of holes in the disc, after last nights success I had a quick half hour this morning in the workshop before shooting over to the club where I managed to bugger up what I had done last night which was a bit irritating but using such a small drill I am not surprised so after acquiring a new No.78 drill I was able to crack on this evening. Only managing to find an hour once I had got home, and I have literally come from the lathe to the PC to post these pictures, I have managed to make some progress which sets me up nicely to carry on tomorrow. So below is just a quick shot of the first ring of holes being drilled after I had gone round and spotted them all with a center drill  And here is the finished first ring, once I have done all 4 I will then skim this face so that there are no marks left from the center drill and all the holes will look better.  This image is just a quick reminder of what it is I am doing in case anyone is unsure what I am on about with all these holes. 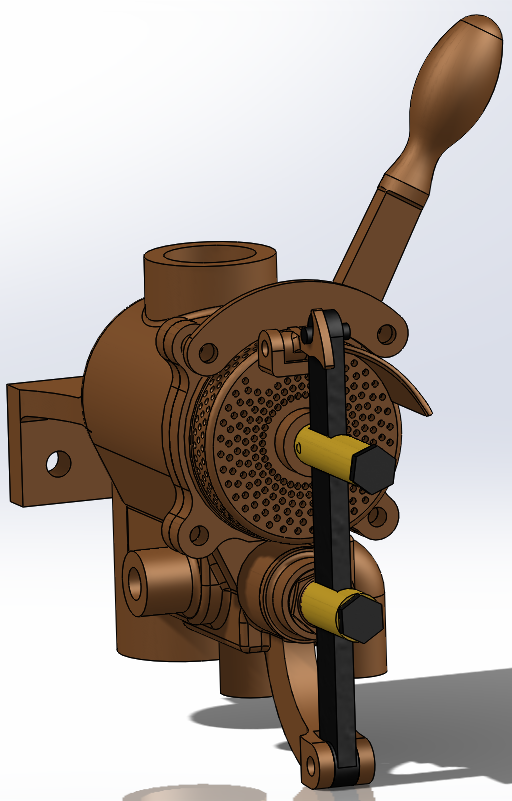 Cro |
|
|
|
Post by Deleted on Dec 20, 2014 23:48:06 GMT
So almost 24 hours later and I have managed to drill the first ring of holes in the disc, after last nights success I had a quick half hour this morning in the workshop before shooting over to the club where I managed to bugger up what I had done last night which was a bit irritating but using such a small drill I am not surprised so after acquiring a new No.78 drill I was able to crack on this evening. /quote] If you are going to replicate the image, then that's serious attention to detail, and worthy of great praise! John |
|
|
|
Post by 3405jimmy on Dec 21, 2014 8:04:04 GMT
96, 16 thou holes if you do that lot without breaking a drill I would put a line on the lotto you’re bound to win.  |
|
|
|
Post by Cro on Dec 21, 2014 12:27:34 GMT
So almost 24 hours later and I have managed to drill the first ring of holes in the disc, after last nights success I had a quick half hour this morning in the workshop before shooting over to the club where I managed to bugger up what I had done last night which was a bit irritating but using such a small drill I am not surprised so after acquiring a new No.78 drill I was able to crack on this evening. /quote] If you are going to replicate the image, then that's serious attention to detail, and worthy of great praise! John John, Due to size constraints and trying to make it as simple, think I've gone past that point already, as possible it will look like this but I hope it still looks fairly realistic.  I just realised I need to do 120 not 96....you'd think i'd be paying more attention doing all of this wouldn't you?! I just center drilled the second ring so back to the lathe to drill them! Cro |
|
|
|
Post by Deleted on Dec 21, 2014 17:17:03 GMT
Would you like one of these to help you ?? >>>>>>>>>>>>>>>>>>>>>>>  |
|
|
|
Post by Cro on Dec 22, 2014 10:41:47 GMT
Before I head back to the workshop to crack on for another day I thought I would post last nights success. After a bit of head scratching and interesting words between myself and the Myford, mainly from me, I managed to produce something I am quite proud of, although not perfect it seems to have come out very well and given me a few ideas to try for the next attempt. So attempt 2 saw the first drill head to the bin, as to be expected with doing this many holes with such small drills it would be a miracle to do them all without breaking one, but one slipped off center and found its way into another hole so that was that one ruined.  Attempt 3 saw a lot more initial success, I went away from using the center drill because at this size it just wasn't helping and was causing part of the issue with the drills breaking into other holes as it was just creating a small flat rather that a sharp center point I was after. as can be seen here I still had 2 slip over, not sure why bu the second one saw the end to my second No.78 drill (that's when I had words with the Myford) luckily I was able to grind the end again and finished off the second ring.  I then thought "Oh well this is another for the bin lets try the next drill size up and see how I get on" I'll let the photo do the talking for this one.  Now to the workshop to make another with the larger drill size and slightly larger spacing between holes and see how I get on and then to crack on with the few other parts that are left. Will try post some progress later on today. Cro |
|
|
|
Post by fostergp6nhp on Dec 22, 2014 20:15:34 GMT
A slight compromise on hole diameter and quantity might be a wise move.
|
|
|
|
Post by Deleted on Dec 22, 2014 21:02:21 GMT
------or a mini-multi spindle drilling machine..Now THERE's a tool-makers challenge !!
|
|
jma1009
Elder Statesman

Posts: 5,901
|
Post by jma1009 on Dec 22, 2014 22:00:38 GMT
hi adam,
i am very impressed, and the myford dividing head is a marvellous addition and quite rare as was very expensive.
2 things...
1. you need to sort out a way of creating a centre for very small drills. this is something very familiar to those of us who have made their own injectors - as you have found the smallest centre drill is way too big. i have some clockmaker's centre drills/spade drills if you want to try a few out. or make your own. they are quite easy to grind up from a dental burr with the head removed off a blunt one.
2. quite often one cant realistically copy exactly fullsize but you instead need to give a semblance of the fullsize thing - in this respect i endorse fostergp6nhp's comment. plus very few of those holes need to go all the way through to destroy the vacuum.
cheers,
julian
|
|
|
|
Post by Roger on Dec 22, 2014 22:42:24 GMT
That's a magnificent effort, especially with the kit you have. That's an awful lot of suffering but worth it in the end.
The material you're drilling ideally needs drills with no top rake ie no helix and I don't know if you can even get those in the size you need. It's always going to want to grab given half a chance so you've done amazingly well. A compromise on size is very sensible and it still looks right.
As an aside...
You can get away with this sort of situation with CNC because you can control the feed accurately so it doesn't grab. For that job I'd use a solid Carbide PCB drill and I wouldn't centre drill it first, they are stiff and sharp enough to centre themselves if you go gently enough. I've drilled a 0.24mm diameter hole 1.5mm deep on my mill in Brass that way. It takes time but that doesn't matter, it's not a commercial job.
|
|
|
|
Post by Cro on Dec 22, 2014 23:04:31 GMT
Julian and Roger thanks for the comments and tips, I have spent quite a bit of time changing the CAD model using less holes and so on but still felt that to try and keep the desired look this was the best so I have stuck with it for now, the chap I am doing these for actually has a CNC mill and the original plan was to do these on that but I was determined to do the first one myself and although this one isn't perfect for proving the design and that both sides of the valve can work when scaled down to this size it is sufficient and I think so far I am winning! For the image above I ended up not using a centre drill on the final two rings and just had the drill out of the chuck enough to keep it steady but get the desired depth I wanted and this seemed to work well. Silly thing is Julian Dad is a watch maker by trade but sadly we no longer "make" clocks but service and so on so I doubt we have any of Grandads old bits left but I may go up the shop tomorrow and have a look. I spent today making up the other bits for the rest of the valve including the steam brake and the connection between the two and other than waiting for the 14Ba's to arrive in the post and a few little bits it is almost finished. The valve disc I made in two parts (and a handle) and silver soldered this together, never been so nervous soldering before but I couldn't get the join on the front face wrong other wise I would start filling the holes I had just spent time drilling but luckily a steady hand and patience and I got there, I then realised the first handle I had made was much too big so some slight adjustment and this was sorted and now looking much closer to being correct.  I spent some time lapping this in with the brasso, firstly with a piece of paper sat on the drill table on the valve disc as I have found this to be very good way of doing it and then putting that disc onto the other face with more brasso, some more time spent on this and it will be just right. Here is a quick video of me trying it out (hope this works)  And since then I have just been doing all the other little bits and here it is now at the end of play today.  Hope you like, Adam |
|
|
|
Post by Deleted on Dec 23, 2014 1:45:15 GMT
Outstanding !!
|
|
|
|
Post by Roger on Dec 23, 2014 8:23:14 GMT
Agreed, that's a lovely piece of work.
|
|
|
|
Post by Cro on Dec 23, 2014 9:35:40 GMT
Thanks guys, soon I will need to hook it up to a ejector and vacuum cylinder and a steam brake and see what happens, luckily a guy at my club has a driving trolley with a vacuum cylinder on one bogie and an air brake cylinder on the other so I can possibly test it all on that!
Back to the workshop when back from the fun old trip to the dentist!
Adam
|
|
|
|
Post by Roger on Dec 23, 2014 10:05:44 GMT
Thanks guys, soon I will need to hook it up to a ejector and vacuum cylinder and a steam brake and see what happens, luckily a guy at my club has a driving trolley with a vacuum cylinder on one bogie and an air brake cylinder on the other so I can possibly test it all on that! Back to the workshop when back from the fun old trip to the dentist! Adam See if you can get some worn drill bits... you may as well get some pleasure to go with the pain. |
|
|
|
Post by Deleted on Dec 23, 2014 11:06:46 GMT
and dental burrs as well...
|
|
|
|
Post by Rob on Dec 23, 2014 11:12:44 GMT
And a dental nurse as well...
|
|
|
|
Post by Deleted on Dec 23, 2014 12:16:31 GMT
|
|


