|
|
Post by delaplume on Jan 30, 2020 16:53:25 GMT
"I've colour coded all of the small nut sizes so I can quickly put my hand on the right one."............ now there's a thought..
|
|
jem
Elder Statesman

Posts: 1,065
|
Post by jem on Jan 30, 2020 16:58:57 GMT
I have coloured all my spanners, taps dies drills and everything else, most are blue metric, green UNF and UNC red whitworth black BA this makes life much easier for me.
best wishes
Jem
|
|
|
|
Post by Roger on Jan 30, 2020 18:53:50 GMT
"I've colour coded all of the small nut sizes so I can quickly put my hand on the right one."............ now there's a thought.. I bought a bumper pack of mixed colour nail varnish from eBay for that purpose. |
|
|
|
Post by Roger on Jan 30, 2020 22:34:29 GMT
I've Loctited this lever in place so it won't move when I drill the cross hole. This was started with a 0.8mm PCB drill and finished with a 1mm HSS one.  20200130_175226 20200130_175226 by The train Man, on Flickr The double linkage gives a rapid closing to start with then a finer action and then the link is just about vertical so the cab handle can move up out of the way of the other one next to it. I'm not 100% sure how it will work out in practice, but it's easy enough to change it later if I don't like it.  20200130_200352 20200130_200352 by The train Man, on Flickr As you can see, it was a struggle to find a route through all of the obstructions to get this to work. Obviously I could have routed the pipes to a valve under the Cab floor, but it's almost impossible to retain access to remove the grate and ashpan as it is with just one pipe coming from the riding car, let alone adding another two. 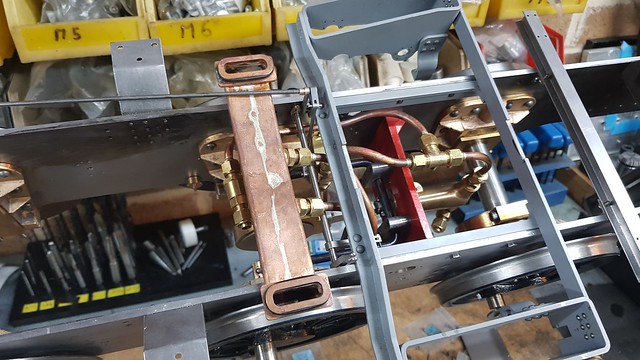 20200130_201745 20200130_201745 by The train Man, on Flickr |
|
|
|
Post by Roger on Jan 31, 2020 16:34:56 GMT
|
|
|
|
Post by andyhigham on Jan 31, 2020 17:47:55 GMT
Roger, what size rivets have you used your tool on? I assume they are steel rivets and the tool makes short work of them
|
|
|
|
Post by Roger on Jan 31, 2020 18:53:37 GMT
Roger, what size rivets have you used your tool on? I assume they are steel rivets and the tool makes short work of them These ones are 1mm, and as you say, it makes short work of those. |
|
|
|
Post by 92220 on Jan 31, 2020 19:06:55 GMT
Hi Roger.
That rivet squeezer produces an excellent job!! Does the rivet snap rotate as you turn the T-handle or stay still? Just curious as to whether it 'polishes' the rivet head or not. I'm making the former to beat out the rear firebox corner mouldings at the moment, but when I've finished that I want to make up a rivet squeezer like yours. Thanks for the drawings which will be so useful for making it.
Bob.
|
|
|
|
Post by andyhigham on Jan 31, 2020 19:26:25 GMT
Narrow gauge locos tend to use larger rivets in 5" gauge. I guess more force could be exerted by using a finer thread M8 x 1, 0.75 or 0.5
|
|
|
|
Post by Roger on Jan 31, 2020 20:12:53 GMT
Hi Roger. That rivet squeezer produces an excellent job!! Does the rivet snap rotate as you turn the T-handle or stay still? Just curious as to whether it 'polishes' the rivet head or not. I'm making the former to beat out the rear firebox corner mouldings at the moment, but when I've finished that I want to make up a rivet squeezer like yours. Thanks for the drawings which will be so useful for making it. Bob. Hi Bob, There's nothing to stop the anvil from rotating. Sometimes it does, sometimes not. If you want it to stay still, you could add flats to the anvils and a grub screw. Just be aware that the biggest issue with the press is supporting the anvils in different positions and overall rigidity. Given half a chance it will twist round rather than stay straight, so the chunkier you can make the parts away from the anvils the better. It's a compromise, but a long taper down to a small anvil area is probably the best option. |
|
|
|
Post by Roger on Jan 31, 2020 20:14:02 GMT
Narrow gauge locos tend to use larger rivets in 5" gauge. I guess more force could be exerted by using a finer thread M8 x 1, 0.75 or 0.5 Hi Andy, You won't have any problem getting enough force with an M8 thread. The problem will be rigidity long before you get to the limit of what force you can apply. |
|
|
|
Post by andyhigham on Jan 31, 2020 20:28:14 GMT
Please see Absolutely Riveting thread to avoid thread drift on here
|
|
|
|
Post by Roger on Jan 31, 2020 22:01:26 GMT
The Pannier Tanks need to move forward 1mm, so these are two new brackets being made with a 1mm offset between the holes to achieve that. Here I've roughed one out with an 8mm cutter to 14mm deep, even though the bracket is only 11mm long. The back was then finished and the inside faces cleaned up with a 4mm cutter to reduce the inside radius and leave only 0.2mm to go.  20200131_201619 20200131_201619 by The train Man, on Flickr The angle was 3D machined using a 3mm radius mill with a 0.5mm corner radius to get the 1mm radius corner. The end recess for each one was machined while vertical, one for each hand.  20200131_203955 20200131_203955 by The train Man, on Flickr  20200131_152911 20200131_152911 by The train Man, on Flickr The holes were added using a 2mm PCB drill then opened out to 2.5mm with a HSS one. The setup was around the centre of rotation, so I only had to turn it through 90 degrees to add the other offset holes. Again, the offset was on opposite sides for the two hands of the brackets.  20200131_154427 20200131_154427 by The train Man, on Flickr And this is them quickly held in place with posidriv screws for convenience at this point.  20200131_215054 20200131_215054 by The train Man, on Flickr |
|
|
|
Post by 92220 on Feb 1, 2020 8:50:22 GMT
Hi Roger. That rivet squeezer produces an excellent job!! Does the rivet snap rotate as you turn the T-handle or stay still? Just curious as to whether it 'polishes' the rivet head or not. I'm making the former to beat out the rear firebox corner mouldings at the moment, but when I've finished that I want to make up a rivet squeezer like yours. Thanks for the drawings which will be so useful for making it. Bob. Hi Bob, There's nothing to stop the anvil from rotating. Sometimes it does, sometimes not. If you want it to stay still, you could add flats to the anvils and a grub screw. Just be aware that the biggest issue with the press is supporting the anvils in different positions and overall rigidity. Given half a chance it will twist round rather than stay straight, so the chunkier you can make the parts away from the anvils the better. It's a compromise, but a long taper down to a small anvil area is probably the best option. Hi Roger. Thanks for that explanation. I was only curious to know as some commercial rivet heads could do with cleaning up! I think I might try making the snap positively rotate, to try and smooth the heads, and see what happens. It might work, it might not. If the rotating snap is on the head forming side, it might make head forming even easier, and produce a better shaped head. It's something that is easy to try for very little effort in making the snaps. I will let you know how it goes. Bob |
|
|
|
Post by Roger on Feb 1, 2020 9:12:06 GMT
Hi Bob, There's nothing to stop the anvil from rotating. Sometimes it does, sometimes not. If you want it to stay still, you could add flats to the anvils and a grub screw. Just be aware that the biggest issue with the press is supporting the anvils in different positions and overall rigidity. Given half a chance it will twist round rather than stay straight, so the chunkier you can make the parts away from the anvils the better. It's a compromise, but a long taper down to a small anvil area is probably the best option. Hi Roger. Thanks for that explanation. I was only curious to know as some commercial rivet heads could do with cleaning up! I think I might try making the snap positively rotate, to try and smooth the heads, and see what happens. It might work, it might not. If the rotating snap is on the head forming side, it might make head forming even easier, and produce a better shaped head. It's something that is easy to try for very little effort in making the snaps. I will let you know how it goes. Bob Hi Bob, I'm not sure about making the anvil rotate. Quite often you have a flat anvil on that side for flush riveting, and I think you'll find that the anvil will walk off the rivet. I don't think there's much benefit in it turning, in fact I think you're better off stopping it. That's because you often have to add a flat on one side of the anvil so you can get close enough to an inside corner, and it's a nuisance if the flat doesn't stay where you need it. |
|
|
|
Post by 92220 on Feb 1, 2020 9:23:32 GMT
Sorry Roger, I didn't make myself clear. I was meaning that the rotating anvil would be for forming a snap head on the tail of the rivet, so that there is a snap head on both sides of the seam, rather than a snap and a flat head. I can certainly see that the anvil would have to be fixed for a flat head forming. It might not work but locking the anvil would be far easier than making a locked anvil then able to rotate. I'm really just curious to see if it would work or have any advantages, rather than having any specific requirement for such.
Bob.
|
|
|
|
Post by Roger on Feb 1, 2020 10:01:16 GMT
Sorry Roger, I didn't make myself clear. I was meaning that the rotating anvil would be for forming a snap head on the tail of the rivet, so that there is a snap head on both sides of the seam, rather than a snap and a flat head. I can certainly see that the anvil would have to be fixed for a flat head forming. It might not work but locking the anvil would be far easier than making a locked anvil then able to rotate. I'm really just curious to see if it would work or have any advantages, rather than having any specific requirement for such. Bob. Ah, I see. It might help to form the head if it turns, but the biggest issue by far with any riveting is the rivet bending to one side. That will dominate the process more than anything else. Forming a full head takes 1.5x the diameter of the rivet, and unless the rivet is a very close fit in the hole that's going to be a real challenge. Personally I avoid that, prefering to use the pre-formed head where it's most visible and aiming for a smaller head where it's not so. Don't be afraid to keep stopping and bending the rivet back if it starts to bend over. Continuing is going to end in tears. For flush riveting, the smallest rivet length you can get away with is what I go for to avoid these problems as far as possible. |
|
|
|
Post by 92220 on Feb 1, 2020 12:42:43 GMT
Thanks Roger. Not having done a lot riveting, I am a bit of a novice, and still learning! All tips gratefully received!!!
Bob.
|
|
|
|
Post by delaplume on Feb 1, 2020 14:10:38 GMT
.....Avoid the Golden Rivet ??...
|
|
|
|
Post by Roger on Feb 1, 2020 17:25:41 GMT
More progress on the removable part of the bunker front to make it easier to drive. Here I'm drilling the 0.8mm rivet holes. I'm doing it this way because it's more accurate than spotting through from the top plate. I've just stripped out the hole positions and set it to the right position from the back because it's offset by one material thickness to form a ledge. The ledge is where the back plate with the bunker windows locates. This is going to take some time, so I've expanded the drill holes into linear moves and let it get on with it.  20200201_112727 20200201_112727 by The train Man, on Flickr The rear angle will just have dummy rivets showing on the rear vertical edge.  20200201_170506 20200201_170506 by The train Man, on Flickr These rivets have been squeezed into small countersinks...  20200201_170520 20200201_170520 by The train Man, on Flickr ... which were then filed smooth.  20200201_171605 20200201_171605 by The train Man, on Flickr This is where it's going to fit. The shelf and front are going to be one item, so I can drive with or without it as required.  20200201_171641 20200201_171641 by The train Man, on Flickr |
|


