rrmrd66
Part of the e-furniture

Posts: 339 
|
Post by rrmrd66 on Apr 26, 2021 9:03:43 GMT
Morning all.
This is excellent.
More examples please, including pic's. We must all have this problem.
Any suggestions about loading systems into the back of a small van (Transit Connect).
Cheers
Malcolm
|
|
rrmrd66
Part of the e-furniture
Posts: 339
|
Post by rrmrd66 on Apr 14, 2021 5:50:50 GMT
Hi Mike Like your "little people" for the Isle of Man. I too have used the car jack system. Maybe my bearing arrangement is a bit more "agricultural" than yours. However it works. Good to see you back. I love your attention to detail. Regards Malcolm  fullsizeoutput_67c fullsizeoutput_67c by Malcolm HARWOOD, on Flickr |
|
rrmrd66
Part of the e-furniture
Posts: 339
|
Post by rrmrd66 on Apr 11, 2021 16:10:58 GMT
Are 10" hacksaw blades still available I wonder? Hmm?
Hemingway Kits seems to think they are.
"The machine cuts at 90 strokes per minute using standard 10" blades and the stroke is adjustable between 2" to 3½".
Oh. Panic over. There are plentiful suppliers on Amazon etc.
The kit btw looks interesting.
Malcolm
|
|
rrmrd66
Part of the e-furniture
Posts: 339
|
Post by rrmrd66 on Mar 25, 2021 18:51:02 GMT
It really annoys me that suppliers are running prints of error ridden drawings and charging top money. A huge A0 sheet with numerous parts hardly has a fighting chance of reaching the end of the build in a legible state. All drawings should be A4 with the minimum number of parts on each, that way they can be laminated to keep them clean. Ideally the drawings should be available as PDFs to print at home. Don't get me started on fractional measurements and lack of tolerances on drawings GRRRRRR!!!!! 100% agree
Malcolm
|
|
rrmrd66
Part of the e-furniture
Posts: 339
|
Post by rrmrd66 on Mar 20, 2021 10:22:22 GMT
Track Metals in Birmingham is always very obliging. Speak to Fred via his eBay shop. Just tell him what you want. www.ebay.co.uk › str › trackmetals Good luck Malcolm |
|
rrmrd66
Part of the e-furniture
Posts: 339
|
Post by rrmrd66 on Mar 2, 2021 10:09:21 GMT
|
|
rrmrd66
Part of the e-furniture
Posts: 339
|
Post by rrmrd66 on Feb 9, 2021 7:50:15 GMT
Hello John/ngfan
Thanks for your comments.
Julian kindly checked out the blast nozzle/petticoat layout for me. This is about what he suggested. Time will tell how well it draws/drawers/draughts/steams??.
The steam valve lubrication will be done via a hydrostatic regulating valve fed from a pressurised tank between the front frames/buffer beam. Description in my next posting. Hope it all works.
Running boards etc as per DY design om my engine.
My springs have 3 spring steel elements to DY spec/design. The remainder are Tufnol strips. I hope that they are stiff enough.
Drain cock levers as per DY design. Agree they and the linkage are fiddly. The actual valves, from Blackgates, seem better suited for a much smaller scale.
I find Flickr excellent for uploading pics. You get a 1000 limit for free.
Good luck
Malcolm
|
|
rrmrd66
Part of the e-furniture
Posts: 339
|
Post by rrmrd66 on Feb 3, 2021 10:10:50 GMT
|
|
rrmrd66
Part of the e-furniture
Posts: 339
|
Post by rrmrd66 on Jan 31, 2021 7:20:15 GMT
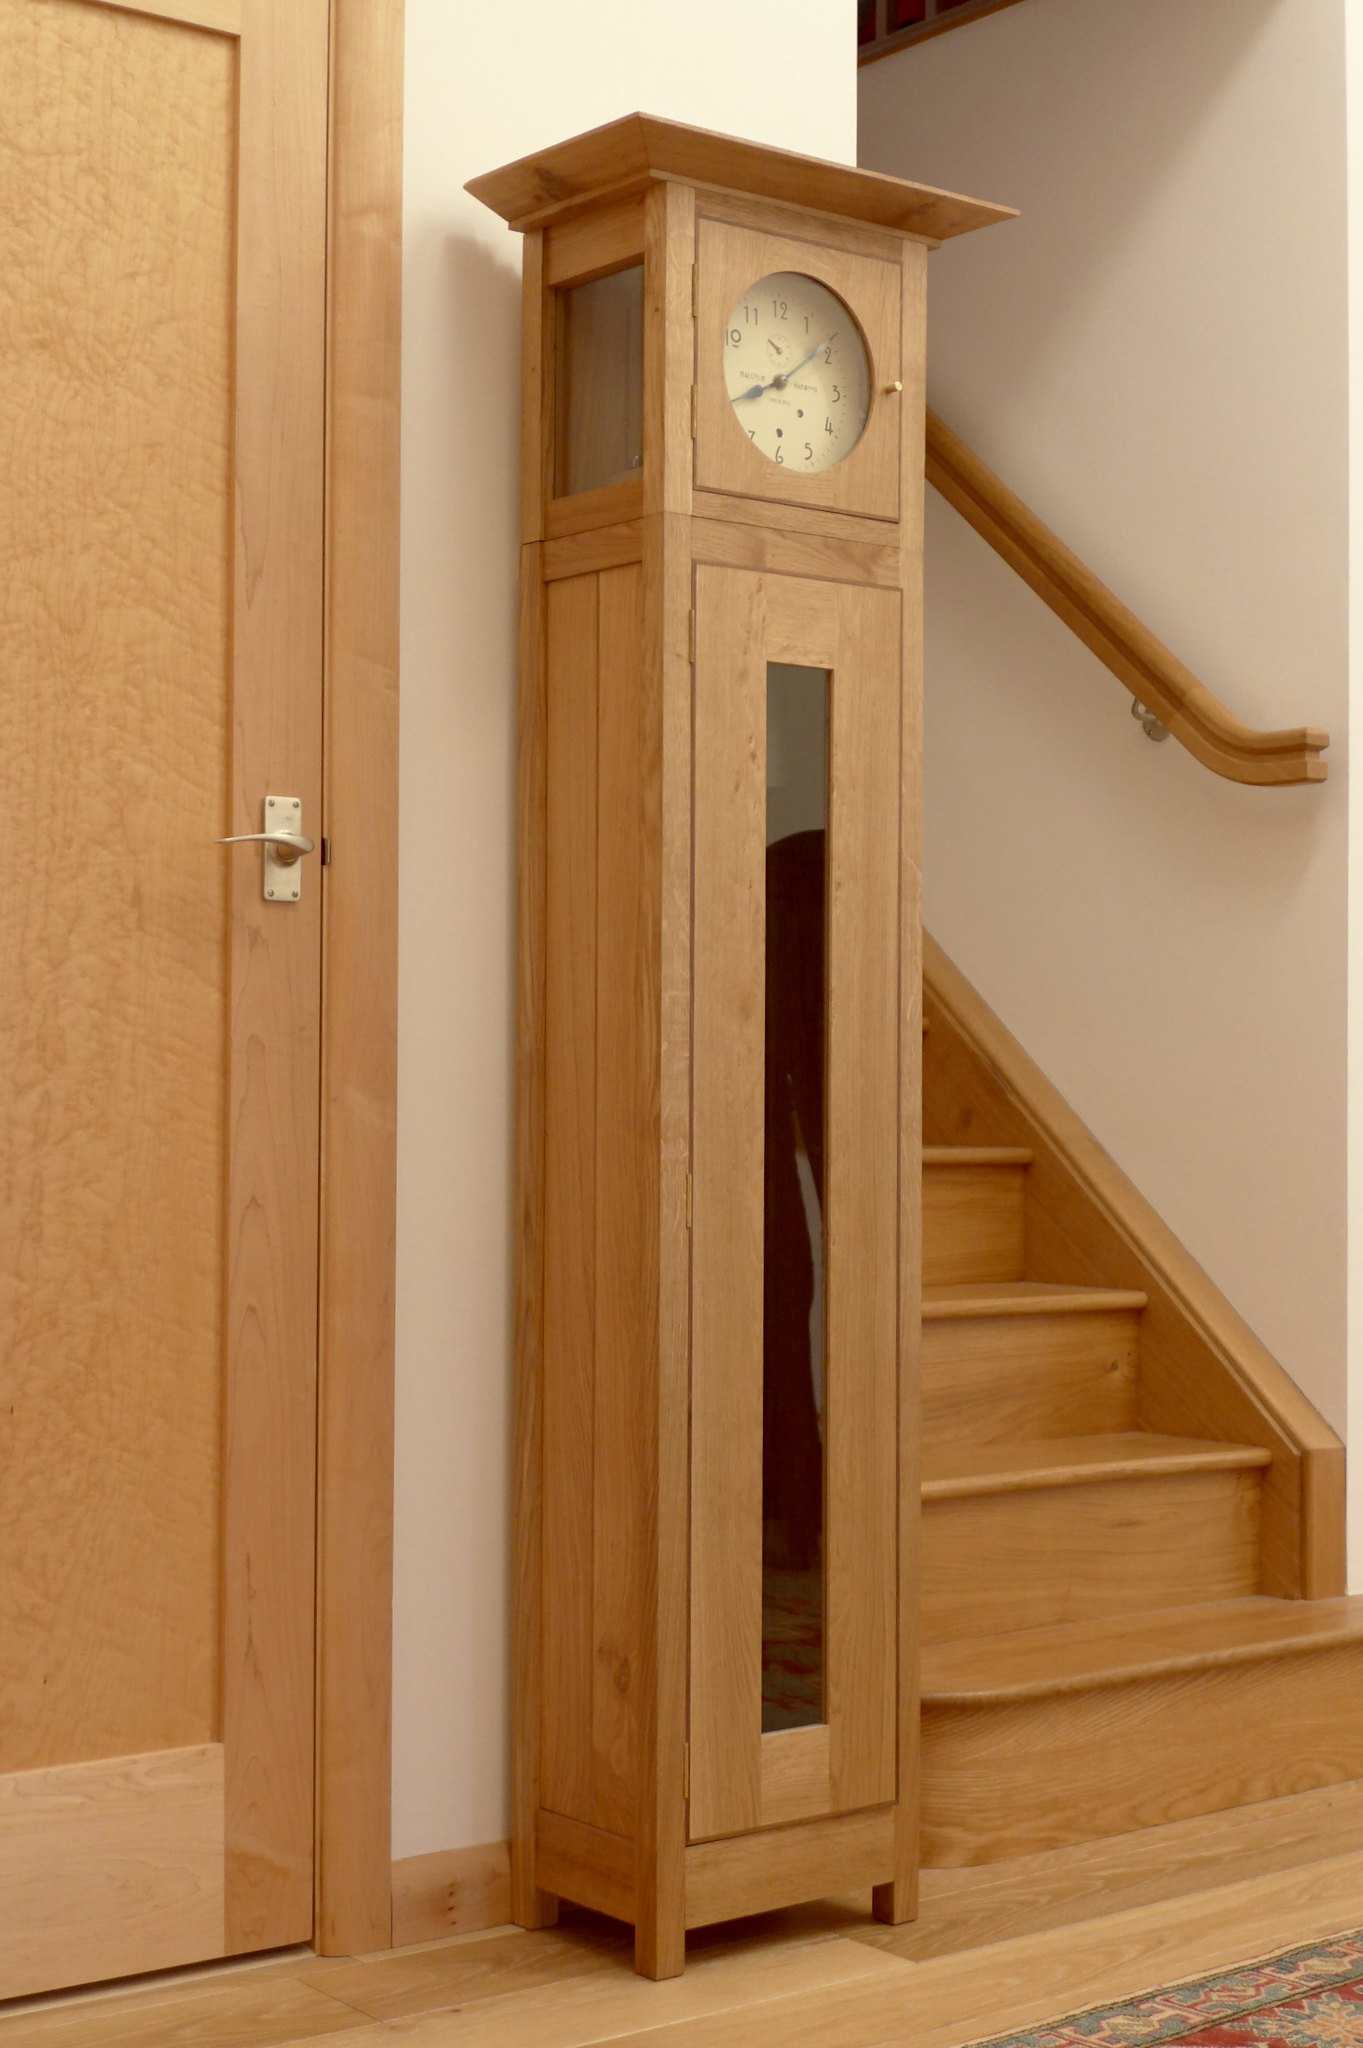
Hi David Here is the Wilding 8day wall clock in the "grandmother case"
Good Luck
Malcolm
|
|
rrmrd66
Part of the e-furniture
Posts: 339
|
Post by rrmrd66 on Jan 27, 2021 13:04:03 GMT
Hi Jordan(?)
Glad to be of help.
Good luck with your build.
Cheers
Malcolm
|
|
rrmrd66
Part of the e-furniture
Posts: 339
|
Post by rrmrd66 on Jan 27, 2021 7:29:44 GMT
Hello Simplyloco I checked this out some time ago. The Presto brand name is the original one but is now owned but the new owner/manufacturer, Suncraft International, who is based in China. The attached doesn't make clear exactly where they are produced. Maybe just sales/distribution in Sheffield. www.presto-tools.co.uk/HistoryCheers Malcolm |
|
rrmrd66
Part of the e-furniture
Posts: 339
|
Post by rrmrd66 on Jan 27, 2021 7:11:48 GMT
|
|
rrmrd66
Part of the e-furniture
Posts: 339
|
Post by rrmrd66 on Jan 26, 2021 14:45:35 GMT
Good afternoon to all of you. Here is the latest update on the build, Fitting the ashpan
This is the TIG welded stainless steel ashpan, shown previously, complete with a Blackgate's stainless grate. Note that the ashpan has a 1/4" i.d. tube through which a rod of sufficient length is pushed through two similar size holes drilled in the side frames. This located the ashpan positively against the bottom of the firebox also retaining the grate above. This is not as per DY's design who suggests a two legged arrangement fixed from the grate bars to the inner side faces of the firebox.
The ashpan is a snug fit between the frame plates with little or no room to move. The support tube was tilted upwards by about .030" right to left during manufacture. As I had to drill two 1/4" dia. holes in the frames to accept the retaining pin I was aware that this had to be done in "one shot". I overcame finding the actual centres of the support pin in the frames by making a marking out pin tool. This 1/4" dia. pin is slightly less in length than the internal width of the frames. One end has a point on
it, the other flat.
The inside of the frames has marking blue applied. The pin in inserted in the tube. The ashpan offered up to the firebox and all is held firmly by jacks under the firebox. A screwdriver blade can just be inserted at the "flat end" of the pin and it is pressed point first into the inside of the frame. This gives the centre of the pin taking into account the 030" taper. The pin is reversed in the tube and the process repeated. You now have two centre pop marks on the inner frame plates. By carefully transposing the "x" and the "y" position of the marks onto the outside of the frames you can now drill the holes insitu. I hate freehand drilling whilst trying to retain a degree of accuracy. The drill always seems to wander about. I overcame this by the use of anchored drill bushes. They can be fixed to a piece of scrap plate and of such form as to be able to be clamped over the hole centre. Boneham and Turner can supply the drill bush and anchors. (Take care with their on line shop as it has some odd glitches in invoicing). The drill bush with its anchor can be seen on the right hand side of the photo and the centre pop on the left. A ring was added later to the head end of the pin for withdrawal and a hole at the other end to take an "R" clip to ensure that the pin does not shake itself free.
With the ashpan fitted the axial position of the boiler/firebox was fixed I was now able to finally fix the smoke box assembly to the front of the engine. The time had come to fit the super heater elements into the boiler S/H tubes and connect them from the wet steam header and into the valve inlet unions. This was one of those tasks which I guessed would be problematic and kept putting off but in the event all compression joints behaved and all went very smoothly.
Consideration needs to be given however to the order all the other pieces are to be fitted into the confined smoke box space. The chimney funnel has a shouldered saddle on the outside and a contoured retaining flange on the inside of the barrel. They are connected with a through screw(x4) going through the smoke box shell. I fixed the inner flange to the 1.5" dia. chimney tube with the help of 6BA grub screws as I did not want the heavy chimney with its bronze cap falling onto the blast nozzle. The petticoat piece has to fitted as well bear in mind. This I accomplished withe engine inverted on its stand. Care should be taken when doing this as the weight of the engine is now considerable and once past its centre of gravity drops (or rotates in my case) like the proverbial lead balloon.
I had trial fitted the blast nozzle steam pipe earlier and felt certain that was one of the last things to fit. This connects blast nozzle to the inner wall of the smoke box and out via a 90° shop made union. I used standard commercial compression joints and a 5/8" AF spanner is required to tighten them. There is not much room in there. But one flat at a time and it is just possible.
The one thing I did not fit previously and maybe should have done was the smoke box door ring. The retaining 6ba csk. screws with nuts were quite a struggle to fit after the smoke box and all the other internals were fitted. This was achieved by balancing/sticking the small (one size smaller) 6BA nuts to masking tape and waving it hopefully in the dark interior of the smoke box in the hope it would find the end of the csk. screw. It worked just! Possibly best to fix this first but then that clunky 5/8" spanner may not have been quite so easy to wield.
Finally the smoke box door together with its brackets and pin, dart and crossbar, which had been finished for some time, were fitted without undue problems. The lower two of the three screws at 3 and 9 o’clock are to retain the cross bar brackets.
Front of finished smokebox with working dart.
I can now start fitting out the firebox end of the boiler with all of the relevant valves and associated piping.
More on this next time. Thanks for reading
Malcolm
|
|
rrmrd66
Part of the e-furniture
Posts: 339
|
Post by rrmrd66 on Jan 4, 2021 13:28:49 GMT
Thank you gentlemen.
I lifted the pic off the FR website. Of course it's not a Hunslet, now you tell me.
Malcolm
|
|
rrmrd66
Part of the e-furniture
Posts: 339
|
Post by rrmrd66 on Jan 4, 2021 11:58:03 GMT
Good morning and a Happy (?) New Year to all of you.
Please tell me what are the cylindrical objects on either side of the smoke box on the Hunslet pictured below.
I am guessing either Sand boxes or valve gear oil reservoirs. Any other suggestions?
Cheers
Malcolm
|
|
rrmrd66
Part of the e-furniture
Posts: 339
|
Post by rrmrd66 on Nov 30, 2020 15:15:27 GMT
Afternoon everybody.
At the risk of boring everybody silly (I ran a successful hydraulic seal company for 30+ years) I can only add to Rogers erudite comments.
Virgin PTFE, as a seal material,(especially high pressure and temperature) is pretty useless due to its cold flow/deformation under load characteristics.
It must be modified by the addition of some filler material to gain partial improvement.
Fluorosint is modified by the addition of mica. It boasts improved characteristics when compared with the unmodified, at a price btw.
Here is some blurb from the manufacturer:
FLUOROSINT® 500 (PTFE + mica) (ivory)
FLUOROSINT® 500 has nine times greater resistance to deformation under load than unfilled PTFE (tested according to ASTM D 621; stress of 14 MPa of 50°C). Its coefficient of linear thermal expansion approaches the expansion rate of aluminium and is 1/5 that of virgin PTFE. It is considerably harder than virgin PTFE, has better wear characteristics and maintains low frictional properties. FLUOROSINT® 500 is also nonabrasive to most mating materials.
Happy Sealing
Malcolm
|
|
rrmrd66
Part of the e-furniture
Posts: 339
|
Post by rrmrd66 on Nov 24, 2020 10:19:56 GMT
Hi Norman
Just Google "15mm C spanner". There is lots of choice.
Top of the list is Cromwell tools who I find very reliable with very fast delivery.
Cheers
Malcolm
|
|
rrmrd66
Part of the e-furniture
Posts: 339
|
Post by rrmrd66 on Nov 18, 2020 18:45:38 GMT
The Colchester spindle is probably MT4 1/2, they often are, and are originally supplied with a sleeve to size down to MT3. Needless to say, the sleeve usually goes missing. hi ettingtonliam
Interesting what you say.
When I first got my M300 I got a freelancer who had built the lathes at Harrison's for 40 years to have a look at it. I have kept in touch He tells me he has two spindle adaptors in his kit bag. One that is MT3/5 and the other that isn't. He calls it the "earlier one".
The guy at Colchester gave me the I've been doing this job for 20 years and it has always been MT3/5. Always helpful when you have just paid over £120 for a part that obviously will not fit and despite "the technical people" saying it will be "just a bruised spindle bore".
Cheers
Malcolm
|
|
rrmrd66
Part of the e-furniture
Posts: 339
|
Post by rrmrd66 on Nov 18, 2020 12:47:45 GMT
Good afternoon everybody. The boiler with cladding and boiler band coated with high temperature paint plus smoke box more or less fully completed. 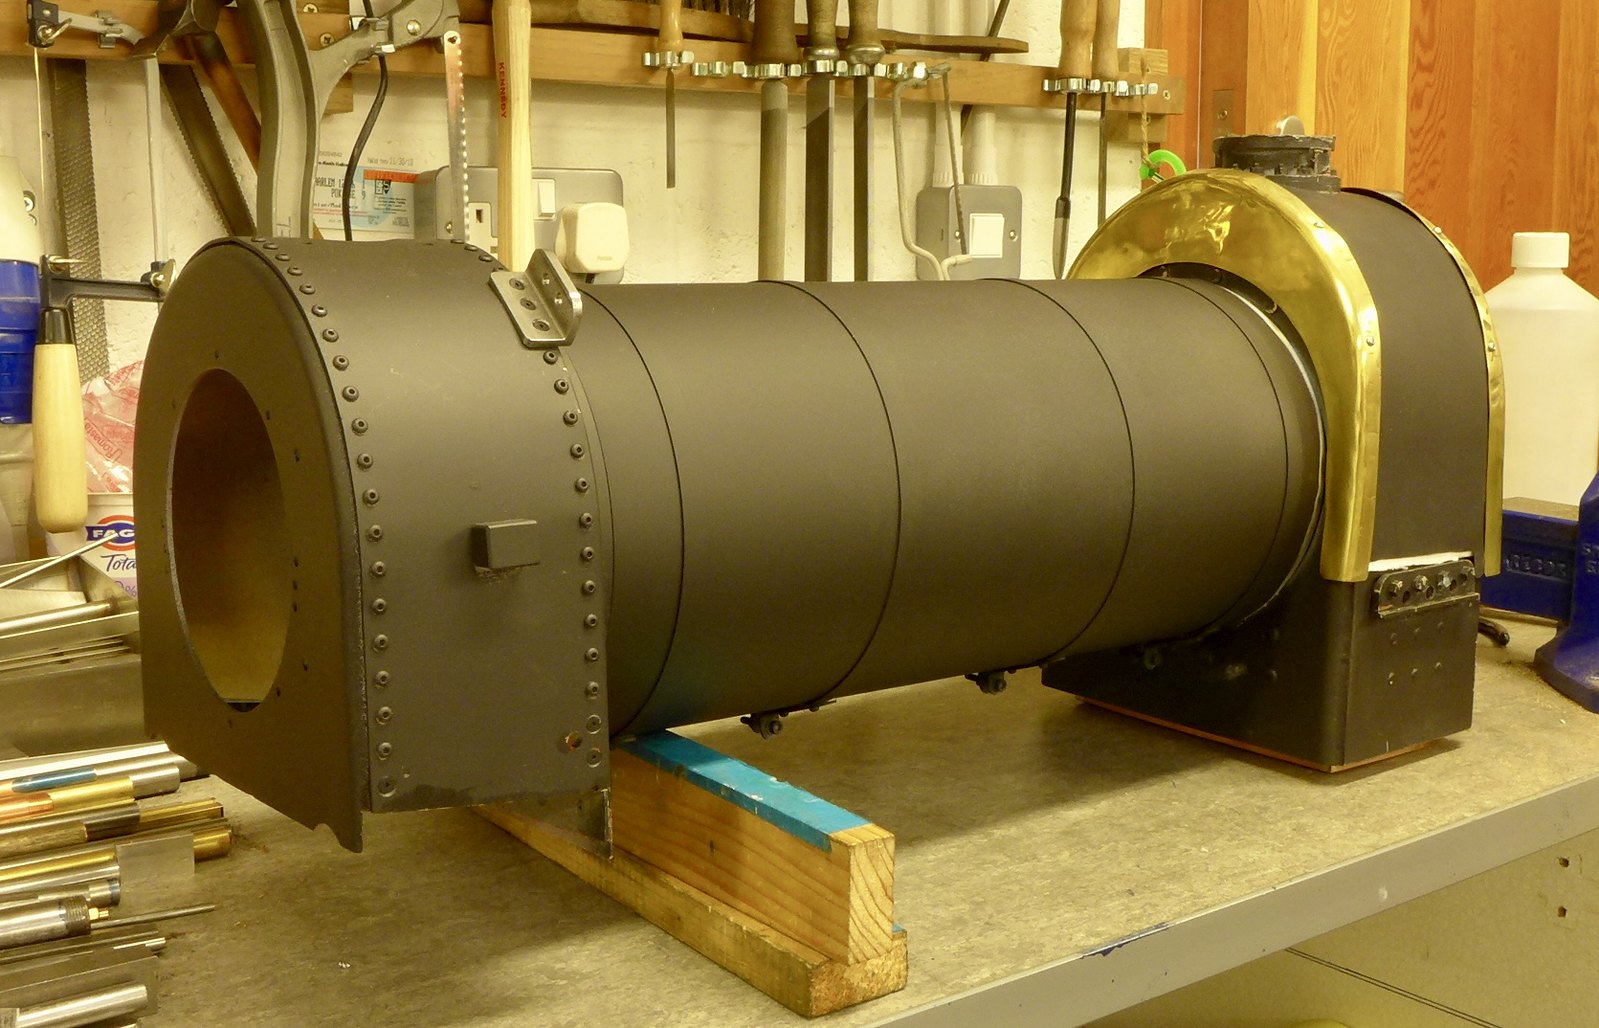 fullsizeoutput_d3e fullsizeoutput_d3e by Malcolm HARWOOD, on Flickr A few weeks since I updated this build diary. Have been stuck for along time trying to get the saddle tank soldered and water tight. After having completed the first solder up of the saddle tank I was disappointed with amount of seam leaks I had. The external application of epoxy sealing compound did not fully solve the problem. In my wisdom I unsoldered the inner wrapper of the tank, cleaned it up, re tinned the joint surfaces and started again. I made 4 more angle brackets to fix the outer wrapper to the end plates.  fullsizeoutput_d40 fullsizeoutput_d40 by Malcolm HARWOOD, on Flickr The build of this saddle tank has to be done in two separate operations. First the outer wrapper has to be soldered on top the endplates and secondly the inner wrapper. Clamping of all of the curved surfaces I found was as necessary as it was difficult. This is where I came upon the phenomena of work hardening in the brass inner wrapper as I managed to generate small cracks during the clamping whilst repeat soldering. I could have maybe got by with an internal sealant (see later) but decided to roll a fresh inner wrapper and use a high temperature solder (296°C) for the outer wrapper and a low temp solder (145°C) for the inner, courtesy of CuP Alloys. The fundamental problem with the design is that at the "bottom" of the tank the two legs (inner and outer wrappers) are only 0.5" apart and there is a real danger that you undo one whilst soldering the other. A future note to any other person wanting to build the tank for the MEL kit of parts is that the end plates are 3mm thick whilst the outer and inner wrappers at 1.5mm. The end plates act as a considerable heat sink during the soldering. MEL construction notes suggest a 200W soldering iron is all that is needed although oddly it adds they used a small micro gas torch, which I found to ineffective, as I did a 200W soldering iron. In the end I used a very ancient CampingGaz Butane blow lamp which gave just the right amount of heat. I am guessing a standard Sievert 7.5kW torch would have caused distortion. Taking the lead form one of our forum members I decided to use a tank sealing kit. I think it’s meant for rusty petrol tanks on classic cars. The kit consists of 3 parts. A Cleaner, a primer and a final coat. I think is some form of polyurethane compound. It certainly dries rock hard and has sealed the seams effectively. I still have to make sure that the numerous unions attached to the tank are water tight.  fullsizeoutput_d44 fullsizeoutput_d44 by Malcolm HARWOOD, on Flickr I made a start on finishing off the (half) cab, as it is. My problem here was the optional tapered pillars. Turning a 7" long x 7/16" dia rod with a 3° taper to a 5/32" dia. end finished with a 2BA thread may be easy for some but not for me. I managed 1 but scrapped 3. Both the Harrison and the Myford have to have the tailstock offset. I got into an argument with Colchester about a dead centre not being MT3/MT5 and asked for my money back. Probably easier on the Myford and take 0.010" cuts. I think the radius tool was the last straw and the pillars pinged off across the workshop. I reverted to plain rod in the end. The securing of the pillar at its base was another problem as it coincides with the joint between frame and buffer beam. I made a small brass spacer foot which doesn’t look so bad. Apologies to the purists!  fullsizeoutput_d4f fullsizeoutput_d4f by Malcolm HARWOOD, on Flickr Lastly for this update I have more or less completed the ash pan and damper. Beautifully TIG welded by a chap who does industrial stainless work for a living. I asked him if he liked a challenge. He certainly rose to it. I wasn't so keen on DY's hinge system and replaced it with some stainless butt hinges. I'm not too certain how long they will last with the heat and ash. I have a spare set though. I pleased with the linear ratchet though that operates the damper. Awaiting stainless fixings in this shot.  fullsizeoutput_d51 fullsizeoutput_d51 by Malcolm HARWOOD, on Flickr Next step is undercoating the saddle tank and mounting it so that I can make a start on the piping. Cheers Malcolm |
|
rrmrd66
Part of the e-furniture
Posts: 339
|
Post by rrmrd66 on Nov 16, 2020 17:23:51 GMT
|
|