|
|
Post by cplmickey on Jul 10, 2022 8:18:52 GMT
She's a beauty Adam and sounds lovely. Ian
|
|
|
|
Post by Cro on Sept 16, 2022 8:35:14 GMT
Well I really haven't had much to update over the last 12 months from the workshop, on the last page I was doing a similar update from last Gilling visit - this is going to have to change! But here it is anyway - Gilling 2022. The Black 5 was loco of choice again as sadly work on the 9f has been virtually non existent, I got a lot of stick for it not being done having promised it would - 2023 maybe??? This year I managed to finally get the transfer on having done the repaint 8 years ago, all that is left is the smokebox number plate to do and then its ready for another small rebuild. I also picked up a new driving truck, a Stove R, which looks much more in keeping in a train than the old one.  Untitled Untitled by Adam Cro, on Flickr The previous owner, Ray, who has owned the loco since the mid 70s came up for the weekend thanks to his daughter as now in his 91st year its a rather long way on his own. He was over the moon to get a chance to drive her on the ground level with some scale stock, a happy man for sure.  Untitled Untitled by Adam Cro, on Flickr Back home in the workshop I have been slowly working back on fittings and the 9f whilst Jess was away for a few days. I spent a lot of time end of last year working on the cab to get all the new fittings in and finish the back end of the loco off. During this I realise the 'scale' cab would not fit the boiler as the Winson boiler is too tall therefore I had to re-do a lot of the work I had already done. Frustrating but necessary so I have re-rolled a new cab and now working on the little details.  Untitled Untitled by Adam Cro, on Flickr  Untitled Untitled by Adam Cro, on Flickr More of this over the weekend I hope. Lastly there is another new project in the workshop but this one is for a 'rainy day' long off in the future. I have acquired a part built Duchess built to works drawings for the Ivatt variety which will be finished as 'Sir William A Stanier FRS' as per the builders original plan. John was a member of Beech Hurst and sadly passed away in 2020 and his wife has hung onto it for as long as she could but has now decided it was time to let her go but her biggest desire was to see it stay in the club. Not many in the club could take on something like this these days and I was honoured to be offered the loco so after selling off a few bits, including my first ever loco I bought with money from grandad in the form of a Rob Roy, I managed to pay for the Duchess. The work to date is exceptional, all the cylinders are from Johns own patterns as well as the cannon boxes and various others. The boiler is again to his own design to have a more scale appearance including the correct blower valve on the backhead and the manifold mounted as per full size on the angled flange, I look forward to carrying this on one day and hopefully doing Johns work justice.  Untitled Untitled by Adam Cro, on Flickr  Untitled Untitled by Adam Cro, on Flickr 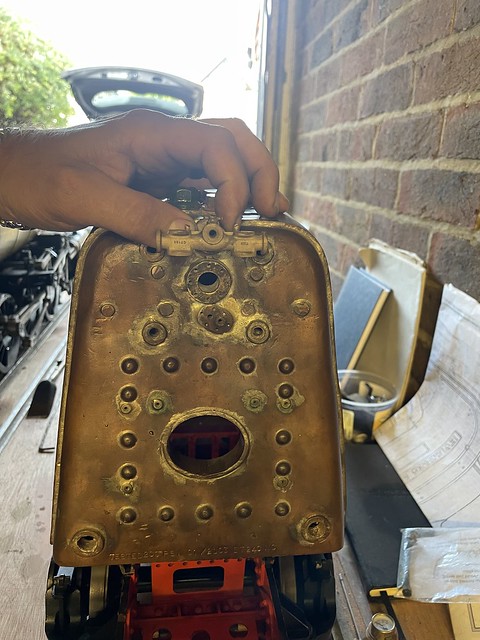 Untitled Untitled by Adam Cro, on Flickr Right, back to work! Adam |
|
|
|
Post by Cro on Feb 21, 2023 20:02:14 GMT
In my last update on "What I've done today" I said I would post more details of what I've been up to on the 9f, a few weeks later and I've got time to share some photos with you all. Back to around Christmas time and I made a start on the cab. Head back to Sep. 2021 I was working on the cab, fitting the spectacle plate, and doing the finishing touches before I realised that it was all a waste of time. I hadn't adjusted the running board height on the cab to suit the taller boiler so when I went to fit the cab the running boards looked like a ski slope. So after some measuring and adjusting the new laser cuts were in hand and the work began. There are a lot of little bits that go into this so I'll dump photos to show some of the details.  Untitled Untitled by Adam Cro, on Flickr  Untitled Untitled by Adam Cro, on Flickr  Untitled Untitled by Adam Cro, on Flickr 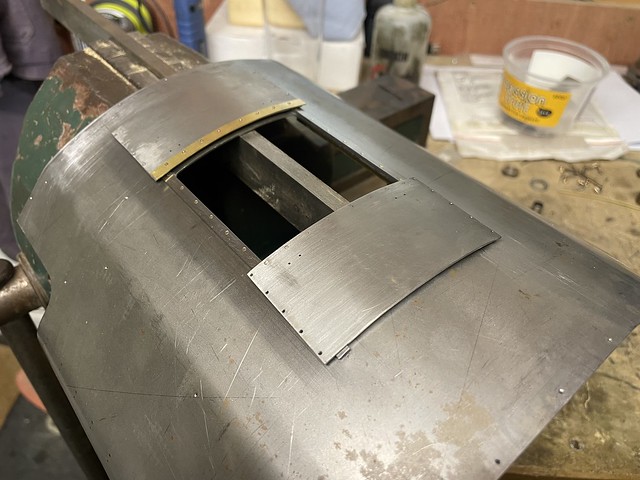 Untitled Untitled by Adam Cro, on Flickr  Untitled Untitled by Adam Cro, on Flickr  Untitled Untitled by Adam Cro, on Flickr Moving on from that I was determined to get the running boards on, very simple boring work but a good result at the end. To get the folded over edge I machined a groove half the thickness in the rear of the plate which meant folding it was a bit easier.  Untitled Untitled by Adam Cro, on Flickr  Untitled Untitled by Adam Cro, on Flickr This lead to the smoke deflectors and brackets.  Untitled Untitled by Adam Cro, on Flickr  Untitled Untitled by Adam Cro, on Flickr  Untitled Untitled by Adam Cro, on Flickr I then moved back to the lubricator theme with the new double tank lubricator all made and fitted between the cylinders, I will need to make up a split eccentric to go over the leading axle and drive the pumps. Here is it mounted to the front stretcher the sits above the pony.  Untitled Untitled by Adam Cro, on Flickr And tucked in between the cylinders.  Untitled Untitled by Adam Cro, on Flickr And lastly, this lead me to some piping.  Untitled Untitled by Adam Cro, on Flickr This week some more laser cuts arrived from Ed at MEL and I couldn't help myself getting it together.  Untitled Untitled by Adam Cro, on Flickr  Untitled Untitled by Adam Cro, on Flickr I can see what I'll be doing next, lots of shiny copper pipes! I'm still targeting Gilling in August, 6months or so to go so going to be tight that's for sure. Sorry for the photo dump, you know me, love to show lots of photos. Hopefully some more soon but bit of DIY required first which is hopefully last job in the house - the end is in site! Adam |
|
dscott
Elder Statesman

Posts: 2,438
|
Post by dscott on Feb 21, 2023 22:55:11 GMT
Bring her up to the Main Line event at the Rugby Club.
They have a superb raised track, and the members are superb.
A great place to camp or even stay in the town.
Loved every photograph.
David and Lily.
Of course we did Club Running today.
|
|
|
|
Post by terrier060 on Feb 22, 2023 16:49:08 GMT
Lovely work Adam.
Ed
|
|
tony9f
Involved Member

Posts: 95
|
Post by tony9f on Feb 26, 2023 12:07:34 GMT
Nice work Adam, she's really starting to come together. I really like the injector bracket, is it something you can supply?
I think your approach to the lubricators is a practical way to go with plenty of capacity in the tanks and probably more accurate control of oil delivery.
Tony
|
|
|
|
Post by Cro on Feb 26, 2023 20:15:34 GMT
Hi Tony,
Glad you like it, just been doing some plumbing today, will put photos up tomorrow.
Yeah can do the bracket no problem, I have a spare one here actually.
Once I’ve had some fun with the plumbing, something I really enjoy, I’ll get back to the lubricator to make the eccentric/strap & drive. I know from the year running that a 1/8” Ram was too much so I’ve made them at 3/32 which I do on all my lubricators anyway.
Adam
|
|
|
|
Post by Cro on Feb 27, 2023 13:55:59 GMT
I managed half a day in workshop after DIY was done and got on with the injectors. First task was to machined the Exhaust injector body to take the flanges, pipe fittings and the exhaust steam pipe as well as the main body features for when I make it work. Sadly no photos but all very simple set ups on the mill to machine the pad faces, tapping hole sizes and counterbore for the pipe fitting.  Untitled Untitled by Adam Cro, on Flickr Next up was to get the bracket on the frames, this meant removing an angle bracket which forms part of the rear drag beam, it will require some modification before it goes back on. I also had to countersink the fixing bolts for the rear drag beam into the frames for the same reason the bracket wouldn't fit otherwise.  Untitled Untitled by Adam Cro, on Flickr I decided to start with the exhaust pipe as the position and angle of this would heavily define the rest of the pipework as we will see shortly. I wasn't sure how best to bend this without deforming it so I started by annealing it and tried to do it by hand. This worked a treat and after annealing again I managed to get the right bend/angle without much flattening of the pipe. It did highlight that the position of the injector steam valves was too far forward as they need to come down between the exhaust pipe and the cab therefore they had to move.  Untitled Untitled by Adam Cro, on Flickr 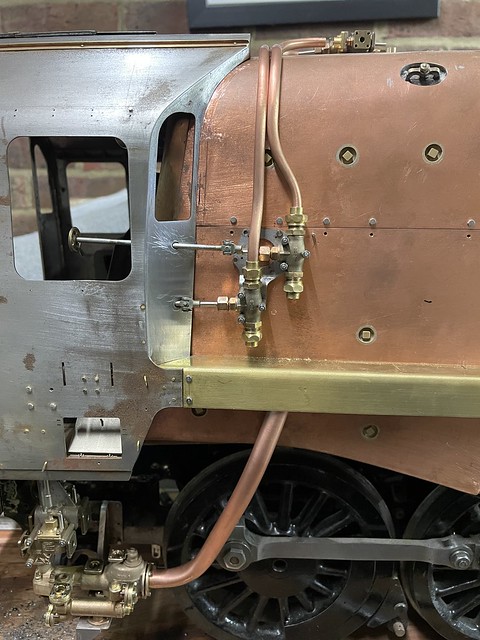 Untitled Untitled by Adam Cro, on Flickr I will have to modify the spindle length later on as now too long. Next up was a simple case of annealing and bending in the steam delivery pipes and machining a slot in the running plates to clear the pipes. 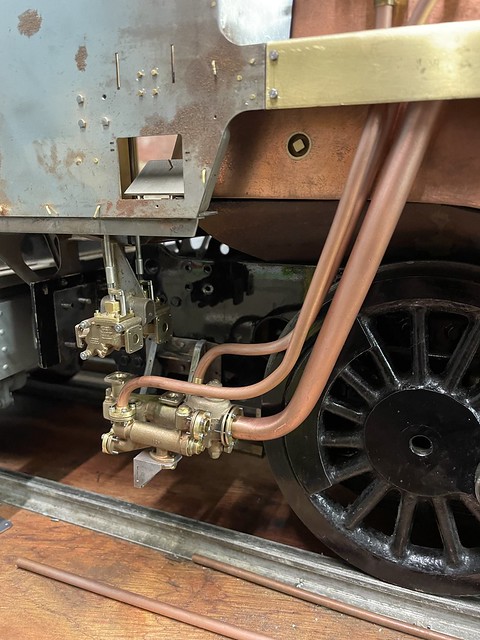 Untitled Untitled by Adam Cro, on Flickr Starting to take shape now this is as far as I got, water pipes up next which will take a bit of time as I need to make the 90deg elbow for the exhaust injector first and the 10x water pipe is quite a tight 'S' style bend.  Untitled Untitled by Adam Cro, on Flickr Lunch break over, back to work! Adam |
|
oldnorton
Statesman
 5" gauge LMS enthusiast
Posts: 696
|
Post by oldnorton on Feb 27, 2023 14:20:48 GMT
..... machining a slot in the running plates to clear the pipes. Hooray ! a knowledgeable loco chap among the wretched tide of 'running boards'  Nice to see this part of the build Adam as it reminds me so much of my Britannia pipework being put on, and the layout on a 9F is so similar. I had A4 photocopies of firebox and cab side photos to work from to get all those pipes in the places that full size had them. It is when doing this that you realise little things like cleading seams and washout plugs are not quite where you would like them to be  That exhaust steam supply pipe flange bend is very tight on a Brit, I assume the 9F is the same. I used the thickest wall tube I could find (1/8 inch wall) and bent it red hot to get the radius. Norm |
|
|
|
Post by 92220 on Feb 27, 2023 14:29:15 GMT
Hi Adam.
Those injectors look fantastic. The loco is really going to look amazing when finished. Nobody will believe it could possibly a Winson kit. Oh. My mistake. It's a Cro Kit!!! Brilliant!! Please can you put me down for a pair of castings too? I've sent you an email.
Bob.
|
|
|
|
Post by Cro on Feb 27, 2023 14:41:59 GMT
..... machining a slot in the running plates to clear the pipes. Hooray ! a knowledgeable loco chap among the wretched tide of 'running boards' Nice to see this part of the build Adam as it reminds me so much of my Britannia pipework being put on, and the layout on a 9F is so similar. I had A4 photocopies of firebox and cab side photos to work from to get all those pipes in the places that full size had them. It is when doing this that you realise little things like cleading seams and washout plugs are not quite where you would like them to be That exhaust steam supply pipe flange bend is very tight on a Brit, I assume the 9F is the same. I used the thickest wall tube I could find (1/8 inch wall) and bent it red hot to get the radius. Norm Norm, Been guilty of running board club for many years until chatting to a friend at weekend about the details and he got it right made me realise! Yes the bend probably should be tighter and it does come very close to the rods on the rear drivers but its safe enough. But yes you spot on the little issues here and there but such is life, I'm pleased with the results so far. 9f and Brit together in August? Adam |
|
|
|
Post by Cro on Mar 17, 2023 20:11:57 GMT
The work on the 9f injectors lead me back to the test boiler and trying to nail the 10xs. It’s not perfect yet but I’m pleased with the progress, certainly the best attempt so far at these. Some final adjustments to be made to get the overflow running completely dry over the full range but so far so good. flic.kr/p/2onH8FMAdam |
|
oldnorton
Statesman
5" gauge LMS enthusiast
Posts: 696
|
Post by oldnorton on Mar 17, 2023 20:43:00 GMT
Lovely to see those working. My only question would be whether the test allows for the long pipe run up to the top feed and the sharp bends past the ball. I would guess it will be fine. I have got a good 28oz injector under the cab floor pushing through a dummy 10X and on up to the top feed, That is a long way and it just works. I would be very tempted to re-pipe mine and fit one if you offered them for sale  Now you just need a working Metcalfe exhaust injector to match it  Norm |
|
|
|
Post by Cro on Mar 18, 2023 7:33:13 GMT
Norm,
That’s a very good question, and the answer is I don’t know. When I get it into johns test rig I think he has a much longer run between injector and balance valve so we shall see then.
The aim is to sell these hence why I’ve put so much effort into learning about producing them and tooling up for each and every part of the process. I have had quotes to CNC all the parts leaving me to machine the bodies and the prices are very good, next step will be a trial set to see if they can produce the parts required to the tolerances needed but having now done a set (or 5) to get this working it’s not as time consuming as I expected it to be.
The exhaust will be up next, I am just doing the cone drawings now as I have the man flu and got something in my eye Thursday night in workshop and have scratched my cornea so not in any state to spend the day on DIY or the workshop. I’ll be catching up with paperwork, posting etc etc.
Adam
|
|
|
|
Post by Cro on Feb 21, 2024 8:01:11 GMT
Coming up to 10 years of doing these fittings now and I've finally taken the step into the world of owning a 3D printer - crazy considering the whole business is based around this manufacturing process! More to come soon but here is my Anycubic Mono X 6k - some more setting up and learning to do at the weekend before I try and print anything.  Untitled Untitled by Adam Cro, on Flickr Aim is to use it for jigs and fixtures, maybe some patterns and cores and if I get on well with it I will try some castable resins too. Adam |
|
|
|
Post by Cro on Mar 6, 2024 14:40:22 GMT
To follow my last post here are some results from the printer - I am amazed at the quality of the prints from what is essentially a low cost hobby printer. The parts in question I have been practicing with are 7 1/4" BR Tender Filter Boxes as these were not a viable part to print in wax due to the size & price. Having a flat surface also made them a simpler part to start with and learn all about the support process. To get to the point I have below I did 6 different test prints with different setups. This is the parts in the build plate software allowing for position and support structure. You can have as much as you like on the build plate it won't increase the build time, this is only affected by Z height so 1 box or 6 takes the same amount of time to print.  Untitled Untitled by Adam Cro, on Flickr After 6.5 hours on the print (left overnight) this is what you come back to. 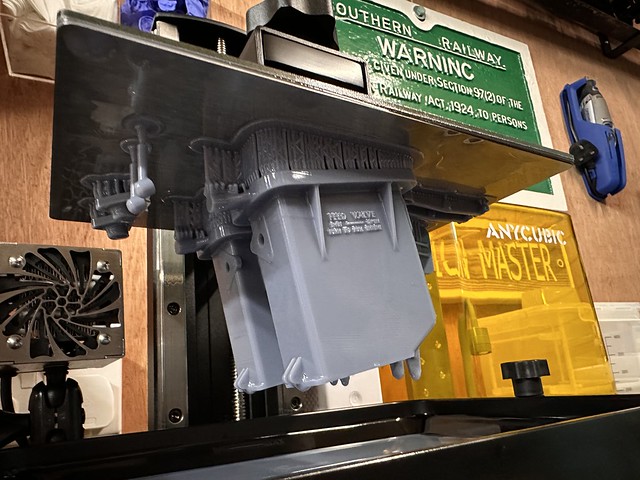 Untitled Untitled by Adam Cro, on Flickr All parts washed in Isopropyl Alcohol.  Untitled Untitled by Adam Cro, on Flickr The support structure when removed.  Untitled Untitled by Adam Cro, on Flickr Surface finish and detail is brilliant.  Untitled Untitled by Adam Cro, on Flickr Some may look at this and ask "why did you print on an angle". This is what I spent time playing with as I wanted to avoid supports on the other surfaces and keep the part flat but this type of printer relies on the adhesion of the first layer on the build plate being greater than the adhesion of the last printed layer on the bottom of the resin tank when increasing the Z height for each layer. If the suction of the liquid of the adhesion of the last printer layer is too great you end up with this.... 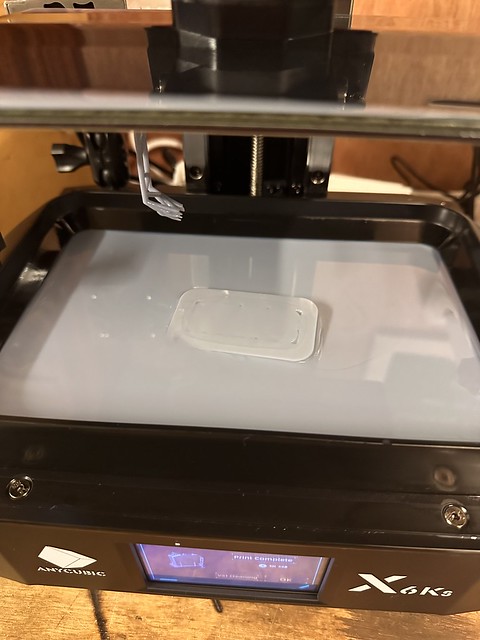 Untitled Untitled by Adam Cro, on Flickr In a similar way if the support on the edges is not enough during this "battle" for adhesion you get sagging. 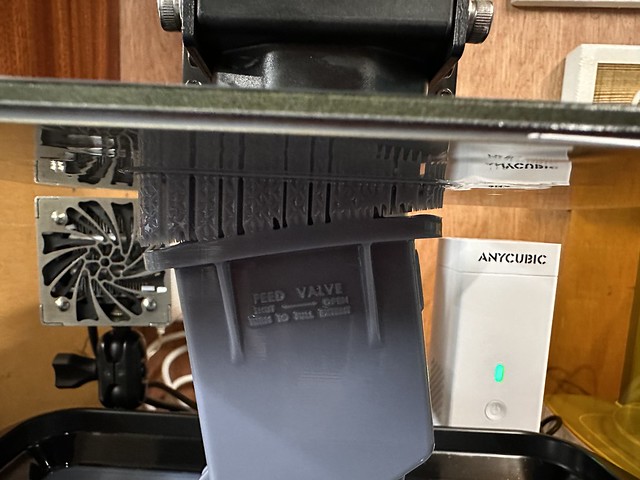 Untitled Untitled by Adam Cro, on Flickr So far a really interesting learning experience. The main plan for the printer was to print machining jigs and fixtures for the castings as I have had done externally before but I have sent these to the foundry as the supplier claims the resin is suitable for burnout so I will be interested to see how it turns out. This set of parts above has cost around £3-£4 in resin. More to follow! Adam |
|
|
|
Post by suctionhose on Mar 6, 2024 21:17:33 GMT
Not being an avid follower of 3d printing, your pictures and explanations didn't make much sense because the prints looked like they were hanging upside down!
Having done some searching over breakfast, now I understand your printer is not a filament printer like most people have played with but a RESIN PRINTER where the UV cured resin builds down from the top and emerges like a creature from the bog...
Now I understand what you're saying and why you chose that type of printer; for the smooth surface resulting. Interesting.
|
|
|
|
Post by Cro on Mar 6, 2024 22:08:59 GMT
Hi Ross,
Sorry didn’t explain that too well but yes you have it spot on. I sponsored a kickstarter project back in 2016 which was based around a mobile phone as the light source to do this exact process but sadly it never came to fruition but 8 years later these printers are affordable and producing great results. Some castable resin turned up today so I’ll be giving that a go shortly once I’ve tried a few more parts out on the basic resin as it’s far cheaper.
Adam
|
|
|
|
Post by keith1500 on Mar 7, 2024 7:24:40 GMT
Just curious. Picking up on two things you have mentioned which sound really interesting; Burn out and castable resin.
This means your resin print goes direct to the foundry and is used as the pattern, only they burn it out rather than extract it.
|
|
|
|
Post by Cro on Mar 7, 2024 8:39:14 GMT
Just curious. Picking up on two things you have mentioned which sound really interesting; Burn out and castable resin. This means your resin print goes direct to the foundry and is used as the pattern, only they burn it out rather than extract it. Hi Keith, That's correct, just like we have been doing with the direct wax printing but now with a resin instead. My main intention is not to do this all myself as the castings Mike supplies me are still top quality but it gives me options and allows me to play around with things a bit more. Adam |
|


