barlowworks
Statesman
  Now finished my other projects, Britannia here I come
Posts: 878 
|
Post by barlowworks on May 12, 2017 21:26:34 GMT
Hi everybody
I have been been reading this forum for quite some time and have even contributed to one or two threads where my limited knowledge has allowed.
The big question I have is are you all ready for yet another Britannia thread. Probably a bit of history may be prudent at this point. I have been active in the model railway hobby for over 45 years and in all that time have never modelled anything bigger than O gauge. I had always admired live steam in the larger scales but never really considered that I had the skills (or the equipment) to do it justice so never got involved.
A friend in the O gauge group got involved in the 16mm garden railway at our local society here in Sheffield and asked me along. Having seen them I thought " I've got to get one of these" so about 35 years of modelling in O gauge literally went out of the window right there. He also started building a Polly loco, the O&K 0-6-0 and there started the top of a very slippery slope. Once the loco was complete and the teething problems ironed out he said do you want a go. Before long I had my first wiff of steam oil and had well and truly got the bug.
I managed to upgrade my workshop with a Warco lathe and mill and when I retired decided a retirement present was in order. The little O&K was a delight and I did consider one but have always been a main line fan at heart so decided a go for something like a Jinty or a Pannier in 5 inch gauge, you know, something reasonably small. Round about that time I saw advertised a part built Britannia complete with certificated boiler and most of the machining done so it seemed ideal for a novice, just a bit big. Also it was built from the Perrier drawings which were included so I thought, why not, give it a go. Luckily it went into my car but upon getting it home I discovered problem number one. My workshop, which had been perfectly adequate for O gauge for 35 years was now tiny and I found I could get the loco in but never turn it round.
A year on and I had managed to extend the workshop, convincing the domestic authorities that it was required as an essential part of the construction on the conservatory I was building at the time. So finally I can make a start, with the part built tender being the first thing to be tackled.
Oh I forgot, I'm also building an O gauge A4 for a friend and have a 16mm garden railway to complete. Who said I would spend all my time in front of the TV. There aren't enough hours in the day at the moment.
Mike
|
|
|
|
Post by Rex Hanman on May 12, 2017 21:53:18 GMT
Mike, There were 55 full size Brits so there must be room for 55 scale ones on this forum. Just pick a vacant munber!  |
|
|
|
Post by springcrocus on May 12, 2017 22:10:07 GMT
Of course the forum is ready for another Britannia project, the same as it is ready for ANY new project. Every one of us has something to contribute and something to learn. We all do things slightly differently due to available resources and one person's "I always do it this way" is another person's "Ah ha!" moment. The main thing to remember is that it is not a competition. Just set your own goalposts and start the project. You may move the goalposts at a later date, or not, as progress dictates. There is only one person you need to satisfy.
Take my own build. Limited funds and resources, so I build to the level that pleases ME. Some may like my work and others may be critical of my somewhat slapdash manner. It matter not, I enjoy what I do, and sharing with others adds to that pleasure.
I genuinely believe you will enjoy your project more if you share it with your peers, rather than remain a solitary person in your workshop. And, like you, I model in other scales (half your size) and skills can often cross scales comfortably. So I say, "Go for it, Mike" and let us all be enriched by another source of inspiration and learning. We cannot have too many projects running, in fact the more the merrier. Often I look in here and think that everyone has packed their bags and gone home!
Regards, Steve
|
|
|
|
Post by Deleted on May 12, 2017 22:10:58 GMT
I for one look forward to your progress Mike, you can never have too many build threads IMHO of course...I also build O gauge, as does Jim who I'm sure you know is also building a Brit from Perrier drawings....I'm even part way through an O gauge A4 too, have built a J71 and brake van, all LNER of course, oh and a turnout using templot for a 31.5mm track gauge. I also have a Martin Finney Gresley A1 with corridor tender sitting under the bench awaiting it's turn. I won't be doing anything re-layout though not before 4472 is finished at least.
Please do start a build thread, I'm sure others will enjoy it as well...
regards
Pete
|
|
barlowworks
Statesman
  Now finished my other projects, Britannia here I come
Posts: 878 
|
Post by barlowworks on May 12, 2017 22:50:20 GMT
Thank you for your support gentlemen, I will certainly document things as I go. I've already made a start but will put it into a proper post later. The other important thing I'm hoping to get from this thread is help with the " how do I do this" and "how does this bit work and where does it go" type of question that I'm sure will crop up on a regular basis.
Many thanks in anticipation
Mike
|
|
|
|
Post by Jim on May 13, 2017 1:43:30 GMT
Are we ready for another Britannia build thread? Of course we are Mike.
Every one has their own way of building models, there is no 'only way' despite the odd claim that there is so Mike please start your build thread and I'm certain we will all gain from it. From a personal view point I've gained immeasurably from the other Brit and Clan builders, ranging from ideas to detailed drawings of components to add that extra sense of authenticity even, as in my case they are mostly nonworking.
Looking forward to you first posting.
Jim
|
|
|
|
Post by Jim on May 13, 2017 1:47:28 GMT
........... I also have a Martin Finney Gresley A1 with corridor tender sitting under the bench awaiting it's turn. I won't be doing anything re-layout though not before 4472 is finished at least. Please do start a build thread, I'm sure others will enjoy it as well... regards Pete A Martin Finney Gresley A1?  I'm green with envy Pete, LNER green of course. Jim  |
|
|
|
Post by Deleted on May 13, 2017 6:17:45 GMT
........... I also have a Martin Finney Gresley A1 with corridor tender sitting under the bench awaiting it's turn. I won't be doing anything re-layout though not before 4472 is finished at least. Please do start a build thread, I'm sure others will enjoy it as well... regards Pete A Martin Finney Gresley A1?  I'm green with envy Pete, LNER green of course. Jim  I've had it a while now Jim..must be getting on for close to 10 years...it's a masterpiece...still untouched in the two boxes..I have the motor/gearbox, all wheels, premier rods etc and many Larrie Giffin castings for extra detail....whether I ever get around to building it is another matter altogether....and yes....LNER green of course....  Pete |
|
barlowworks
Statesman
  Now finished my other projects, Britannia here I come
Posts: 878 
|
Post by barlowworks on May 14, 2017 15:42:06 GMT
It started with a buffer, why. Well, looking for somewhere to start I noticed one of the buffers was seized. It seemed like a good place to start. This is a shot of one of the original buffers, this one is on the front buffer beam. Both the rear ones striped down ok when I worked out how they come apart so I removed all the primer and set too. 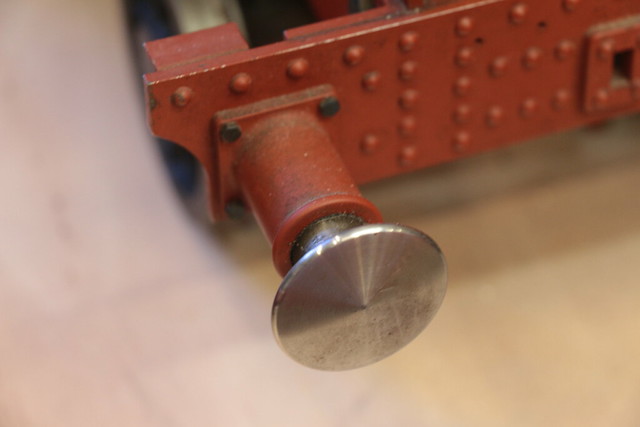 IMG_1307 IMG_1307 by Michael Cawthorne, on Flickr The buffers were upgraded with buffer steps from Doug Hewson and I made up some of the cover plates that go behind them as a finishing touch. Notice the mod I made to the clamp to hold the items in place. They are soft soldered to the buffer bodies but are really secure, I'm not yet confident enough yet in my silver soldering. 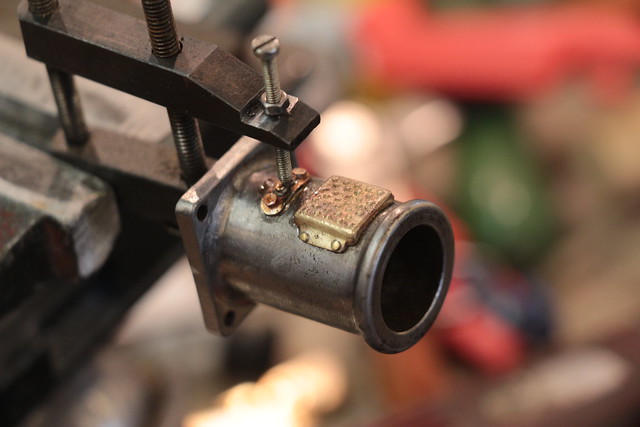 IMG_1309 IMG_1309 by Michael Cawthorne, on Flickr These are the buffers completed. They will be bolted back onto the buffer beam eventually with a nut and washer showing, not a bolt as was the case originally. 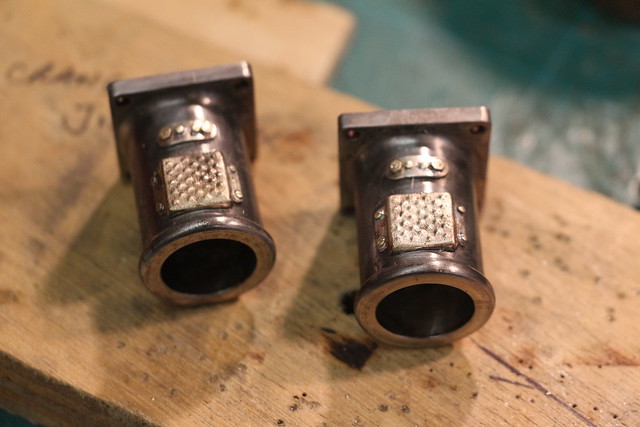 IMG_1310 IMG_1310 by Michael Cawthorne, on Flickr So I'm off and running, next will be a look at the buffer beam itself. Mike |
|
|
|
Post by 92220 on May 14, 2017 15:59:15 GMT
Nice one Mike....or should I say two? Those buffers are a great improvement on the original simple ones. If these are an indication of what is to come, it will end up a really good looking loco. Keep the posts coming. As Steve says, we can all learn from how others tackle a job.
Bob.
|
|
|
|
Post by Deleted on May 14, 2017 16:38:26 GMT
nice 'pair of buffers' sir...  Pete |
|
|
|
Post by Jim on May 14, 2017 21:27:28 GMT
Lovely work Mike I must say. Personally I see no problem soft soldering details like the steps on your buffers. Another alternative to soft lead solder if you're looking one, is the low melt silver solder used in the plumbing trade for water pipes etc. I keep the hard silver soldering for the jobs that require it such as boilers and boiler fittings or parts subjected to heat or are load carrying plus out here it costs an arm and both legs to purchase.  Jim |
|
barlowworks
Statesman
  Now finished my other projects, Britannia here I come
Posts: 878 
|
Post by barlowworks on May 14, 2017 22:15:15 GMT
I wasn't aware of that Jim, I'll have to look into it, thanks for the heads up.
Mike
|
|
barlowworks
Statesman
  Now finished my other projects, Britannia here I come
Posts: 878 
|
Post by barlowworks on May 15, 2017 20:59:39 GMT
On to the tender rear buffer. The more I looked at this, the more it looked wrong. Built exactly to the Perrier drawings. it was only when I looked at the real thing that I realized what was wrong. The 4 holes in the centre are for 6ba retaining bolts. 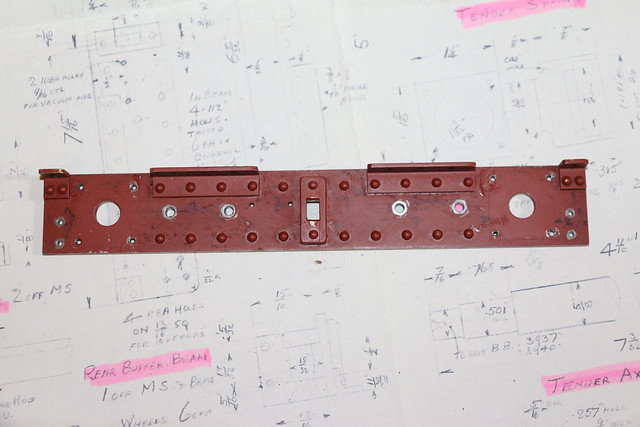 IMG_1312 IMG_1312 by Michael Cawthorne, on Flickr This is part of the rear tender buffer beam from Oliver Cromwell, quite a bit different. Firstly there are 7 rivets between the hook and the buffer not 5. The buffers are held on by nuts and washers not bolts, there is a mounting plate for the steam heating pipe and a bracket for the vacuum pipe. Also the tender tank mounting bracket holes are wrong and there are no rivets in the coupling hook plate and no huge great big bolts holding it on.  I don't want everyone to think I'm a rivet counter, if there are 157 rivets I can cope with 155 but if there are 7 I can't live with 5. 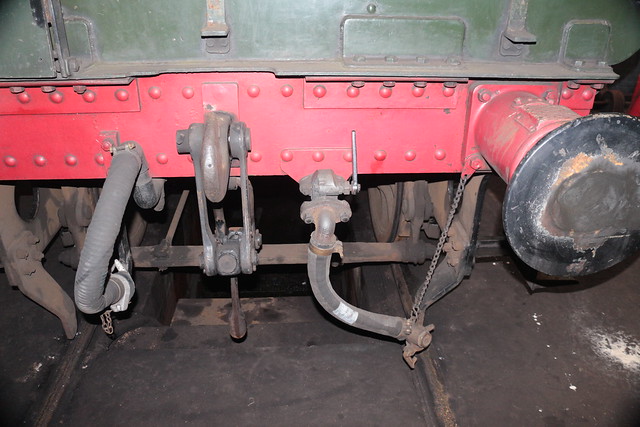 IMG_0906 IMG_0906 by Michael Cawthorne, on Flickr Not trusting myself to make a new buffer beam and get all the holes in the right place (that confidence thing again) I ground of all the rivet detail and started again. 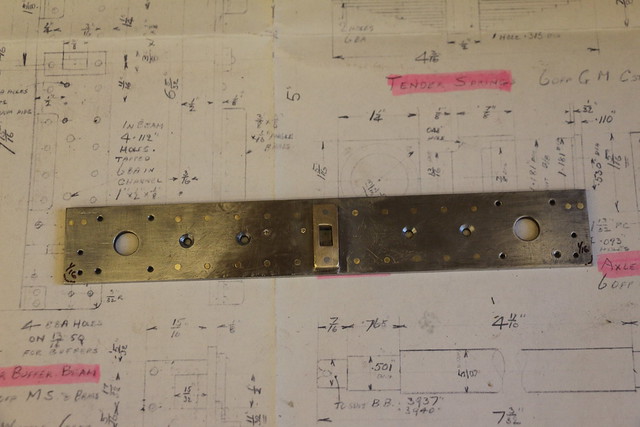 IMG_1313 IMG_1313 by Michael Cawthorne, on Flickr This is just about the final result. Some more Hewson goodies and the fixing bolts are now countersunk and will be filled before painting. The buffer fixing bolts will also be cut to length. I particularly like the little retaining tab on the bottom bolt for the steam heating hose, the work of a few minutes but quite noticeable now its there. The retaining chain will eventually be 2 rigid links with a loop as fitted to 70018 Flying Dutchman in 1955. 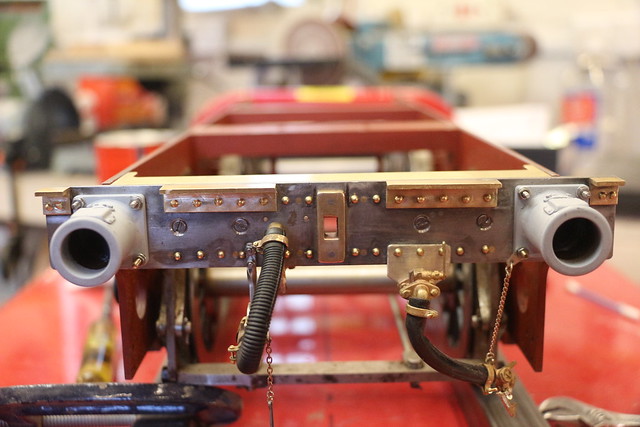 IMG_1323 IMG_1323 by Michael Cawthorne, on Flickr Now I'm going to look at the front tender drag box. I know it has a big engine in front of it but the one that is on at the minute is a blank sheet with a central casting. I'm sure I can do better than that, even if it can only be seen when the tender is uncoupled. Mike |
|
|
|
Post by Deleted on May 15, 2017 21:14:05 GMT
Nice work Mike, I can see that this is going to be a very fine model...keep up the good work sir..
Pete
|
|
|
|
Post by Jim on May 15, 2017 22:22:30 GMT
JP does take a fairly agricultural approach to how various components are attached to the frames and the buffer beams are a classic case. I found the photo collections of Paul Orrell and Nigel Fraser Ker invaluable for getting details right. The other great source of mods made to the Britannias can be found here on David Hey's site: www.davidheyscollection.com/page90.htmJim |
|
|
|
Post by Jim on May 16, 2017 1:06:42 GMT
|
|
barlowworks
Statesman
  Now finished my other projects, Britannia here I come
Posts: 878 
|
Post by barlowworks on May 16, 2017 6:43:28 GMT
Thanks for the reminder Jim. I am aware of these sites but as my last post shows you can't have enough prototype information. This is one of the reasons why I chose a Britannia even though I'm a complete novice, the prototype information is very good and the number of build threads are a god send to a poor metal botherer like myself. Also good old YouTube has a lot of very interesting posts on any theme you care to think off. My latest find is a channel by "no23mk2" who is building a 5" gauge 9F and has produced a number of very good slideshows of his progress. Luckily for us he started with the tender first.
Mike
|
|
barlowworks
Statesman
  Now finished my other projects, Britannia here I come
Posts: 878 
|
Post by barlowworks on May 18, 2017 9:09:51 GMT
Hi everybody This post should bring you up to date with progress so far. This is a picture of the front of a BR1 tender taken from David Clarke's book. It shows the detail on the tender drag box quite well plus a lot of other useful detail. 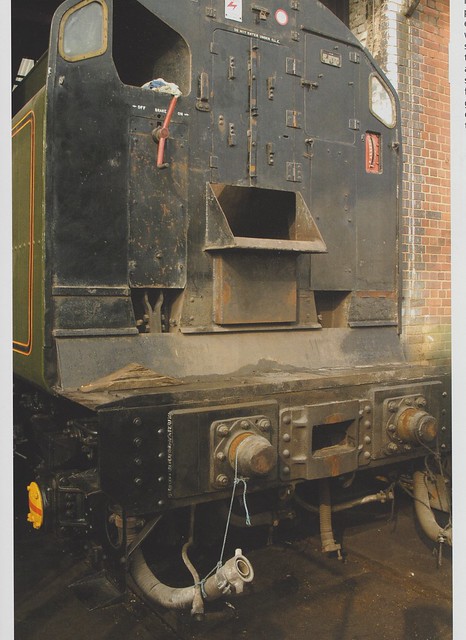 Scan_20170518 (3) Scan_20170518 (3) by Michael Cawthorne, on Flickr The existing drag box to the Perrier design is perfectly functional but I thought I would see what detail I could add to make it look more like the real thing. I know that it can't really be seen but I love this kind of stuff. 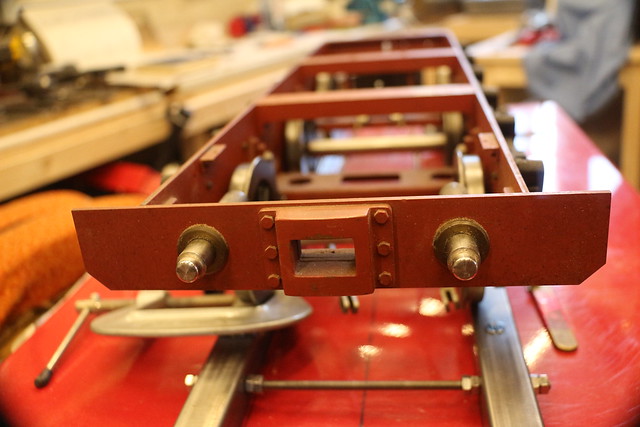 IMG_1316 IMG_1316 by Michael Cawthorne, on Flickr This is what I came up with after a couple of days work. 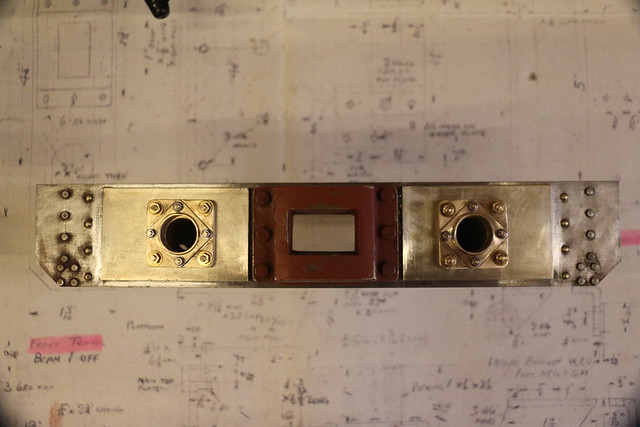 IMG_1331 IMG_1331 by Michael Cawthorne, on Flickr The rivet and bolt detail is purely cosmetic apart from the 2 groups of 4 bolts in the bottom corners that will eventually hold the brackets for the water hose to the injectors from the water filter box. The retaining plates are also cosmetic, the bolt detail is just added to the plates with 8ba and 10ba nuts and washers apart from the 2 horizontal 10ba bolts that go right through the frame spacer to hold them in place. If I was doing this in O Gauge they may well have been 14ba and 16ba, makes you wonder how I did it with with fingers like a plate of thick pork sausages. Luckily the tender is bolted together so I shall be taking it apart to see what detail I can add, there isn't a rivet in sight and I'm sure that can't be right. Posts will become more infrequent now I have caught up with progress and Madam Battleship makes more demands of my time around the garden and those little jobs I always manage to forget.  Keep making swarf Mike |
|
barlowworks
Statesman
  Now finished my other projects, Britannia here I come
Posts: 878 
|
Post by barlowworks on May 18, 2017 9:26:22 GMT
Hi everybody This post should bring you up to date with progress so far. This is a picture from Davuid Clarke@s book showing the front of a BR1 tender. It shows the drag box really well as well as a lot of other useful detail.  Scan_20170518 (3) Scan_20170518 (3) by Michael Cawthorne, on Flickr This is the drag box built to the Perrier drawings, perfectly functional but lacking in a bit of detail. I decided to see what I could come up with. I know it can't really be seen but I love this kind of stuff.  IMG_1316 IMG_1316 by Michael Cawthorne, on Flickr This is what I came up with after a couple of days in the workshop.  IMG_1331 IMG_1331 by Michael Cawthorne, on Flickr All the detail is purely cosmetic apart from the 2 sets of 4 bolts in the bottom corners that will eventually hold the brackets for the water pipes to the injectors from the water filter boxes. The retaining plates are also cosmetic, the bolt detail being 8ba and 10ba nuts and washers apart from the 2 horizontal 10ba bolts that go right through the frame spacer to hold everything in place. My next job is to look at the frames, which appear to be bolted together without a rivet in sight, that can't be right. at least it makes it easy for me to take apart. Posts may now get a little less frequent as Madam Battleship makes more demands of my time with jobs around the garden and those little jobs I always manage to forget.  Keep making swarf Mike |
|


 I'm green with envy Pete, LNER green of course.


