barlowworks
Statesman
  Now finished my other projects, Britannia here I come
Posts: 878 
|
Post by barlowworks on May 18, 2017 10:02:46 GMT
Has anyone spotted the deliberate mistake. 😏 The server was up the spout so I typed it all in again. Now you have two slightly different posts. 😊
|
|
|
|
Post by 92220 on May 19, 2017 8:20:36 GMT
Hi Mike.
The photo of the front of the BR1 tender is interesting. The buffers have those large plates behind them, welded to the front buffer beam. That must be a repair because those plates are not on the BR drawing, and the front bufferbeam is welded to the front dragbox. Your modified bufferbeam is looking good...far better than the original. If you want to replace the central Intermediate Rubbing Plate, as it is called, I can send you a drawing. On the tender it is a casting. I've got it drawn up as a silversoldered fabrication. It wouldn't be readable if I post it on here but I can email you a copy if you want it.
Bob.
|
|
barlowworks
Statesman
  Now finished my other projects, Britannia here I come
Posts: 878 
|
Post by barlowworks on May 19, 2017 8:50:26 GMT
Hi Bob
Thanks for the offer, it was something I had considered but decided to leave as the rubbing plate is in the centre of the dragbox and therefor the least visible of the details. Also my silver soldering skills are in their infancy and fabrications are somewhere down the road at the minute.
Mike
|
|
|
|
Post by Deleted on May 19, 2017 8:57:56 GMT
Hi Mike Just to say that I think you'll find silver soldering is pretty straight forward...do a few test pieces and you'll soon get the hang of it..I had done very little myself before starting 4472...the first real test for me was the tender drag/draw boxes, they are substantial steel fabrications that required a fair amount and strategic placing of heat...daunting at first but now I quite enjoy a little play with the torch...  regards Pete |
|
barlowworks
Statesman
  Now finished my other projects, Britannia here I come
Posts: 878 
|
Post by barlowworks on May 19, 2017 9:20:56 GMT
Hi Pete
The accumulation of experience. Something I didn't expect to be saying as much as I am is "I've never done that before", especially now I'm over 60. I will get there in the end but so much of this is new for me.
Thanks for the encouragement
Mike
|
|
|
|
Post by Deleted on May 19, 2017 9:55:20 GMT
You're not alone Mike....much of what I've done on 4472 are first time experiences....machining the coupling rods now is a case in point...keep up the good work sir....
Pete
|
|
barlowworks
Statesman
  Now finished my other projects, Britannia here I come
Posts: 878 
|
Post by barlowworks on May 26, 2017 17:30:48 GMT
Hi everybody
Just a quick progress report. As I suspected the tender frame was bolted together. I've spent the last couple of days stripping it down to its component parts. Everything has had to be degreased, the previous owners making sure nothing rusted up. The stretchers have been primed and painted black along with the spring detail. I also had a go at blackening the brake gear with limited success. My next job will be to countersink the bolt holes in the main frames and mark out and fit the dummy rivet detail.
Mike
|
|
barlowworks
Statesman
  Now finished my other projects, Britannia here I come
Posts: 878 
|
Post by barlowworks on Jun 1, 2017 18:13:50 GMT
Yesterday and today I was indoctrinated into the noble art of drill breaking and in particular how fragile carbide drills can be. I was drilling out the rivet holes in the tender frames for the dummy rivets and got through about 10 of various sizes. Lesson 2 was to make sure I have enough drills in stock. To be fair this is probably the first time I've drilled a lot of holes in steel, only needing to drill into brass or nickel silver before.
Well, the holes are now all drilled and the next thing is to clean up and start fitting rivets.
Mike
|
|
barlowworks
Statesman
  Now finished my other projects, Britannia here I come
Posts: 878 
|
Post by barlowworks on Jun 7, 2017 19:17:27 GMT
Just a quick update on progress. The rivet detail has now been added. There is no rivet detail on the drawings and precious little on the Les Warnett 9F build serialized in Engineering in Miniature, the tenders being virtually the same. Spacing has been determined from photographs and details of the frames on Bob,s (92220) tender frames in his build thread. These are the frames as built to the drawings. 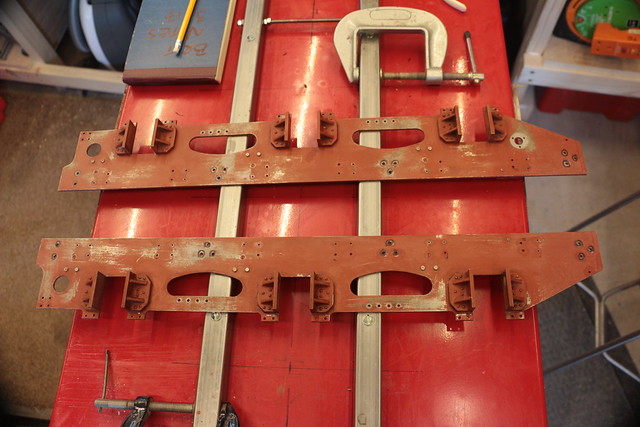 IMG_1336 IMG_1336 by Michael Cawthorne, on Flickr Here are the rivets added in roughly the correct places as far as I can tell. The bolt holes have also been countersunk ready for assembly and filling before painting. There are still a few more holes to drill, firstly there are access holes to the brake hangers (for greasing ?) and a hole for the greasing pipes from the grease points for the brake and water scoop pull rod assemblies. Also a bracket goes above the spring over the centre axlebox to secure the tank. Finally the water pick up bearing has a 5 bolt fixing not three as shown on the drawing. All these things need to be sorted before I can reassemble the frames (after running the insides over the belt sander to smooth out the rivets in their countersinks.) 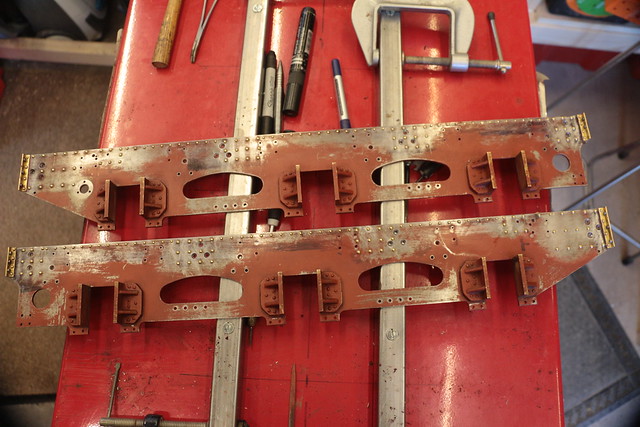 IMG_1338 IMG_1338 by Michael Cawthorne, on Flickr Making slow progress. I would rather have the detail there even though at times its not 100% accurate. For me a representation is sometimes enough rather than it not being there at all. Mike |
|
|
|
Post by Jim on Jun 7, 2017 21:58:26 GMT
Hi Mike,
If it would be of any help I'll check my copy of the works drawing for details.
Jim
|
|
barlowworks
Statesman
  Now finished my other projects, Britannia here I come
Posts: 878 
|
Post by barlowworks on Jun 7, 2017 22:12:21 GMT
Hi Jim
Your post reminded me that I got a set of works drawings with the loco when I bought it. Unfortunately they are like a sheet of wallpaper. I will have to lay them out on the front room floor, that should go down well. 😏 I've finalised the position of most things from photographs so everything should be ok but thank you for the kind offer.
Mike
|
|
barlowworks
Statesman
  Now finished my other projects, Britannia here I come
Posts: 878 
|
Post by barlowworks on Jun 28, 2017 16:17:54 GMT
Hi everybody Just an update on my chassis detailing. The frames are now back together and have been given a quick coat of U-Pol Acid 8 to seal them. The frames went together exactly square with no tweaking required, a testimony to the accuracy of the original builders. 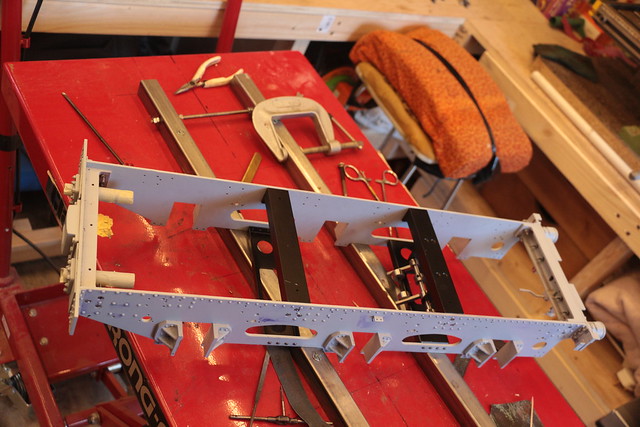 IMG_1341 IMG_1341 by Michael Cawthorne, on Flickr The frames have been reassembled with countersunk screws which have now been given a dab of filler and sanded smooth. Also the bolts on the frame stretchers have been replaced with something a bit neared scale. The front spacer has round head screws as these should be rivets on the full size chassis. a dab of filler in the slot should disquise the screw slots. 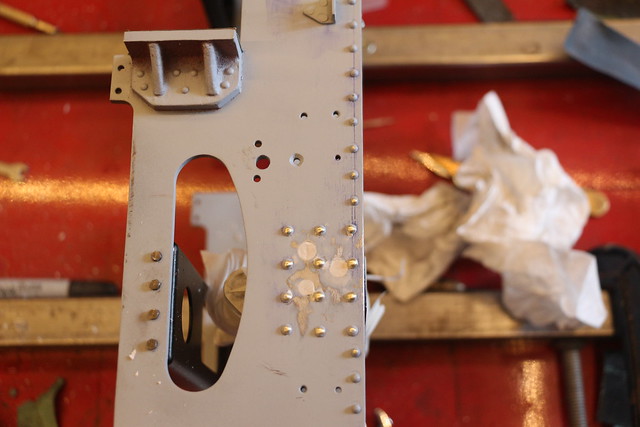 IMG_1344 IMG_1344 by Michael Cawthorne, on Flickr While I was at it I turned up a couple of 2ba nuts so they looked a bit more like a proper fixing rather than a big 2ba nut behind the buffer beam and test fitted the brake anchoring points on the inside of the chassis. 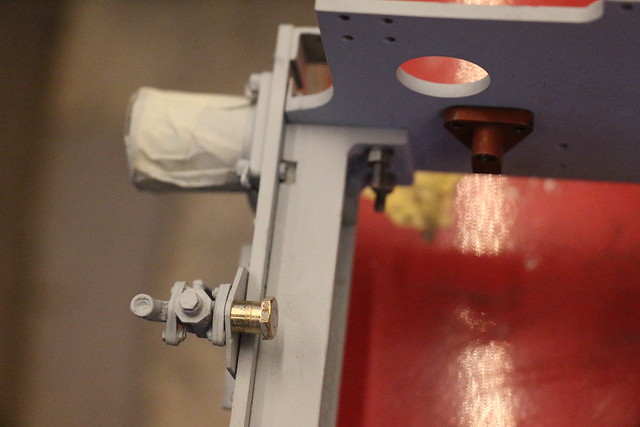 IMG_1356 IMG_1356 by Michael Cawthorne, on Flickr The brake pivots have greasing points on the pin that are accessed from the outside through a hole in the frame. They look quite prominent so I decided to have a go at making a representation on the end of the pivot pins. I had drilled the holes in the frames earlier. This is just a hole drilled into the threaded end of the pivot pin and a length of 1.00mm brass wire glued into the hole, the end was turned down and a 12ba nut soldered on the end. As long as it looks a bit like the real thing.  Img_1349.jpg a Img_1349.jpg a by Michael Cawthorne, on Flickr This is what they will look like when assembled. Another detail that is quite noticeable and took about an hour to do. The other two holes are for round head screws to represent the rivets on the real thing. Origionaly, on the chassis they were bolts. 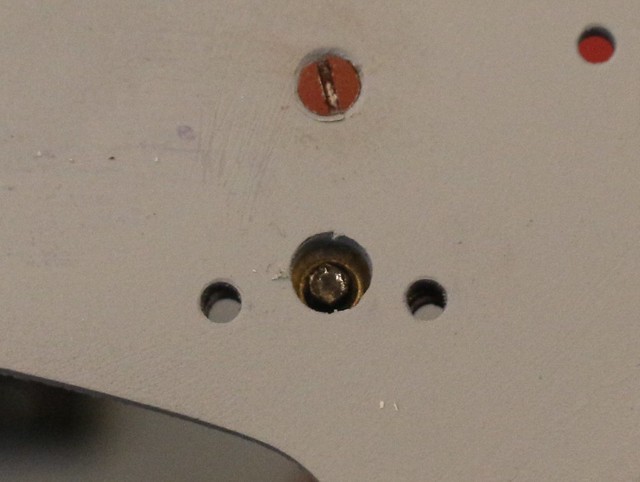 Img_1352.jpg a Img_1352.jpg a by Michael Cawthorne, on Flickr The next job will be to detail the spring hangers which have three retaining bolts on the outside, there are non at present. All this is purely cosmetic, making it look like the real thing, something that I love doing. Mike |
|
barlowworks
Statesman
  Now finished my other projects, Britannia here I come
Posts: 878 
|
Post by barlowworks on Jul 2, 2017 17:27:42 GMT
Hi Everybody This is the latest detailing work on my tender chassis (and also to make sure that I can load pictures to my thread after the latest problems with PB, I should be o.k. as it's Flickr but once an idea gets out there you never know where it will end). The first picture shows the spring hanger and brake greasing point mentioned in the last post, this being from Oliver Cromwell. On my original build there were no nuts and bolts on the retaining plates and they were held on by 8ba bolts. 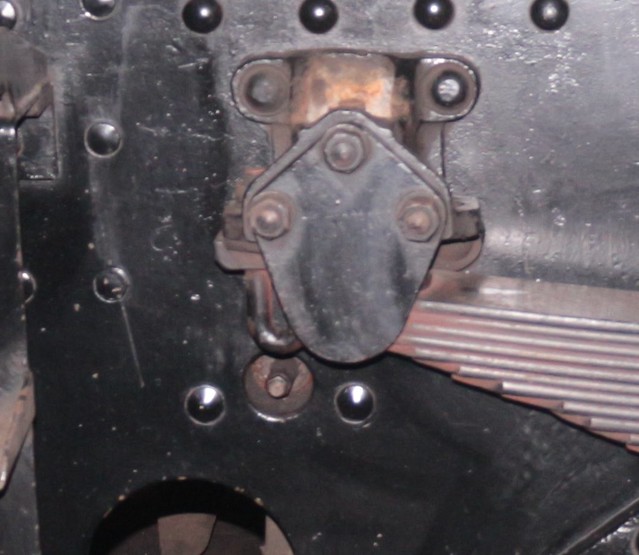 Img_0892.jpga Img_0892.jpga by Michael Cawthorne, on Flickr These are the dummy nuts and bolts added to the spring retaining plates, 12ba looking about right. I might still get the file round them and try to make them look more like the real thing, there are a few differences. 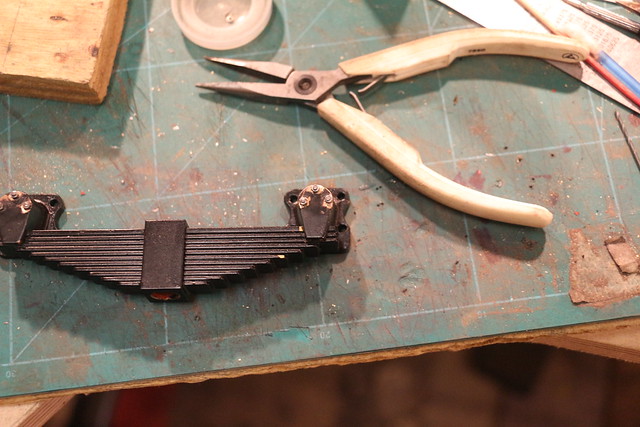 IMG_1357 IMG_1357 by Michael Cawthorne, on Flickr The complete spring assembly (and the brake pivots on the inside) are now retained with 8ba round head screws which, I think, look a lot better than the 8ba hex head bolts. Again the slots will eventually be given a dab of filler to smooth them out. 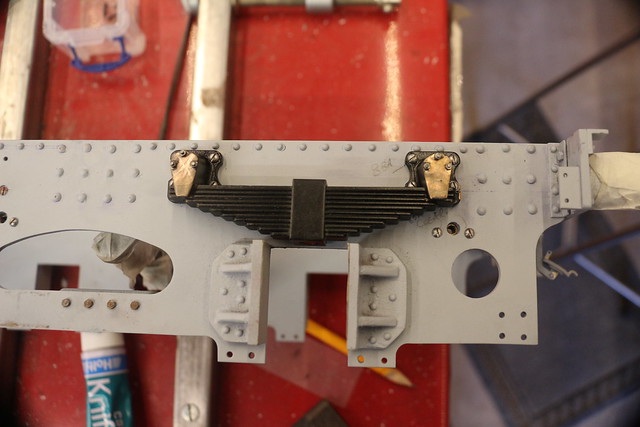 IMG_1358 IMG_1358 by Michael Cawthorne, on Flickr It seems a great pity that so many build threads are now without photographs. To someone with limited experience like myself they were invaluable especially being able to see how someone has solved a particular problem. I hope a sensible solution is found soon, a good number of threads on any forum you care to think about will have been affected. The loss of information and probably enthusiasm is quite staggering. Progress is slow at the moment as Madam Battleship keeps dragging me down the garden path with a knowing smile  , only to be presented with a garden implement and explicit instructions about how to use it.  Mike |
|
|
|
Post by springcrocus on Jul 2, 2017 21:21:44 GMT
Hi Everybody ... Progress is slow at the moment as Madam Battleship Head Gardener keeps dragging me down the garden path with a knowing smile  , only to be presented with a garden implement and explicit instructions about how to use it.  Mike Wear your big smile, Mike.  I see you have one of these, too. I'm reliably informed that I also enjoy gardening.   Regards, Steve |
|
|
|
Post by GWR 101 on Jul 2, 2017 22:44:31 GMT
Had to cut the lawn this afternoon  , but that was after I had silver soldered the last of the pipework for Juliet  and it was cooling down prior to pickle.  Regards Paul |
|
barlowworks
Statesman
  Now finished my other projects, Britannia here I come
Posts: 878 
|
Post by barlowworks on Jan 18, 2018 13:22:30 GMT
Hi everybody Ive not posted on this thread for quite a while, I thought I would show you the reason why and update on a bit of progress I made recently on the tender chassis. This first photo is the tender of a DJH O gauge A4 that I have been building for a friend. The tender is now complete. 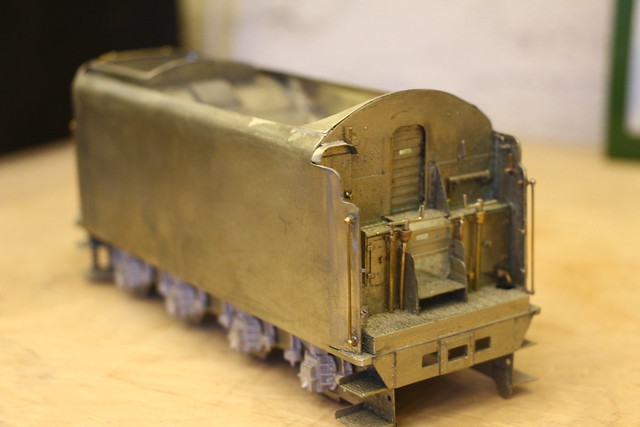 IMG_2082 IMG_2082 by Michael Cawthorne, on Flickr This is part of the chassis that I have been working on since July. All the motion and cylinders are now complete, (just left off at the moment) and just awaiting the lubricators and linkage to complete and this is then ready for painting. At the minute its a bit cold and damp in the workshop for that so I had a few days on the Brit tender. 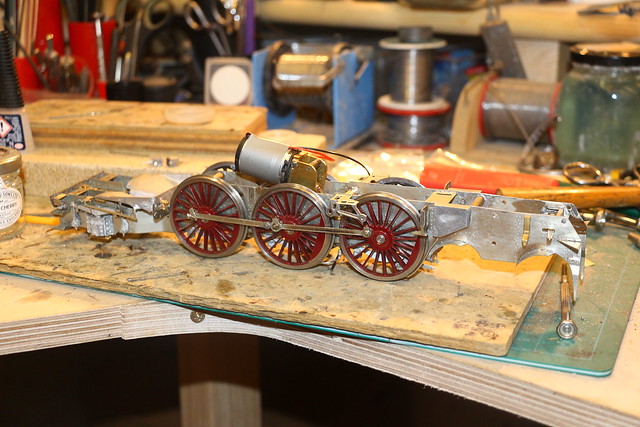 IMG_2086 IMG_2086 by Michael Cawthorne, on Flickr All the parts in this thread so far are detailing the existing chassis so it looks a bit more like the real thing. These are the axlebox keepers which should have a flute in them so I cut one with a Woodruffe key cutter so they look something like they should. 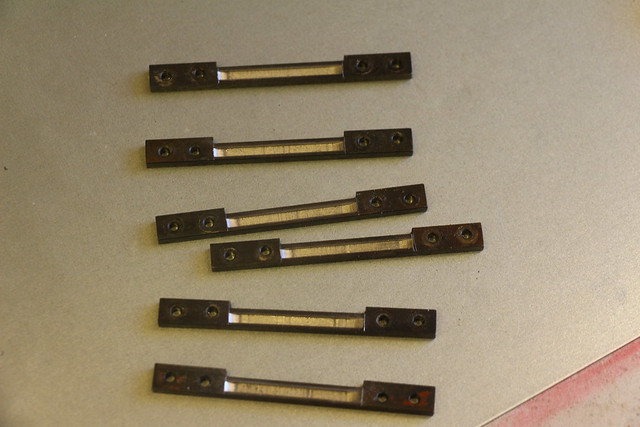 IMG_2079 IMG_2079 by Michael Cawthorne, on Flickr These are the springs made by the previous builder from brass strip. I thought they looked o.k. but the ends of the leaves should be cut at an angle. These were duly cut on the mill but I didn't do the rear as I figured they would never be seen from the front. They were then the first things to be given a blast in my new sand blasting cabinet. I've tried out glass beads to start with which clean up things pretty well but I think I may need something a bit more aggressive to give things a really good clean and a surface with a good key to paint on. Any suggestions on suitable media would be most welcome. 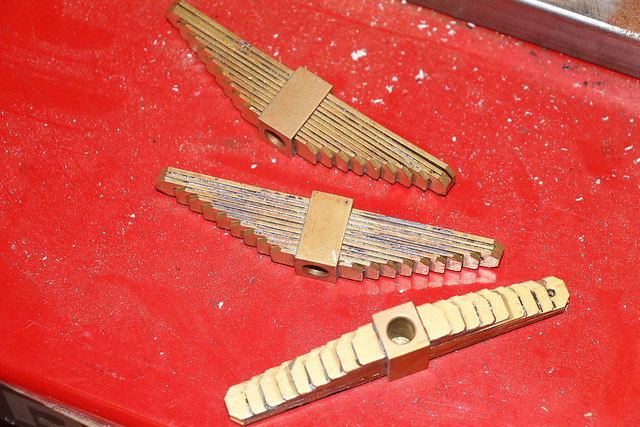 IMG_2090 IMG_2090 by Michael Cawthorne, on Flickr Well that's progress so far. One of the other things I did recently was to go over the drawings and general arrangement drawings and as many photographs of the tender chassis as I could find. I now have a long list of 'improvements' to make it look more like the real thing. The thing is, in my mind I would add most of the things on the list to a model in O gauge so why not in 5 inch scale. I know I would not be really happy if I didn't go that extra yard. All the best Mike |
|
|
|
Post by 92220 on Jan 18, 2018 13:37:13 GMT
Hi Mike.
You asked about blasting grit. I used aluminium oxide powder, bought off Ebay. I've also used ordinary children's play-pit sand, bought from Toys R Us quite effectively (and cheap!). If you go down the actual sand route, which works fine, the sand needs to be dried in the oven before first use, to make sure it flows like salt or sugar, to work in the grit blaster. Aluminium oxide powder can be used straight from the bag.
Bob.
|
|
|
|
Post by Jim on Jan 19, 2018 11:09:44 GMT
The use of beach sand sounds interesting Bob, must get a bag next time we go to the coast to visit the daughter. I've also used soda which is user friendly but rather expensive at least out here it is.
Jim
|
|
|
|
Post by steamer5 on Jan 19, 2018 19:33:21 GMT
Bob & Jim,
Be a bit careful using sand. It contains silica which isn’t recommend to be inhaled in dust form!
I use glass beads work ok, I put a cyclone on the air out to the vacuum cleaner works a treat!
Cheers Kerrin
|
|
barlowworks
Statesman
  Now finished my other projects, Britannia here I come
Posts: 878 
|
Post by barlowworks on Jan 23, 2018 12:02:20 GMT
Hi everybody I've decided to go week and week about with O gauge and 5 inch gauge in the workshop this year so I'm at least making some progress on both projects. That is until Madam Battleship drags off me down the garden again.  The next thing on my list of improvements are the tender horn guides. This is what they look like at the moment. Perfectly serviceable but not a bit like the real thing. 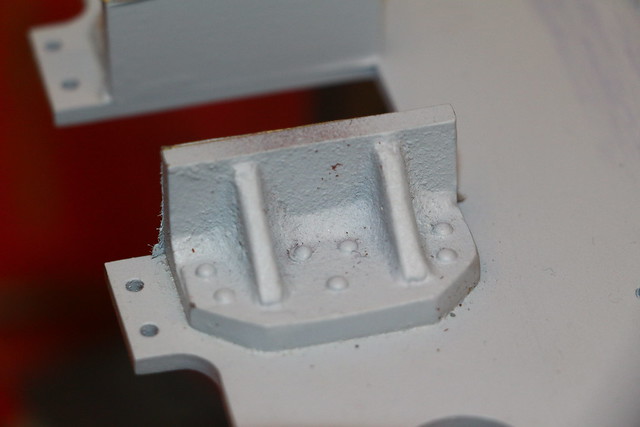 IMG_2092 IMG_2092 by Michael Cawthorne, on Flickr This is one from Britannia. They are quite lumpy little blighters, not a bit like the ones I've got at the moment. 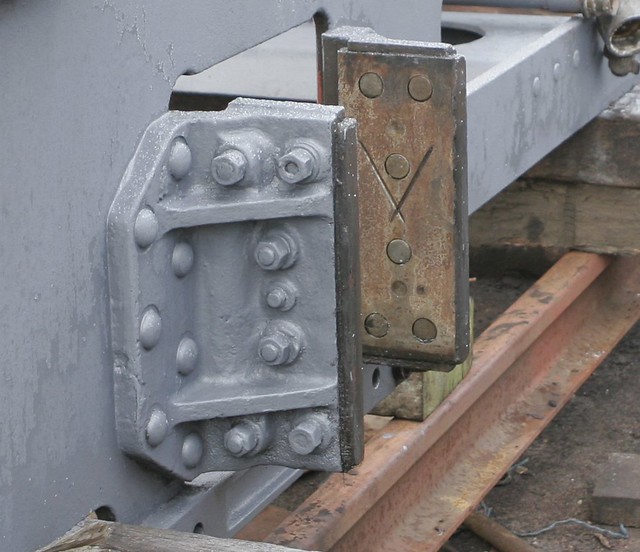 _MG_0122a _MG_0122a by Michael Cawthorne, on Flickr This is my attempt at making them look something like. 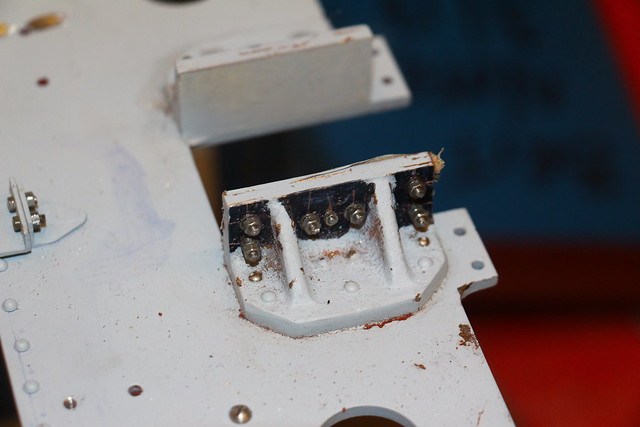 IMG_2093 IMG_2093 by Michael Cawthorne, on Flickr I think they should be ok covered in a layer of black paint. Again, its all cosmetic. just 10ba studs with nuts and washers and a 12ba stud and nut for the grease nipple in the centre, push fitted into blind holes and held in place with a dab of superglue. The other side is still to do as I used up my supply of 10ba washers. I'm after the impression of what it looks like rather than it functioning like the real thing at the moment. Probably a throw back to my O Gauge thinking. This week is an O gauge week so I may have an update on progress next week. Regards Mike |
|