|
|
Post by baggo on Feb 20, 2009 23:57:07 GMT
Hi Matt, Yes, it will get the works ;D I'll need to start looking for some serious webspace soon though  John |
|
Myford Matt
Statesman
  There are two ways to run a railway, the Great Western way, and the wrong way.
Posts: 621
|
Post by Myford Matt on Feb 21, 2009 1:14:07 GMT
John, that's excellent news – looking forward to it already!
Cheers
Matt
|
|
|
|
Post by drjohn on Feb 21, 2009 9:44:18 GMT
Having exhausted my arms cutting out the frame steel blanks for the tender, I sat back with a G&T (the sun was over the yard arm ... honest ;D) and reviewed the late great Miles Kington's trip on 44767 to Mallaig.
What I did notice was the the tender on the full size is more closely coupled to the loco than on even sapper's beautiful beast.
Is this deliberate because we toy train people make ours go round a tighter radius than the full size?
DJ
|
|
|
|
Post by baggo on Feb 21, 2009 10:07:04 GMT
Is this deliberate because we toy train people make ours go round a tighter radius than the full size? Think that's the only reason DJ John (building my muscles up ready for hacking out the mainframes!) |
|
|
|
Post by drjohn on Feb 21, 2009 12:02:42 GMT
[(building my muscles up ready for hacking out the mainframes!) You'll need them John ;D I'm not following Don's words and music, once I have a tender chassis, I'll then make the main loco chassis and do all the diddly-fiddly bits at the end. Cheers DJ P.S. The race is on -- 44767 has spent 26 years on his and hasn't got the boiler fitted yet, and sapper spent 36 years on his and painted it all matt rather than all gloss with the smokebox matt - I'd still love to see a picture of sappers in steam.  P.P.S. I ain't gonna live 26 far less 36 years, so I have to pull my finger out.  ;D |
|
abby
Statesman
 
Posts: 927
|
Post by abby on Feb 21, 2009 16:58:42 GMT
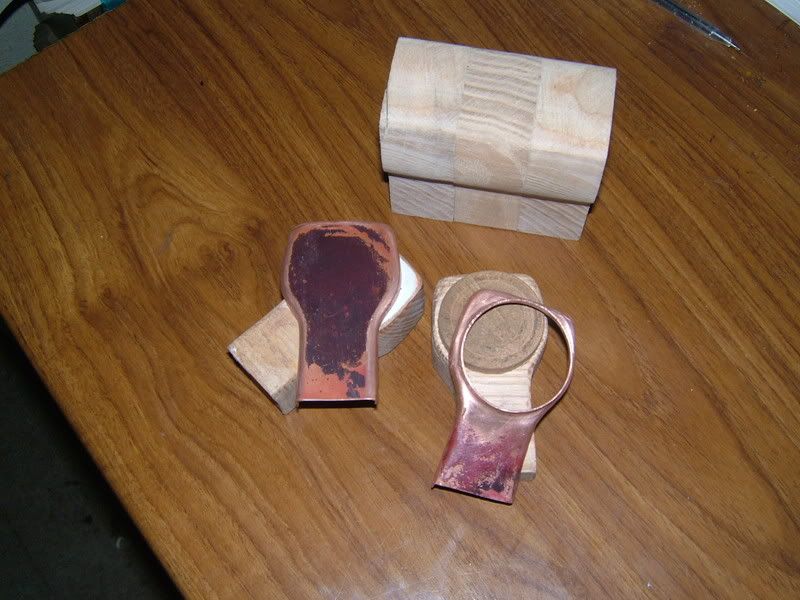
Had a productive day today , after a couple of re-thinks I made these , the formers took longer than the parts , I'll finish this coffee and have a go at the tapered section next !  |
|
redmog
Part of the e-furniture
 Not Morgan weather
Posts: 461 
|
Post by redmog on Feb 21, 2009 18:22:30 GMT
Had a productive day today , after a couple of re-thinks I made these , the formers took longer than the parts , I'll finish this coffee and have a go at the tapered section next ! Yes you've had a productive day, but not as easy as you make it sound if thats 3mm copper! Hardwood former at that! What method did you use to produce the reverse flange on the throat plate for the outer wrapper? Chris |
|
sapper
Involved Member
  
Posts: 73
|
Post by sapper on Feb 21, 2009 19:45:51 GMT
Sorry, I should have added an end date. 44767 took me 20 years to complete but I got diverted with the family. 1 wife and 2 children which made other plans on my time. Since completion I have made 2 long case clocks and a L & Y A class tender engine which flies round the track. My current project is a 7 1/4 Tom Rolt which is more fabrication engineering than Model Eng.
The colour of 44767 is Blackberry Black, Matt. When I was a trainspotter in the 1950s I never saw a glossy Black 5. I have a Simplex which is the same colour. I find that cleaning them with a mixture of paraffin and oil after a run and still hot the colour is just right.
|
|
Myford Matt
Statesman
  There are two ways to run a railway, the Great Western way, and the wrong way.
Posts: 621
|
Post by Myford Matt on Feb 21, 2009 20:02:47 GMT
Matte?
:-)
Matt
|
|
44767
Statesman
 
Posts: 539
|
Post by 44767 on Feb 21, 2009 23:33:49 GMT
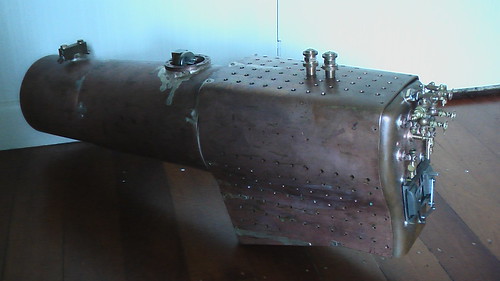
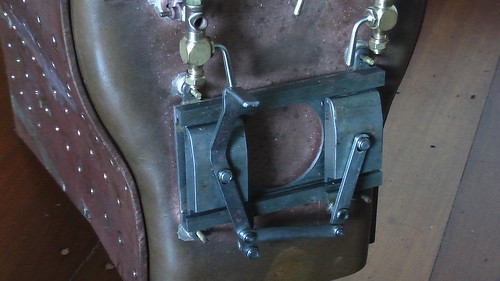
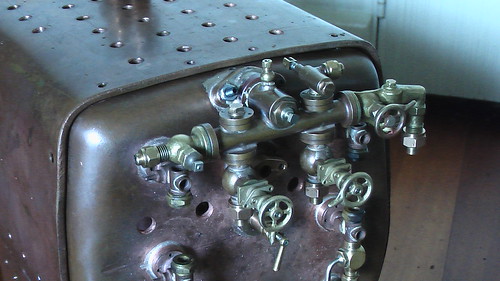
Hello, colour/finish is going to depend on how you want to depict your model. All full size engines were outshopped in a high gloss paint. Because the smoke box gets so hot that paint soon takes on a matt appearance; it was never painted with a matt paint. Those flange plates look familiar! I made my throat plate one in steel though done exactly the same way but with the bend for the sloping bit. I just felt a prod from drjohn so here are some shots of the boiler as is stands. Click on the link to see any comments and other photos.  www.flickr.com/photos/mkrj/3298734126/ www.flickr.com/photos/mkrj/3298734126/ www.flickr.com/photos/mkrj/3298737384/ www.flickr.com/photos/mkrj/3298737384/ www.flickr.com/photos/mkrj/3298735668/ www.flickr.com/photos/mkrj/3298735668/And don't worry about me taking 26 years to make this loco. I do look forward to retirement when I can treat making models as a job without all the interuptions I have at the moment. This year I'll be away overseas for 3 months with work. I am just in the process of making the trays for KiwiSAT (see http://www.kiwisat.org.nz) which takes 47 kg of aluminium and turns 43kg into swarf. Hopefully the other 4 kg is not scrap too! (voluntary work from home). A bit off topic but model engineering got me into my day job. It was the enthusiasm I have for making models that drove me to learn all the skills. Unfortunately my day job now gets in the way a bit. I also make a small machine vice in batches and make parts for a well respected model engineer from home. I am not intending this to be an advert just to show that there is not much time to look at my own model. Maybe when it is finished I can say that I have finished my apprenticeship! |
|
|
|
Post by drumkilbo on Feb 22, 2009 3:08:09 GMT
Well Mike, that looks a superb boiler so far, well done keep up the good work !
Ian.
|
|
|
|
Post by drjohn on Feb 22, 2009 3:31:09 GMT
Sorry, Sapper, when you mentioned about the generator bit, I made the wrong assumption that you had just finished it - and as to the colour, it certainly looks much better than the gloss - like you, I never saw any shiny locos in my youth. And Mike - those boiler fittings are terrific. As for time scale, it's a bit discouraging when starting on the project to think it will take longer than I am likely to live ;D I just wonder how many 5" gauge tenders are floating around the modelling world with no loco to pull them as everyone seems to do the tender first ;D  DJ |
|
44767
Statesman
 
Posts: 539
|
Post by 44767 on Feb 22, 2009 7:24:51 GMT
I didn't mean to knock Sapper's paint work; I think it looks superb. I actually think that gloss paint on any model needs to be reduced otherwise it looks out of scale, if that makes sense. I saw a beautifully made locomotive at the Harrogate exhibition a few years ago which was so glossy that one could see your reflection in it from some distance away.
I can not take the credit for most of these boiler fittings. They are made by Dave Noble who usually has a stand at the Harrogate exhibition. I think they are very reasonably priced as well. The manifold, for example, has the two working injector valves, working whistle valve and the dummy steam heating pressure reducing valve. The main shut off valve was a working valve but now is not made so (not necessary on a model). Also there is a take off for the pressure gauge and a passage for the steam brake connections. All assembled as you see it for less than 100 quid. There is another thread if you want to get into the arguement of cheque book hobbies. I just feel that since I have been making parts for other peoples locos for so long that I should be able to buy ready made things for mine!
|
|
|
|
Post by drjohn on Feb 22, 2009 8:18:05 GMT
Mike - if there were suppliers here who produced such quality stuff, I'm sure I'd probably go for them too. But sadly, no! I've cut out the inner and outer frame steel for the tender, and trued it all up, rivetted the two outer frames together with 3/32 rivets through the three 3/16" holes (the purpose for which, I still have to fathom ;D) and am now making tables for what metric measurement fudges I will have to apply (as all my machinery is metric) so that I keep the same fudge factor throughout the build - hope I can still read my handwriting in 20 years  ;D ;D DJ |
|
44767
Statesman
 
Posts: 539
|
Post by 44767 on Feb 22, 2009 9:03:35 GMT
drjohn,
The 3 holes would be for the brake hangers. I get the feeling that you'll have this finished much sooner than you think. A club member here built this loco (his second) in about 3 years. So stick at it. I am hoping to have mine complete for the biennial live steam convention (held by a different NZ club each time) in 2012. If I haven't finished it by then you may as well shoot me!
|
|
sapper
Involved Member
  
Posts: 73
|
Post by sapper on Feb 22, 2009 19:50:53 GMT
drjohn
Be careful the front and rear wheels on the tender foul the front and rear box members. At least they did on mine. Check before you glue it all together.
Mike
The backhead is looking good. I made all mine to scale but found that when I came to steam the engine the gauge glasses gave false readings so I replaced them with a larger dia glass. I also lowered the position of the pressure gauge so that I could see it when I was driving this enabled me to keep the roof in place. I did originally remove the front portion of the roof to make driving easier and to see the gauge but the engine looks so ugly with bits of the roof missing.
If there is anyone thinking of doing a lot of driving it is worth extending the control of the regulator to the rear of the tender. It is a long stretch across the tender resulting in an aching back at the end of the afternoon.
Sapper
|
|
|
|
Post by drjohn on Feb 23, 2009 4:54:20 GMT
Thanks for the tip Sapper - it actually mentions that on the version of the plans I've got. I'm now trying to decide about 8BA screws - there are no BA taps dies or screws here. 2BA is easy - M5 does for that, as with 4BA - M4 and 6BA - M3, but M2.5 is a wee bit big for 8BA and anyway, I don't seem to be able to source M2.5 hex heads yet. A left hand end mill would be an extremely useful device for reducing the size od hex heads - on my mill, the quill feed is not nearly as accurate as the table feed, and with a bolt screwed into something in the chuck on the rotary table in the horizontal position, if you try to "hex" it witha right hand cutter, it unscrews with very messy results.   DJ |
|
|
|
Post by weldsol on Feb 23, 2009 8:08:42 GMT
Hi DJ as a thought for your re sizing of bolt heads could you not use two slitting cutters mounted with the required spacer as this should stop the unscrewing effect.
Paul
|
|
|
|
Post by alanstepney on Feb 23, 2009 9:19:49 GMT
M2 is a standard size on computer and electronic parts, and bolts and nuts should be readily available.
Usually pan head or countersunk, it would mean cutting off the existing heads, and soldering a nut in its place, if you wanted hex heads.
|
|
|
|
Post by drjohn on Feb 23, 2009 11:19:11 GMT
Paul - slitting saws of your usual model engineering sizes are a luxury for me ;D And Alan, yes, I already did that on Simplex - silver soldering a nut on the end of a long bolt and skimming it off to make it look good - but count the 8 BA bolts that Don asks for on the Black 5 ...  Cheers DJ |
|