|
|
Post by springcrocus on Oct 23, 2021 7:55:31 GMT
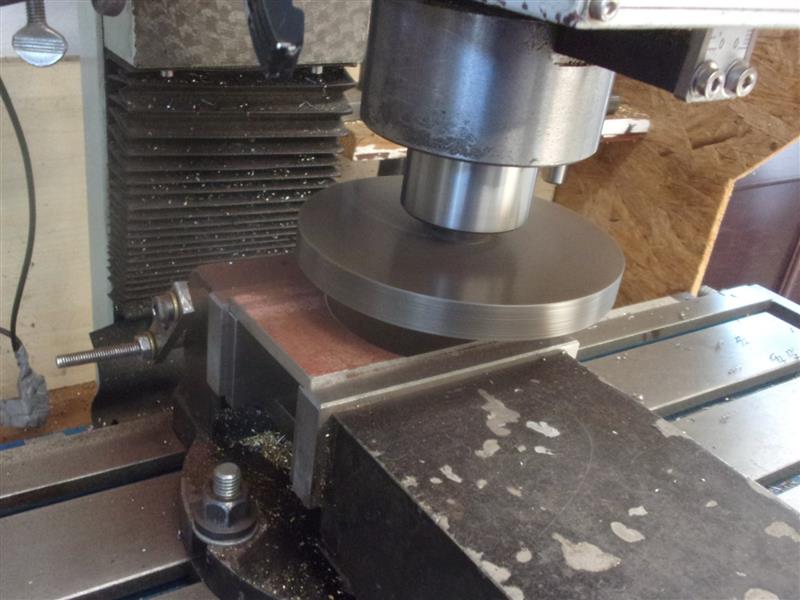
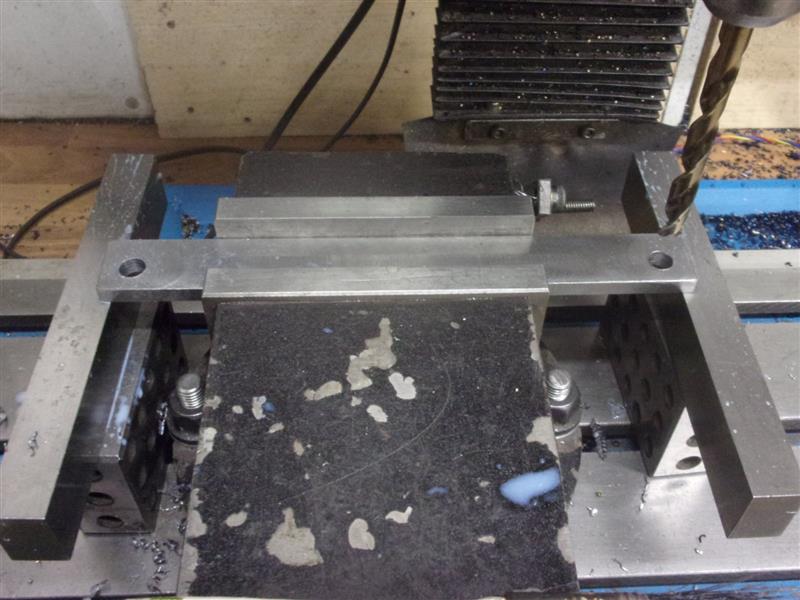
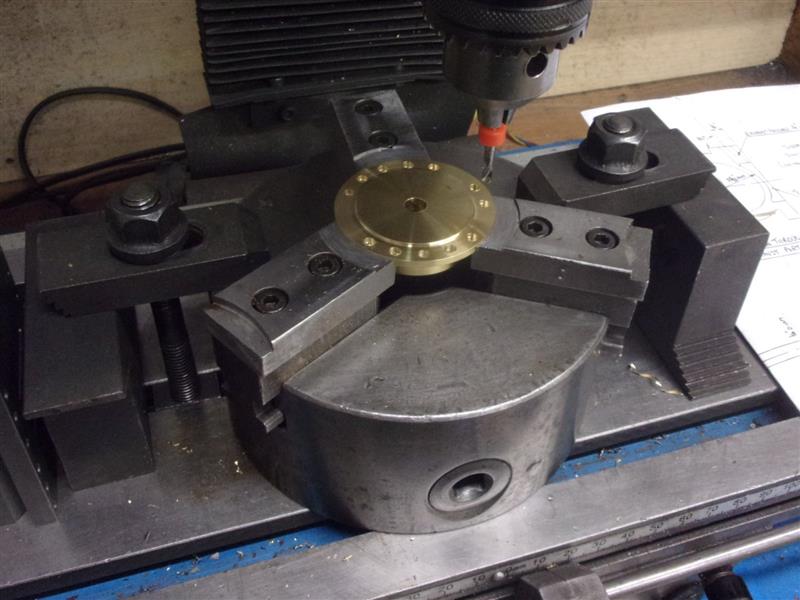
Steve Slightly off topic have you steamed the Brit yet? Dave Not yet, Dave. So close but I seem to have completely lost my enthusiasm for it at the moment.  The drawing for the motion plate took a little while to decipher and it's a fabrication that could be made as a simple plate because it's buried within the frames and won't be that visible once the loco is complete. However, I thought it might be interesting to try and make it look a bit closer to the prototype. Starting point was a lump of plate sawn from some 3" steel angle and a couple of offcuts of flat black steel.  After squaring the plate all round, it was skimmed to 7/32" thick with a flycutter although it will be thinned later to nearer 1/8" thick. The height and length of the plate were finished to size for the top and side plates to be silver-soldered to.  The three cutouts were made next, drilling the corners of the con rod openings with a 4mm drill and a pair of 1/4" diameter holes where the valve spindle guide bracket sits. The centre of the spindle guide was used as the "X0, Y0" reference point. The six fixing screw holes were also drilled but after this picture was taken.  The spindle hole was formed by opening the two holes out with a 12mm end mill followed by a 14mm end mill, clearing the centre at the same time. To remove the con rod openings, a 4mm end mill was wound round clockwise between the four holes taking a 50 thou depth of cut each time.  After that, I lifted the plate higher in the vice and, with the same cutter, milled away thirty five thou from the surface to leave a raised section around the openings, then flipping the plate over and doing the same on the other side. I swapped over to a 1/8" dia cutter and milled a pair of channels to locate the slidebar brackets into. The plate was stood upright and a 3/32" deep cut taken out of the top for the same purpose.  To take the corners off, I set them against a small angleplate and used an angle gauge to rest the workpiece on. A pair of holes were drilled and tapped 9BA in each of the edges so that I could screw the outer plates on before silver-soldering. One supplier, I don't know who, sent me a pack of 9BA hexagon bolts instead of 10BA so I've been using them up on jobs like this.  The slidebar brackets were fabricated from offcuts of 10swg M.S. sheet and the two cross-pieces soldered to the arms with 40% high temperature solder to ensure they didn't fall to bits at the next heat-up. Some 1/4" square was milled down to 3/16" thick and the corners filed to create an oval cross-section. These and the two side plates were bolted on with flux between them. The top one holds the slidebar brackets in place.  The corner pieces were mades next from 1/8" thick material and with the matching angle milled on the ends. These had to be made individually to get a snug fit.  A simple fixture was made to hold the corners in place and a bar was clamped to the slidebar brackets to keep them square. Lengths of 55% silver solder were placed along the outer edges and horseshoes placed around the slidebar brackets, then everything was well-fluxed. The spring clamps in the picture were replaced with miniature "G" cramps before soldering as I've found that the springs in these clamps lose their temper at the elevated temperatures and the clamps fall off.  I rested the fixture on a couple of blocks on the hearth and applied most of the heat to the underside of the plate. Once cooled and pickled, I then set about clearing the excess material from the corner pieces. Conveniently, a 16mm end mill fitted nicely between the slidebar brackets and the side plates and allowed me to form a nice radius.  Apart from drilling some holes to suit the slidebars and cutting off the corners of the brackets, the rest of the work was handwork, filing and linishing the various forms. I've held off drilling the frame fixing holes for the time being as I want to see how it all comes together further down the line. This is how the plate looks now..  ..and this is a photo of the motion plate that I took Tuesday before last when I was allowed to clamber in the pit at Havenstreet over which Calbourne was stood. Thanks for arranging that, Dan.  Regards, Steve |
|
kipford
Statesman
  Building a Don Young 5" Gauge Aspinall Class 27
Posts: 575 
|
Post by kipford on Oct 23, 2021 8:27:25 GMT
Steve
Lovely piece of fabrication. I should have done the same for the Aspinall rather than play with dodgy castings, but with your first loco you have to learn about these things.
Dave
|
|
|
|
Post by springcrocus on Oct 28, 2021 7:19:22 GMT
Coupling rodsI prefer to use hot rolled steel (black bar) rather than cold drawn steel (bright) because it geneally doesn't go banana-shaped when one side is machined. I had to mill down some 1" x 1/2" for the coupling rods and this took quite a time. I used the waiting time to make the various bushes, pins and end caps but haven't bothered to describe the machining, it's all straightforward stuff.  Once the rods had been machined to finished thickness and the sides cleaned up, the next job was to drill and ream the two holes for the phosphor bronze bushes. I've made these 10mm O/D rather than 3/8" and reamed the bore 8mm diameter.  I re-used a fixture that I made for the Britannia rods, a length of 1" square tube by 1/8" wall cleaned up all round. Two holes were drilled and tapped M5 at 6.7/8" spacing and offset to one side by about 1/8". I had already made a pair of bolting bushes with a 5.1mm diameter hole through when I made the PB bushes. The fixture was set in the vice with the ends supported on blocks and additional clamps used to dampen any ringing for when cutting beyond the bounds of the vice. Each rod was clamped on, clocked true and the shaping done with a 12mm end mill. With the "Y" axis set to the centreline of the bushes and the "X" zeroed half way between them, it was a simple matter to wind in, along, out then round to the other side and repeat using the same set of numbers. I also machined the upstand parts - I don't know what they are called - before removing from the fixture.  The fixture was then flipped over and the flute machined using a 1/2" dia x 1/4" wide tee-slot cutter, taking a couple of 30 thou deep passes followed by a 5 thou cut in the climb-milling direction for a better finish.  To round the ends, I made a filing button and used the linisher and the Dremel although I could have set up the rotary table if I wanted to. The final job with these was to drill the oil reservoir in the tops of the rods using a 3mm PCB drill.  All that is required now is to push the bushes in and drill through the oil holes with a tiny drill. DY's drawing is massively out-of-scale here, being drawn about 1/8" shorter than actual. A timely lesson not to scale from drawings.  Regards, Steve
|
|
|
|
Post by springcrocus on Oct 31, 2021 18:27:06 GMT
Bogie wheelsA colleague had four wheels from an abandoned project that he thought might be suitable for Calbourne and it appears that the hub, rim and spoke profiles are correct for the loco. They are cast stainless steel, which I'm a little apprehensive about but he has already done some roughing out and assures me they machine quite well. I will need to sleeve the bores but the rest of the work should be stock removal only.  Everyone has their favourite way of holding wheels for the various turning operations, mine is to use soft jaws bored to suit whatever diameter I'm wanting to hold. I made up a new set of jaw blanks, numbered them and then bored them to suit the turned diameter on the wheels.  I started by holding on the backs and facing the boss to get the right shape and size, then faced the front of the wheel a further 1/32" inboard and took a light skim over the top ready for the second op, repeating with the other three wheels. Then the wheels were reversed and the backs faced to finished width, the outside diameter turned to 3.300" and a nice little radius machined on the outside edge. The boss on the back was also removed on this operation.  The jaws were wound in and a new register machined at about eighty thou deep and 3.300" dia to hold on the newly-turned flange. The tread section was then roughed out, leaving about fifty thou on the flange face and about the same on the diameter. Then a radius tool was used to face the flange to 0.100" thick, the tread diameter to 3.010" and leaving a nice radius in the root of the wheel.  Three further operations were done to complete the machining of the wheels. First, the compound slide was set over to two degrees and the treads coned with the tool running off just before the wheel root. The second was a chamfer to the outside of the tread and the third was to bring all four bores to 0.625" diameter, ready to accept a sleeve. The only job I couldn't do in these jaws was the radius at the inside top of the flange and the wheels will be loaded to a mandrel to machine that. I will finish the wheels once I've made the sleeves. Regards, Steve
|
|
|
|
Post by GWR 101 on Oct 31, 2021 19:12:43 GMT
Steve, impressive as always. stainless wheels they should last a life time. I must organise some soft jaws for my three jaw, a great aid for those sort of jobs. Regards Paul
|
|
|
|
Post by Nigel Bennett on Nov 1, 2021 14:26:03 GMT
Could you avoid sleeving the bores if you split the axleboxes? That's how I did mine.
|
|
|
|
Post by springcrocus on Nov 1, 2021 19:28:04 GMT
Could you avoid sleeving the bores if you split the axleboxes? That's how I did mine. Not in this instance, Nigel. I'm using Glacier DX bearings and DU thrusts on this loco.  Sleeving won't be a problem. Regards, Steve |
|
|
|
Post by springcrocus on Nov 7, 2021 10:13:14 GMT
Bogie wheels cont.The rest of the work on these wheels was mainly concerned with machining away material to end up with the correct profile. First of these was the radius at the root of the spokes where they join the hub. Prior to this, though, I had machined all the bores out to 0.656" ready to take the insert.  A section at the back of the hub needed to be cleared from the spoke root and the lathe chuck was mounted on the mill table for this. A 5/16" diameter end mill was used, aligning each gap by eye and plunge-cutting twenty thou at a time until a slight witness appeared on the hub. The table was left unlocked so that the endmill would find it's own centre on the final couple of cuts.  Back to the lathe and the rear of the hub needed cleaning up. The same radius tool was used for this but work-holding was a little less secure because of the chamfer on the front of the tread and the intermittent nature of the cut. A dead centre held by a live centre was used to stop the work popping out of the jaws but allowing me to get the toolpost nearer to the centreline.  Inserts were made from some 3/4" dia stainless steel, turned to 0.657"-0.658" for a decent interference fit. I left these thirty thou overlength and also drilled a 3/8" hole through them. The chap at my local garage pressed them in for me using their hydraulic press. I wasn't allowed to go through (H&S) but he told me they took 22, 24, 24 and 28 tons pressure respectively to get them home so I don't expect them to fall out. Back on the lathe, the bore was opened out to 0.425" and a 7/16" reamer pushed through.  Some work with the file and Dremel and these are finished and ready to push onto the axles. Regards, Steve
|
|
|
|
Post by springcrocus on Nov 10, 2021 8:36:12 GMT
Bogie axlesThe bogie axles are made from 3/4" dia mild steel and I cut a couple of billets 7" long. Using a backstop, I faced and centre-drilled one end of each axle. Then I roughed out the two journals, leaving about twenty thou on the O/D, but facing the two shoulders to finished length. Run-out doesn't matter here.  Then they were turned round, faced to length and the first operation repeated. The next job was to relieve the centre section of the axles and each one was loaded up against the jaws and, working from the middle, the material reduced to 1/2" diameter with multiple passes to the shoulder, allowing for the radius.  Then the tool was changed over for a radius tool and the shoulders formed. With both ends done, the join in the centre where a slight run-out witness remained was polished out with emery cloth. The tool is 3/8" square tool steel freehand-ground to a radius gauge.  With the wheels finished, I was able to machine the journals to size. A piece of mild steel was machined to 60 degrees inclusive to provide an accurate front-end centre, a driving dog clamped to each axle in turn and the two journals machined at the same time using a live centre to support the back-end. On my lathe, the compound slide needs to be turned round to about sixty degrees and the toolpost re-alligned to allow me to get in close to the live centre.  These are now ready for assembly. Regards, Steve
|
|
|
|
Post by springcrocus on Nov 11, 2021 17:12:06 GMT
Spring hangersThe drawing shows four spring hangers to be made but, because I'm making leaf springs for the driving axles also, I have made twelve of them, plus a couple of spares. Rather than machine the whole thing from solid, I have chosen to silver-solder the pivot tubes on to the hooks. Using 5/16" square mild steel, the first job was to drill a 3/16" diameter crosshole 5/32" from the end. The vice jaws also act as a backstop.  Having a second milling machine, I was able to set up a sort of production line and, after cutting through the end of the hook, the upper arm was made by milling away an equal amount either side with a 3/16" end mill.  Metal was sawn away from the bottom of the front slot into the cross-hole, leaving the basic outline of the spring hook.  This was followed by a session on the linisher and with files to finish the profile of the hook.  These were than parted off at 19/32" long, and the whole process repeated another thirteen times. I had about a foot of 7/32" dia steel tube, a relic from a job in the distant past and which had a conveniently-sized bore of 1/8", and this was used to make the support tubes, parting them off at 7/16" long. By using the frontstop in the front of the toolpost, they were all exactly the same length.  I made a small jig to assist with soldering the parts together, basically a pair of 3mm pins and a screw to push the parts together. The front pin was cleaned and (re)coated with correction fluid after each one, the parts loaded as in the upper right picture, and a short length of solder placed on the join. Heat was applied from below until the solder flowed. The lower picture shows the item after it had cooled a little.  These are the fourteen hooks cleaned up and ready to assemble. I won't bother removing any excess solder because most of the hanger is buried in the equaliser beam or, in the case of the drivers, the spring hanger blocks.  Just the springs to make and the bogie assembly can be finished. Regards, Steve
|
|
|
|
Post by springcrocus on Nov 15, 2021 22:03:48 GMT
Big end brassesI have made the big-end brasses from the billets that I cut out from the main horns. After cleaning up all round and finishing the thickness at 3/8", two of the billets were reduced in width to exactly 9/16". These were then soft-soldered to the other two billets using silver-bearing solder. Once cooled, both sides were cleaned up to leave the thickness at 5/16"  After milling the top and bottom to 1.1/32" across, the ends were squared up the easy way using a vice in a vice.  Then they were brought to finished size just using the main vice but because the two halves are not the same size, I had to make sure that I didn't take too much off one end, leaving too little for the other end. The bearing bore was machined on the lathe using the independent 4-jaw chuck to offset the centre but the picture I took was unusable. Back on the mill, the slots were machined next using a 1/4" diameter end mill. I once had a pair off brasses break at the join doing this sort of operation so, this time, I used a backstop to locate the work and then screwed up a front stop to trap the workpiece. Obviously, it only matters when the soldered join is perpendicular to the cut.  Before separating the parts, I marked one pair with a single punched dot and the the other pair with two dots. Now they won't get mixed up or one half of a pair inverted.  I will drill the oil holes once the bearing strap is made. Regards, Steve
|
|
timb
Statesman
 
Posts: 512 
|
Post by timb on Nov 18, 2021 13:50:15 GMT
I have been away for a while Steve but finally caught up. Great progress and all looking good.
Well done!
Tim
|
|
|
|
Post by springcrocus on Nov 18, 2021 18:52:36 GMT
Con rodsThe con rods have been made in a similar way to the coupling rods, using a fixture to hold the work. After cleaning up the black bar to finished width and thickness, and with one end faced, they were loaded to a backstop and the hole for the gudgeon pin drilled and reamed 5/16" diameter.  Using a pin to keep them aligned, the sides were reduced to 1/2" taking an equal amount off each side.  A pair of new holes were drilled and tapped M5 in the fixture and a top-hat bush made to fit the 5/16" reamed hole. The small end was held by an M5 cap screw through the bush and the big end was held by a clamp. The first operation done on the fixture were the two radii and a boring bar was used for this, doing one side first then flipping the workpiece over and doing the other side. The radius is a little undersize but I'm not getting anal about that.  The tapered sides were made by setting the big end over by 3/32" at the root of the radius and four passes of twenty thou and one of ten made with a 12mm end mill.  The fixture was set on it's side and the thinning of the rods done next, taking 1/32" off each side. I changed to a 10mm end mill for this to get in tighter at the small end. For the second side a piece of brass packing was used behind the rod to stop it flexing.  To complete, the top-hat bush was used as a filing button to round the ends and a pair of phosphor bronze bushes made and loctited into position.  I will make the strap for the big-end brasses before drilling the two holes so these are finished for now. Regards, Steve
|
|
|
|
Post by springcrocus on Nov 21, 2021 8:17:24 GMT
CrossheadsWhen I made the Britannia crossheads, they were a fabrication of two sections so I thought I would have a go at making these ones from a solid lump. The only difficult part looked to be the piston rod boss so worth a try. The starting point was a couple of billets sawn from some 1.1/4" square mild steel bar.  These were faced both sides in the 4-jaw chuck, as this was the easiest way of getting the faces square, leaving the finished width of 13/16". Then it was over to the mill and create the slidebar channel. For this, I roughed them both out first with a 12mm end mill then put them back and finished with a brand-new 1/2" dia one.  Using a snug-fitting packing piece, they were loaded sideways and the main body section reduced to 1/2" wide.  Holes next, small-end pin first and piston rod second. These are both 1/4" reamed and the tapered part of the crosshole will be added later.  Then the slot, roughed out with a 6mm end mill and finished using a new long-series 1/4" diameter slot drill. After milling in one direction, I tipped the part up and milled in from the other direction so that the bottom of the slot was square both ways.  Up on end and the front section was cleared away.  Now the back of the crosshead was shaped with a 1/4" end mill.  Followed by the cutaway at the front, a 7/32" dia cutter, this one.  And finally, for this session on the mill, drill and tap the six top-plate fixing holes. The drawing calls for 8BA but I'm using up a dozen more of the 9BA screws that I have.  Over on the lathe, a 1/4" dia mandrel was made with an M5 cap screw as the clamp.  Because of the square form of the boss, it was expecting too much from the form tool to machine the boss on it's own. The front was turned to 1/2" dia for a short way and a 5/8" hole saw without the pilot drill used to rough out the shape.  Then the form tool was used to reduce the diameter to 7/16" and form the radius at the root. This picture shows how the tool has to fit into the gap without hitting the underside of the slidebar guide.  The only thing left to do after that was the large radius at the lower section of the body. The work was mounted on a 1/4" diameter spotting drill and rolled around the vice taking back-and-forth cuts to remove most of the metal. I think this well-established technique is what David Scott was referring to the other day in answer to another members' request. The composite picture demonstrates how the cutter remains at a fixed height and creates many facets which can easily be linished to the finished shape.  These are the finished for the time being, the only job left to do being the coned seat for the small-end gudgeon pin. I need to find my missing cone cutter, it's in a safe place somewhere....  Regards, Steve
|
|
|
|
Post by GWR 101 on Nov 21, 2021 9:05:48 GMT
Great work Steve as always. I find its most satisfying when a complex part is produced from a "lump" of metal. Regards Paul
|
|
|
|
Post by springcrocus on Nov 24, 2021 18:31:54 GMT
CylindersI've made the cylinders using cast iron billets from M-Machine and, I must say, it's lovely stuff to machine. However, I could have saved myself a bit of time if I'd ordered them to be cut a bit shorter. They had been cut very square and I ended up facing off 5/16" of material.  First, I cleaned up two sides to finish at 2.1/8" then finished the other two faces to 1.11/16". I faced them square and to length on the lathe using a 4-jaw chuck, then returned to the mill to reduce the bottom of each to leave the 1/4" thick bolting flange and something similar on the top.  The top incorporates a boss for the exhaust pipe to fit to and this was left as a square section for now. With bronze it would probably be easier to silver-solder the boss in separately later. None of this can be seen once asssembled, anyway.  The centre-line of the cylinder bore was found next and a No.2 centre drill used to mark the spot. On the lathe, each billet was clocked true to the centre, drilled with a 1" dia drill, then bored out to thirty thou shy of 1.375". The plan was to use a between-centres boring bar to finish but the parallelism was so good that I just carried on to finished size. One of the advantages of a big, rigid boring bar: I wouldn't try this with anything of smaller cross-section.  They came up a couple of thou under the 1.3/8" diameter but, after honing, I shall make pistons and rings to suit. Back to the mill and the drain cock holes were drilled and tapped followed by the exhaust steam flange mounting holes. Steam ports were milled next using a 1/8" diameter slot drill. I can't follow the circular form at the bottom - that requires using a cylinder lining sleeve - but a later picture shows the lowered cuts at each end of the ports.  The undercut of the bolting flanges was next and I was able to use one of the fancy cutters from my odd-ball collection. This makes space for the nuts to fit on the fixing studs. A bit like a standard dovetail cutter but with a much sturdier stem and flatted teeth.  Next up were the fixing holes which were drilled 2.9mm diameter with a PCB drill. The holes are not equi-distant so care needed to be taken here. The picture also shows (just) the step-downs at the end of each steamway and how the dovetail has to end short of the exhaust flange boss.  The cylinders were turned on end, the bore clocked for centre and the holes for the end-cap bolts drilled. The Zeus book doesn't have a 16-hole solution as is required here so the numbers were worked out using the Sine and Cosine of 11.1/4 degrees and 33.3/4 degrees and a radius of 13/16". Those four numbers were the only dimensions needed, just plus or minus respectively. The two spaces at the top leave room for the steam ports to be drilled.  I will continue this in a few days time, there's still a lot to do. I also need to get a bit more Pumphouse bronze to make the steam chest that fits between the cylinders. Regards, Steve
|
|
|
|
Post by springcrocus on Nov 30, 2021 15:16:44 GMT
Slide bars and crosshead coversWith the crossheads finished, attention was turned to the slidebars and these were made from 1/4" thick gauge plate. The hardest part about this job was hacksawing two pieces 13/16"" wide by 4" long from a piece of 2" wide material. They were milled all round to bring them to 3/4" x 4.1/4", then reduced to 1/2" wide for most of the length. They were then held on the milled edges and the end clearance made with a 5/16" end mill, reducing the waist to 7/16"  Continuing to hold the bars in this manner, the four holes were drilled and tapped to suit. Then they were tipped to 15 degrees in the vice and the motion plate ends milled away.  The crosshead cover plates were made from 1" x 1/4" mild steel bar and the first part was to mill the shape of the oil reservoir. I've left the base plate a bit thicker that shown on the drawing, finishing at about seventy-five thou.  Then they were placed back in the vice and the oil reservoir formed by using a 7/32" slot drill to form the hole and a 1/4" x 40 tpi tap run down afterwards.  Finally, the six fixing holes were drilled and the covers fitted to the crossheads.  The motion plate was placed in the vice and the underside of the slidebar brackets trued up, bringing them both to the same height.  Then the plate was stood on end, the centre found and the four fixing holes drilled. Not in the picture, an end mill was used to clean the silver solder away and leave a flat seat for the screws.  I should have widened the pitch of the holes because, even though I used 7BA instead of the 6BA size specified on the drawing, it was still a bit too tight to get a box spanner on the screws. This is the third or fourth time that I have found where DY specifies sizes that just don't fit. These are a couple of pictures of the slidebar assembly as it stands at present.   Regards, Steve
|
|
|
|
Post by springcrocus on Dec 3, 2021 8:00:30 GMT
Cylinders continuedMoving forward with the cylinders, the steam ports were drilled next followed by drilling and tapping the drain cock ports and drilling the angled hole to get it exiting at 3/32" from the ends. Loading onto a 30 degree angle gauge appeared to be the required tilt.  The exhaust port was machined next and I used my tilting table to support the work at 10 degrees from the horizontal. The dimple I made earlier was centered and a hole drilled through at 3mm, followed by a 3/16" end mill and a 1/4" dia end mill, stopping soon after breaking through.  After that, I changed over to the tilt and swivel vice and machined the external shape of the exhaust port, the four cutouts for the steam ports and any other odds and ends that needed finishing. I could have done the exhaust port in this vice but I wanted to be able to see where the bottom of the end mill was.  All the endcap holes were tapped freehand with a 6BA spiral point tap, likewise the exhaust port holes, albeit 8BA. I would like to have smoothed the steam passages using burrs in the dremel but the port slots are bang on size with very crisp edges and it's not worth risking damaging these. I've done a little light filing but that is all.  Nothing more can be done with these until the steam chest is made so that's one of the next jobs on the agenda. Regards, Steve
|
|
|
|
Post by springcrocus on Dec 7, 2021 11:10:54 GMT
Cylinder end capsThese have been made from three sawn sections of bronze plate and it took quite some time to turn squares into circular discs. The 4-jaw chuck was used to get one end turned and faced true before changing to soft jaws in the 3-jaw chuck. One of the billets was sawn through to make two thinner discs for the front covers, then all four were faced turned and the spigot for the cylinder bore turned. The two front caps were reversed and faced to finish length, the two back covers were faced to length and the boss for the spindle gland turned. A 3/32" wide undercut was formed at the base of the boss, the piston-rod hole drilled and the reccess for the gland bored to size.  The lathe chuck was unbolted and mounted on the mill to allow the fixing holes to be drilled 2.9mm diameter on the same PCD as the cylinders. At this stage, they are symmetrical but the rear covers are handed on subsequent operations.  The flats on the edges of the covers were milled next, simply hanging on two pins in the vice.  At this point, the rear covers were bolted to their respective cylinders and set up for milling the shape of the boss. I made a few modifications to my rotary table to allow for better clamping and for a central pull-down bolt. There is also a locating spigot for the cylinder bore and the two fences are there to stop the work rotating around the single clamping screw. With the DRO zeroed on the centre of rotation, a 12mm end mill was used to cut down one side to "Y0", the table wound through 180 degress then continuing with the "Y" axis to clear the work. Multiple passes of twenty-five thou were made until reaching 3/4" across the flats.  I was keeping track of the sizes after each pass and made a note of the "X" reading on the DRO when I reached exactly 1.1/8" across the flats and this number was used as the finish pass of the top of the boss, bringing it to exactly 9/16" above the centre-line, the same as the crossheads. Before machining this face, however, the side face of each cylinder was clocked exactly square to the table.  With the vice back on the table, the gland mounting holes were drilled and tapped 8BA.  Finally, the two holes in the top of the boss were drilled and tapped 6BA to allow for fixing the slidebars.  I will make the pistons next so that I can assemble the cylinders to the slidebars and check the accuracy of the bolting face. Regards, Steve
|
|
|
|
Post by springcrocus on Dec 13, 2021 10:59:05 GMT
Bogie wheelsetsThe bearings have now been pushed into the axleboxes and the oil holes drilled through. I used a smear of loctite retainer to help keep them in place.  I've also made a small modification to the wheels and axles. Quite a few times I've read of others having the occasional wheel come loose and have decided to use locking screws to keep mine in place. In the back of the wheels, I have drilled a twenty degree hole using the tilting vice. These have been tapped M4 and cup-point stainless steel grub screws will be used.  After lightly tightening one screw to get a mark, I then undercut each of the axles with a 20 degree tool to leave a pocket for the screw to land on, This stops the screw raising a high spot on the axle and hampering future removal. It also has the advantage of pushing the wheel firmly back onto the shoulder of the axle. The wheels themselves are a very light press fit.  Finally, the axleboxes were loaded to the shafts, the wheels pressed on, screwed up and the ends of the axles faced off. The travelling steady that I made the other day was used to support the outer end of the wheels.  The wheelsets are now complete and can be put aside until assembly.  Regards, Steve
|
|


