|
|
Post by RGR 60130 on Jul 10, 2014 17:00:40 GMT
They look excellent Mike. I look forward to seeing the first castings.
Reg
|
|
44767
Statesman
 
Posts: 538
|
Post by 44767 on Jul 10, 2014 18:33:26 GMT
Just check the expansion rates, you don't want the iron liners coming loose at heat I'll definitely do the calculations and will shrink the liners with liquid nitrogen rather than heating the cylinder casting to insert them. Mike |
|
|
|
Post by fostergp6nhp on Jul 10, 2014 18:59:22 GMT
An option could be a high silicon iron as that supposedly flows well, IIRC Ford used it for their cylinder blocks/heads or maybe SG iron if that's runny enough as then you would only need to liner the valves.
|
|
44767
Statesman
 
Posts: 538
|
Post by 44767 on Jul 10, 2014 19:09:00 GMT
Yes, I'll see what the foundry suggests. SG iron would be good if if flows well enough. The bore still needs a liner though.
|
|
44767
Statesman
 
Posts: 538
|
Post by 44767 on Aug 27, 2014 7:25:46 GMT
Well some progress on another front. I have been looking into getting my own 3D wax printer to do all the complicated castings on the loco. I had asked a supplier to provide samples printed in a high definition mode. I chose the top feed casting and modelled it with the gallery already cast in it and to test the accuracy, I modelled in the threads on the studs. Here is what the casting looks like. 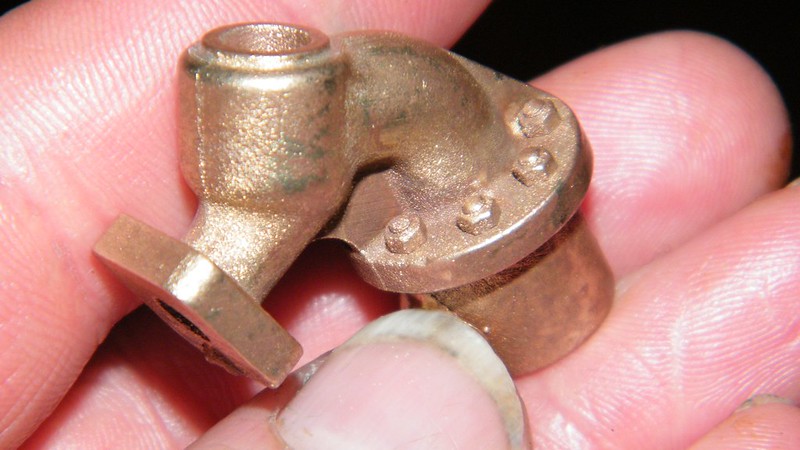 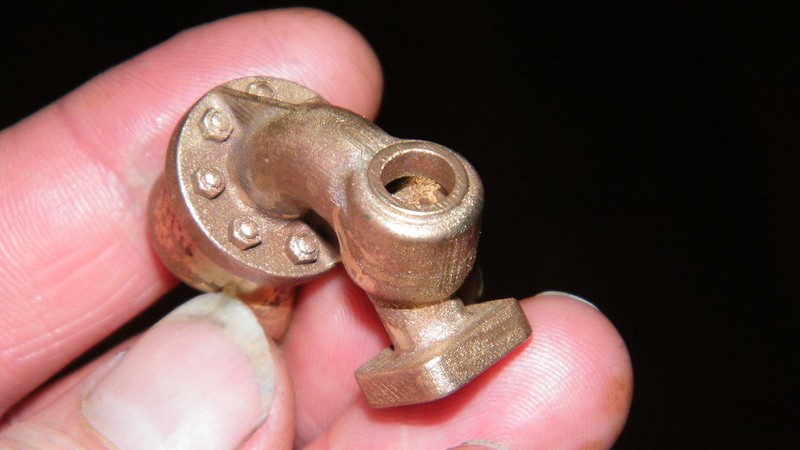 I am really encouraged by the result. Now that the casting shows the machines capability I think you'll agree that it will be put to a lot of use for my project as well as others'. Mike |
|
|
|
Post by Jim on Aug 27, 2014 7:56:01 GMT
Most impressive Mike and a superb rendition of the original.
The top feeds are such defining features that they just beg for finely detailed castings such as yours. In my opinion they really make the model. Are you intending to do a run for sale to modellers?
Jim.
|
|
44767
Statesman
 
Posts: 538
|
Post by 44767 on Aug 27, 2014 8:06:24 GMT
My intention is to make these castings available to others. I can do them in any scale, too. Yes, I had the works drawing for this item so it won't look any more authentic!
|
|
|
|
Post by Doug on Aug 27, 2014 12:47:27 GMT
My intention is to make these castings available to others. I can do them in any scale, too. Yes, I had the works drawing for this item so it won't look any more authentic! I am loving the work you are doing on this loco the detail is just amazing! Without me going throug the rigmorol of sending shapeways a 3D model etc. how much does it cost to get a part made like that valve body? "ball park" i am planning a 2.5" loco at the moment and the only way i will be able to get the detail that small is by getting 3D printed castings made as its a one off design so i am quite interested in the new methods like laser sintering etc. I asked a "brass casting company" about getting parts made for my Speedy but the cost was completely mad i could by a set of cylinder castings for the cost of my cylinder cover castings being made form my patterns. shocking! |
|
44767
Statesman
 
Posts: 538
|
Post by 44767 on Aug 27, 2014 13:19:42 GMT
Please don't hold me to this but based on the costs so far and guessing at how much the machine will cost to run, I think they will be in the order of £35.00 for a pair in 5" gauge. For 2 ½" gauge perhaps about £25.00 for a pair. I know there are some on the market at the moment which aren't cored out and they are substantially more than that. I hope that I'll be able to keep the prices to a level where it is cost effective for the likes of you, Doug, to consider the castings I'll be able to produce.
Thanks for your comment about my project so far.
Mike.
|
|
|
|
Post by suctionhose on Aug 28, 2014 1:28:03 GMT
A couple of questions on the cylinder if you'll indulge me?
Relating to the moulding and casting part of the process: -
The LMS Patriot people produced a fullsize cylinder from a styrofoam pattern which is not unlike a wax in the sense that it is melted / burnt out of the mould.
Given the size of the bores and passages on a FS cylinder, I can imagine working the sand into the passages and ramming it up to something strong enough to take the molten metal.
In your case, with quite delicate cores as it were, how and from what material do you make the mould?
Are ceramic cores necessary for small passages?
|
|
44767
Statesman
 
Posts: 538
|
Post by 44767 on Aug 28, 2014 9:00:25 GMT
It is a very similar process as you say however the main difference is the actual mould material. Once the wax has been produced this is attached to a tree with wax rods which will become the runners. The whole tree is then immersed in a ceramic slurry about the consistency of thick cream. As you can see, the entire wax will be covered. It is then brought out and allowed to dry. The dipping and drying is repeated several times until a thick enough coating is obtained (about 2-3mm) The shell, as it is called, is then fired in a kiln which hardens the ceramic just as pottery does and of course the wax melts out. The wax that the printer uses leaves no ash at all. It actually vapourises and doesn't burn so very small detail is not compromised. This leaves a void into which the metal is poured.
The small castings I have been getting cast here are done in silicon bronze which has a reasonably low melting point. Instead of the slurry a compound similar to plaster of Paris is used (some even use plaster of Paris) and the mould is then dewaxed again by heat which also drives out the moisture. These are centrifugally cast which makes sure all the detail is crisp. In both cases the mould is preheated before casting.
I hope this helps.
Mike
|
|
|
|
Post by suctionhose on Aug 28, 2014 9:12:32 GMT
Yes thank you. I am familiar with the lost wax process though not done it in person. I guess it is the ceramic slurry I'm thinking about for coring 1/16 holes etc.
Very interesting!
Ps Am I correct in thinking foundry sand is what the patriot people used or is it a resin sand like old style shell cores?
|
|
44767
Statesman
 
Posts: 538
|
Post by 44767 on Aug 28, 2014 11:14:51 GMT
I'm not sure what they used but my guess is that it was normal casting sand. Jordan Leeds (on this forum) had a bit to do with it.
Mike
|
|
|
|
Post by vulcanbomber on Aug 30, 2014 20:52:42 GMT
Well some progress on another front. I have been looking into getting my own 3D wax printer to do all the complicated castings on the loco. I had asked a supplier to provide samples printed in a high definition mode. I chose the top feed casting and modelled it with the gallery already cast in it and to test the accuracy, I modelled in the threads on the studs. Here is what the casting looks like.   I am really encouraged by the result. Now that the casting shows the machines capability I think you'll agree that it will be put to a lot of use for my project as well as others'. Mike Well they look good enough to go onto my 9F!!!! And a couple of other projects I have rolling around the brain as well.... Good job well done there. |
|
44767
Statesman
 
Posts: 538
|
Post by 44767 on Aug 31, 2014 13:27:32 GMT
Well Vulcanbomber you know where to get them if you want them! There is a little duscussion as to whether these can screw in because of the clearance around it in the cladding but it would be a minor change to face off the boss for the male thread and bolt them on using actual studs and nuts as in full size. Actually, thinking about it, the boss could still be used as a plain diameter with an o-ring seal rather than trying to seal on the flange face. Are you wanting any pony truck castings for your 9F? I have all but got them ready to go. This is the CAD model for the 2-6-2T front pony truck 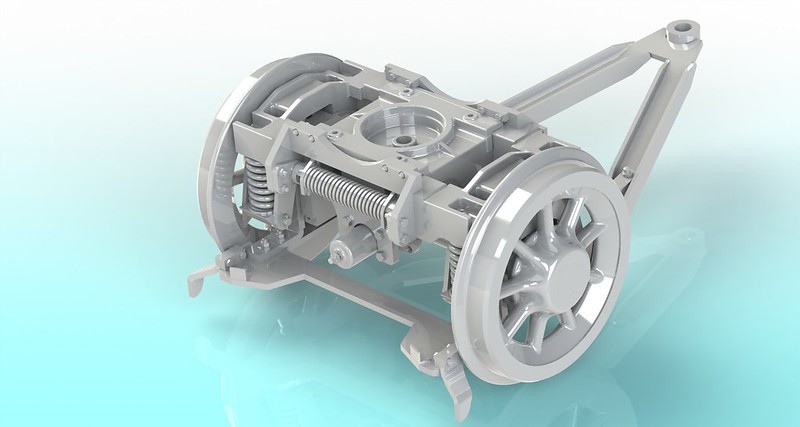 The 9F is slightly different in that the triangular frame is longer and designed to bolt on to extensions of the rear axlebox guides and has different strengthening plates. But apart from that and tiny changes to the lube points the other castings are the same. I think I will have these as a stand alone kit to suit all the other standards with a front pony truck. This is the difference between what's on the market at the moment (background) and my lost wax cast version of the slide. 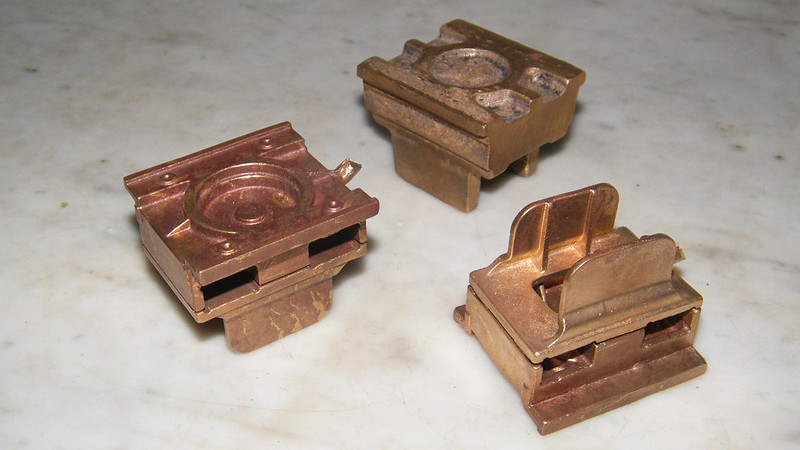 From now on though the casting will not be in two halves; that was only a sample and the foundry couldn't handle a casting that size! Cheers, Mike |
|
|
|
Post by ejparrott on Sept 2, 2014 12:33:43 GMT
Drool......
Been looking at styrofoam patterns for my cylinders as you know, like the Patriot group, but from my research the samd for that is not traditional sand and is not rammed. Instead, pure silica sand dry is used and vibrated in to place -ramming would damage the pattern. The beauty is there's no drying time for the mould, saving two days from production
|
|
44767
Statesman
 
Posts: 538
|
Post by 44767 on Sept 27, 2014 8:00:42 GMT
Sorry it's been a while. I have been rather busy recently as I now have my 3D printer. I am overseas at the moment too which doesn't help. If anyone would like to see the sort of castings now possible, I'll be at the Midlands show on the Friday (after about noon) and the Sat & Sun with some samples cast from my waxes. It is not really a production method for easy to mould waxes but most certainly is a very cost effective way to produce very short runs of very complicated castings. Since there is no tooling involved it is an ideal way to produce a wax for much less than the cost of a mould for it.
|
|
44767
Statesman
 
Posts: 538
|
Post by 44767 on Oct 12, 2014 14:20:14 GMT
I took delivery of my printer only a week before I came up to China. Very frustrating! I did manage to get some waxes printed and cast before I left. Here are a few samples of what's now possible. 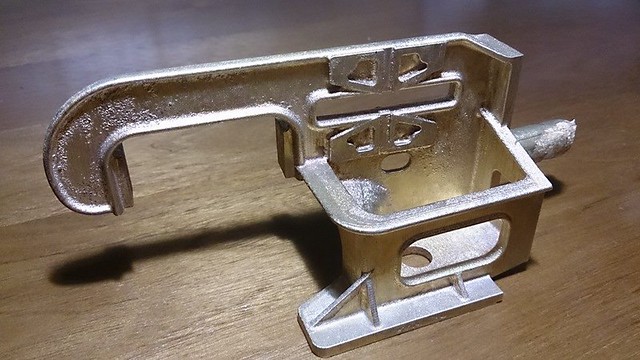 This is one of the motion brackets. It's pushing the limits of the foundry's capacity but I have convinced them they need to set up to be able to cast my cylinders! 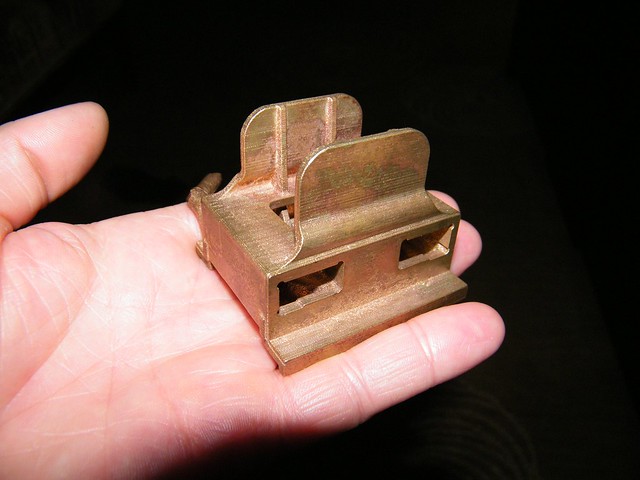 The sliding pivot for the pony truck. It's all cored out so no milling in those square holes! 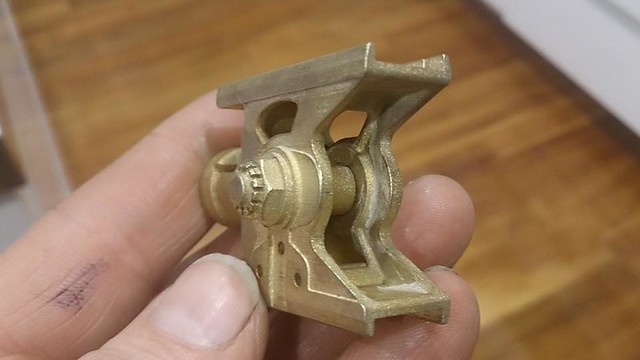 For a bit of fun this was cast to net size with little end pin in place. All detail per the works drawings for these castings. 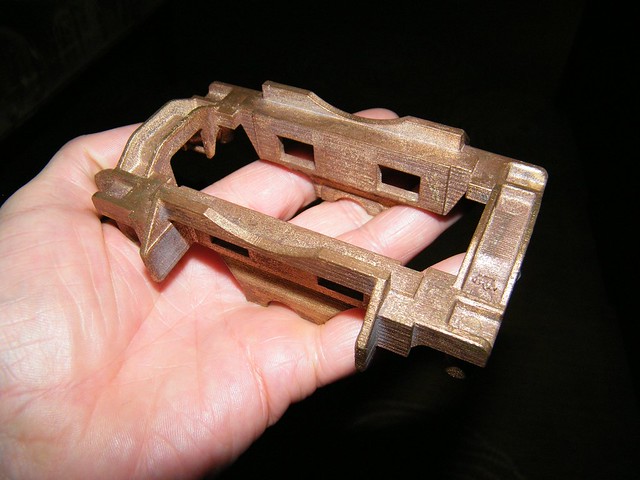 The pony truck frame. The wax for this broke towards the bottom of the tails. I got them to cast the broken piece anyway and I'll just silver solder them back in place. All these really are just samples to check shrinkage rates and for show. Since the wax is printed directly (and the printer compensates for the shrinkage of the wax itself) the only contraction to allow for is the cooling metal. First tests show that this is 1.33% whereas I was having to allow 3.1% for the RP, silicon mould and casting shrinkage. If anyone would like to see these you can meet me at the Midlands show on Friday, Saturday and Sunday. Hope to see some of you there! Mike |
|
|
|
Post by Deleted on Oct 12, 2014 14:23:52 GMT
Wow! Very nice Mike! Are they 5 inch, they look quite big. Well impressed though!
Ben
|
|
44767
Statesman
 
Posts: 538
|
Post by 44767 on Oct 12, 2014 14:29:37 GMT
Wow! Very nice Mike! Are they 5 inch, they look quite big. Well impressed though! Ben Yes, these are all 5" gauge but now the 3D models are done it's simple to print any scale you want. That's the great advantage- it's a "no tooling" method. |
|