rrmrd66
Part of the e-furniture

Posts: 339 
|
Post by rrmrd66 on Nov 29, 2017 12:35:29 GMT
Well blow me down, Norman.
Daughter is in NE7
You could be neighbors,almost!
Best Wishes
Malcolm from sleety (at present) Thirsk YO7
|
|
rrmrd66
Part of the e-furniture
Posts: 339
|
Post by rrmrd66 on Nov 29, 2017 8:09:58 GMT
Thanks for the tip Goldstar.
By a strange freak of coincidence it is on my Christmas wish list to Santa Claus in the far north (daughter in Newcastle upon Tyne).
Cheers
Malcolm
|
|
rrmrd66
Part of the e-furniture
Posts: 339
|
Post by rrmrd66 on Nov 26, 2017 19:30:50 GMT
Hello again Steve
Hi Steve (and Lisa)
I have had a good read through your post and that of Lisa's
All good stuff. It was detail of the indexable tool setting screw I was after. Is it 40 tpi x 50 graduations?
Somewhere in Lisa's post (I think) I was diverted to a "mrcrispin" on You tube. Have you seen this? Well worth a look.
Cheers
Malcolm
|
|
rrmrd66
Part of the e-furniture
Posts: 339
|
Post by rrmrd66 on Nov 26, 2017 7:43:59 GMT
Hello David
Bad luck missing the milling machine.
Would still appreciate stand detail if you can find it.
Regards
Malcolm
|
|
rrmrd66
Part of the e-furniture
Posts: 339
|
Post by rrmrd66 on Nov 26, 2017 7:41:57 GMT
Hi Steve
Thanks for the tip.
Still wouldn't mind that MEW article though.
Regards
Malcolm
|
|
rrmrd66
Part of the e-furniture
Posts: 339
|
Post by rrmrd66 on Nov 25, 2017 14:24:33 GMT
Hello Everybody. Has anybody got a copy of Model Engineers Workshop Issue 136 March 2008 with details about the between centres boring bar by Paul Murton? If so would it be possible to scan or whatever to give me a copy. Maybe by a PM? ( Not too certain how that works). I fancy making one in preparation for the machining of the cylinders for my 5" gauge Hunslet Engine. Many Thanks Malcolm ![]() |
|
rrmrd66
Part of the e-furniture
Posts: 339
|
Post by rrmrd66 on Nov 24, 2017 14:31:00 GMT
What! Water base marking blue. Yellow as well. What ever next?
What happened to Stuart's Engineers Micrometer Blue in that familiar blue tin? One would last you a life time. I still have mine.
How many remember the hand scraped MS 1" cube that had to fit 16 ways into a couple of 1"x1" square holes in two 1/4" plates held 1/2" apart by pillars? A 0.0015" feeler gauge was not allowed to pass through the gaps.
This incidentally had to be accomplished with a flat scraper that you had made from an old file (annealed, teeth removed, forged, hardened and sharpened). Still have that as well.
Happy days.
Good to see that apprenticeships have fallen by 59% following the levy that was suppose to encourage them!!!!!!
Cheers
Malcolm
PS Roger. The bunker sides are truly an art work. Beautiful.
|
|
rrmrd66
Part of the e-furniture
Posts: 339
|
Post by rrmrd66 on Nov 23, 2017 8:33:00 GMT
Hi David
Have you more detail about the "large diameter hole" in the pole reverser bracket?
I had an interesting hour with the guys at the Lake Bala NG Railway in their shed a few weeks back where they have 4 or 5 Hunslets of one type and another. Took lots of pictures but not from that side of the cab. Sod's Law eh?
Although I am all for a mod not too sure about the draincock rod. I like levers and bellcranks. Remember this time last tear I was finishing off an 8 day Grandmother clock movement and case.
Enough of my meager efforts. Did you buy that milling machine? If so we would all like to see pictures and details please.
Thanks for your interest
Regards
Malcolm
|
|
rrmrd66
Part of the e-furniture
Posts: 339
|
Post by rrmrd66 on Nov 22, 2017 12:11:12 GMT
Praise indeed from an "Elder Statesman".
I am honoured, sir.
Cheers.
M
PS I do take a certain amount of time to "dress the set" before pressing the button!
|
|
rrmrd66
Part of the e-furniture
Posts: 339
|
Post by rrmrd66 on Nov 21, 2017 16:34:26 GMT
For the jobs where a moderate amount of precision is required I have a quick and dirty method of setting the rotary table axis in line with the spindle. I have turned piece of true-running ground bar machined to a 30 degree included angle point (the exact angle is irrelevant..). Put that in your milling chuck (of course use a bar with the diameter you have a collet/holder for, mine was 20mm). Leave the rotary table loose, bring down the point into the central hole in the rotary table and it will centre itself up on the point. Don't force it into the hole, a light contact is all that is necessary. If the rotary table is large and heavy moving the slides is the best way. I find that the small 5" table moves easily on its own, the 8" is too heavy. Tighten up the clamps of the rotary table and zero all dials. It's taken me longer to write than to do the job and it's accurate for 99% of the jobs I do. Yes good idea. Not so different to my method really. Skinning cats, eh? Thanks for the tip. Malcolm |
|
rrmrd66
Part of the e-furniture
Posts: 339
|
Post by rrmrd66 on Nov 21, 2017 7:27:08 GMT
Hello simplyloco
Into a dustpan.
I have a thing about 'mucky working"
Cheers
Malcolm
|
|
rrmrd66
Part of the e-furniture
Posts: 339
|
Post by rrmrd66 on Nov 20, 2017 21:15:23 GMT
Good evening everybody. A few weeks since I last brought you up to date. I have been very busy on this project although there seems to be glacial progress. I average about 25-30 hours a week. There is a lot of time waiting for materials and tools to arrive. However no excuses so onto the build. The eccentric connecting rods have now been braised and are being finished machined to arrive at the correct distance between the expansion link bush and the face of the eccentric strap. The drill bit stuck in the hole allows me to set the exact distance wit the help of the DRO. 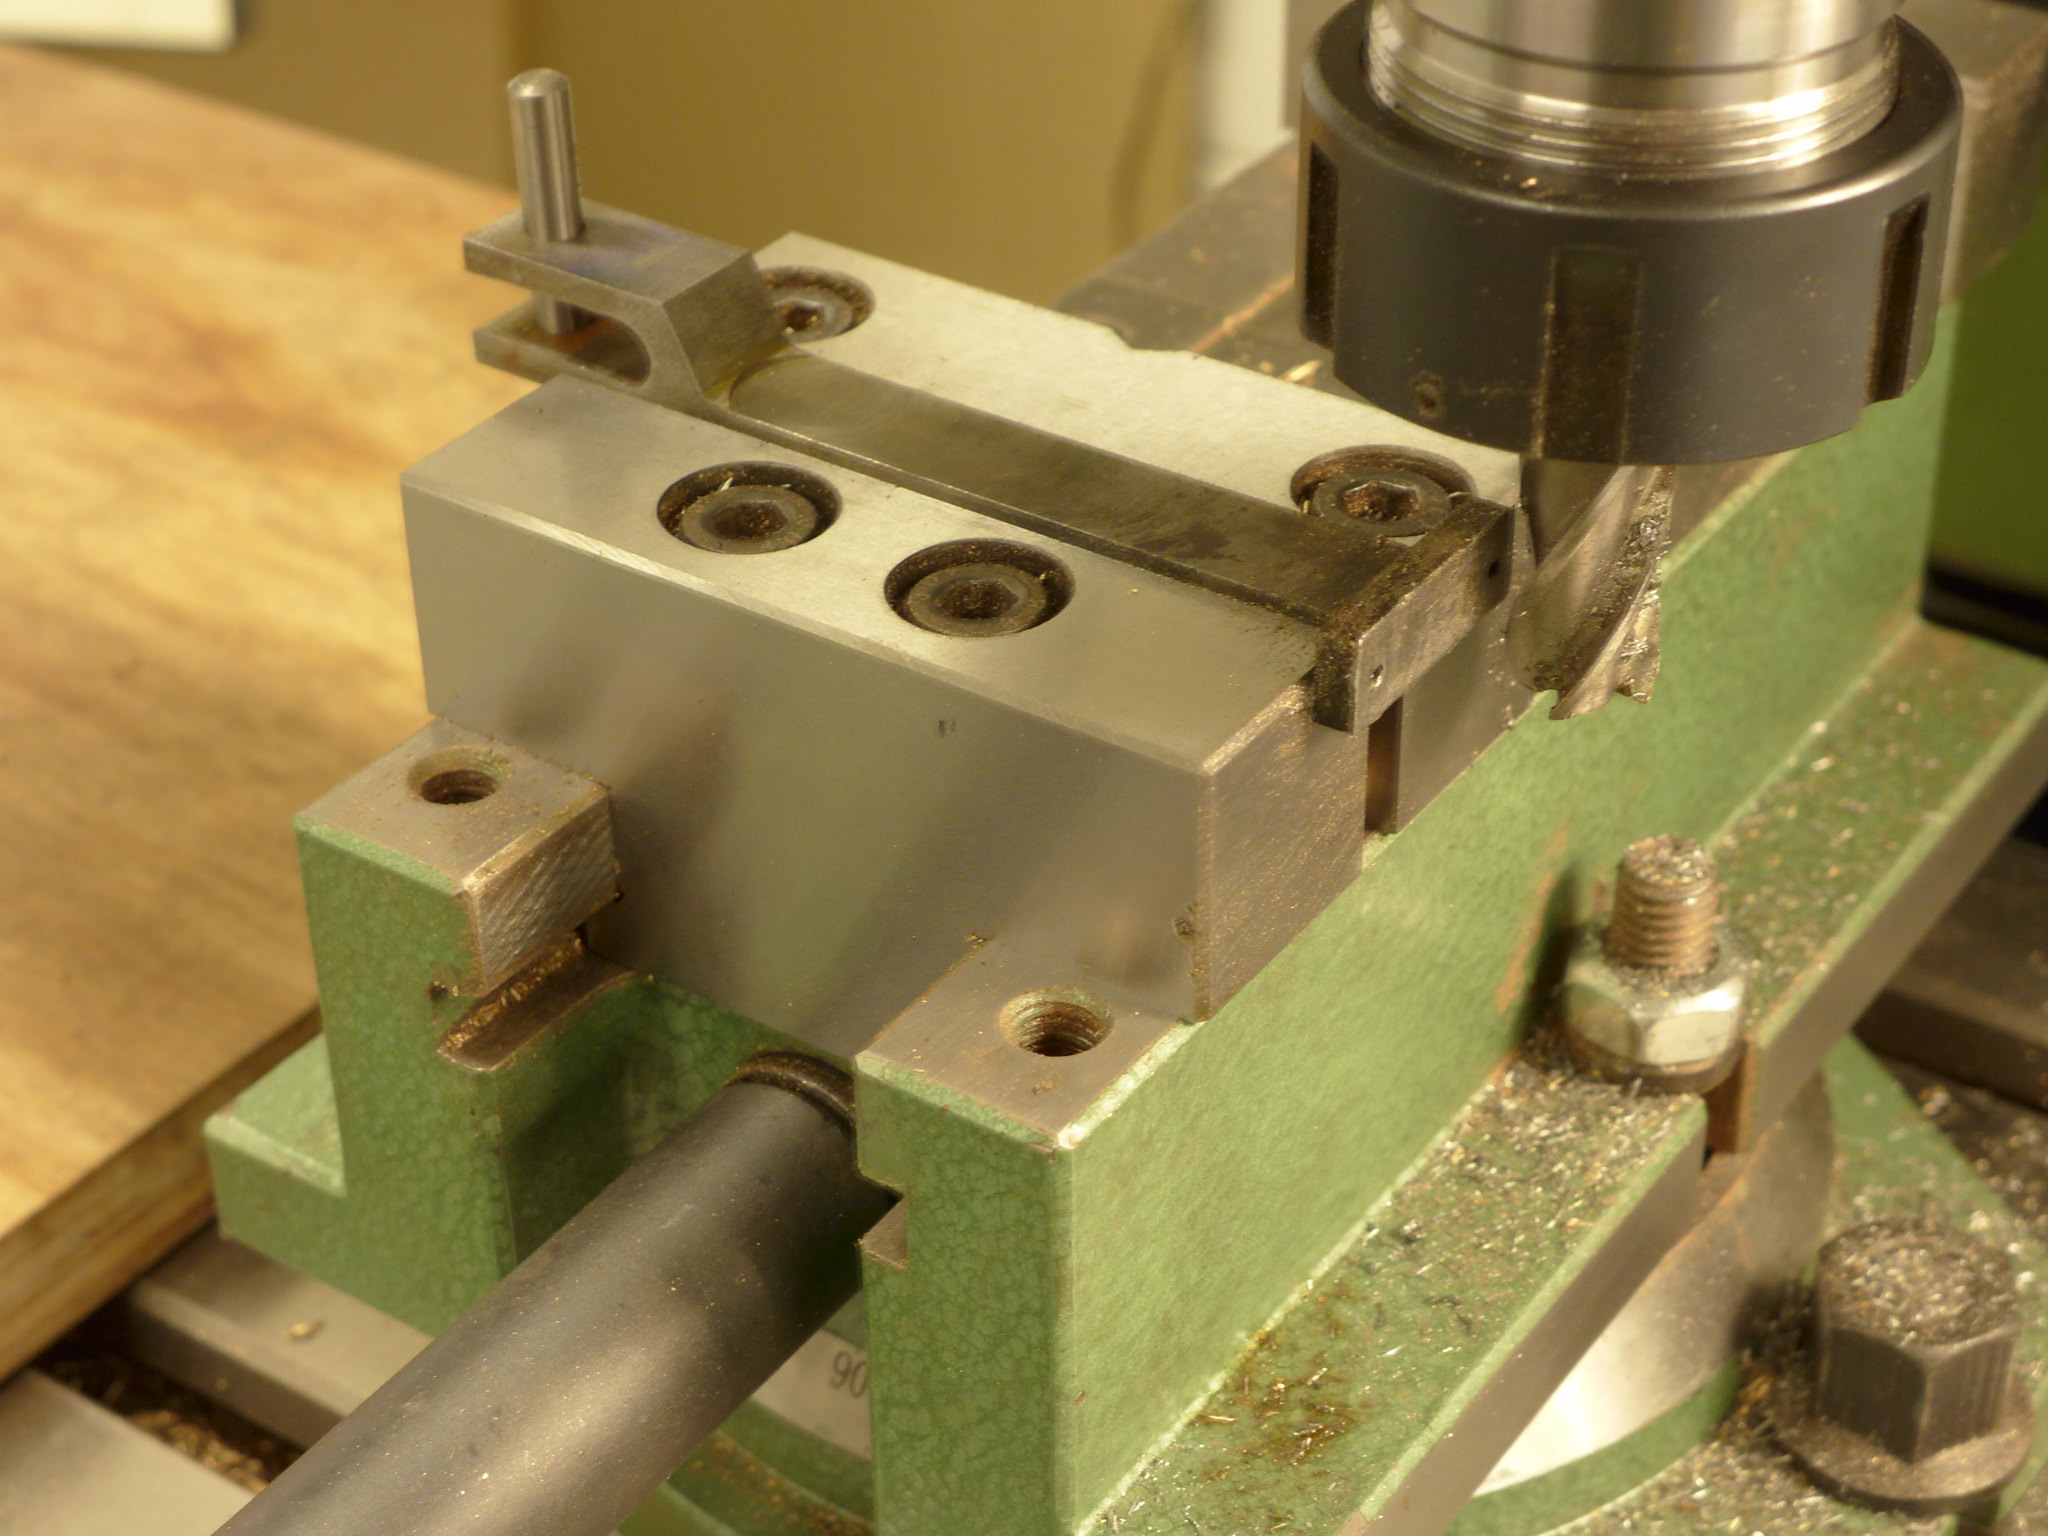 P1010202 P1010202 by Malcolm HARWOOD, on Flickr The connecting rods lenghts are all within +/- 0.0025" so I think that good enough The oil reservoirs and lubrication passages have been drilled. 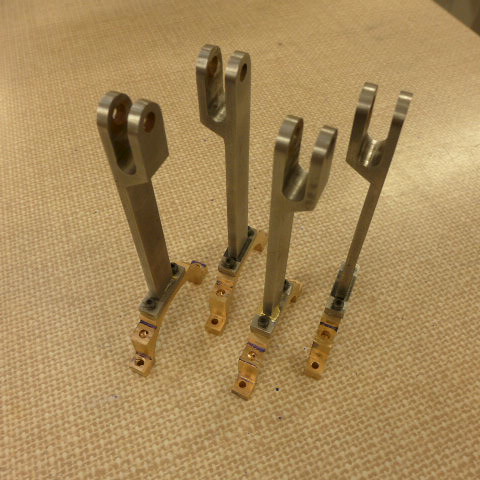 P1010209 P1010209 by Malcolm HARWOOD, on Flickr Next we move on to the intermediate valve guide spindles. Here is one mounted in the 3 jaw chuck in the rotary table with the far end supported by the tail stock and an extra 1/2" of thread with a centre drill which I will remove later. I was uncertain that drilling and milling this "free" end was a good idea unsupported. The chuck is held in the rotary table by an 2MT adaptor which allows the use of the Myford chuck Very good. However, the disadvantage is that the work piece can only be fed into the chuck until it meets this adaptor. I noticed that Roger and Speedy has such a Vertex Rotary table and tailstock. His clamping arrangements are the opposite to mine. I have to clamp the table with straps whereas the tailstock sits nicely in the centre groove of the milling table. Roger's is the opposite. By the way. Not all "H6" rotary tables are of Vertex manufacturer. Some suppliers use this designation but do not make it clear that they are from other suppliers. Shame on them! The horrendous burr and the very short end mill are the result of a minor accident. I broke the cutter! 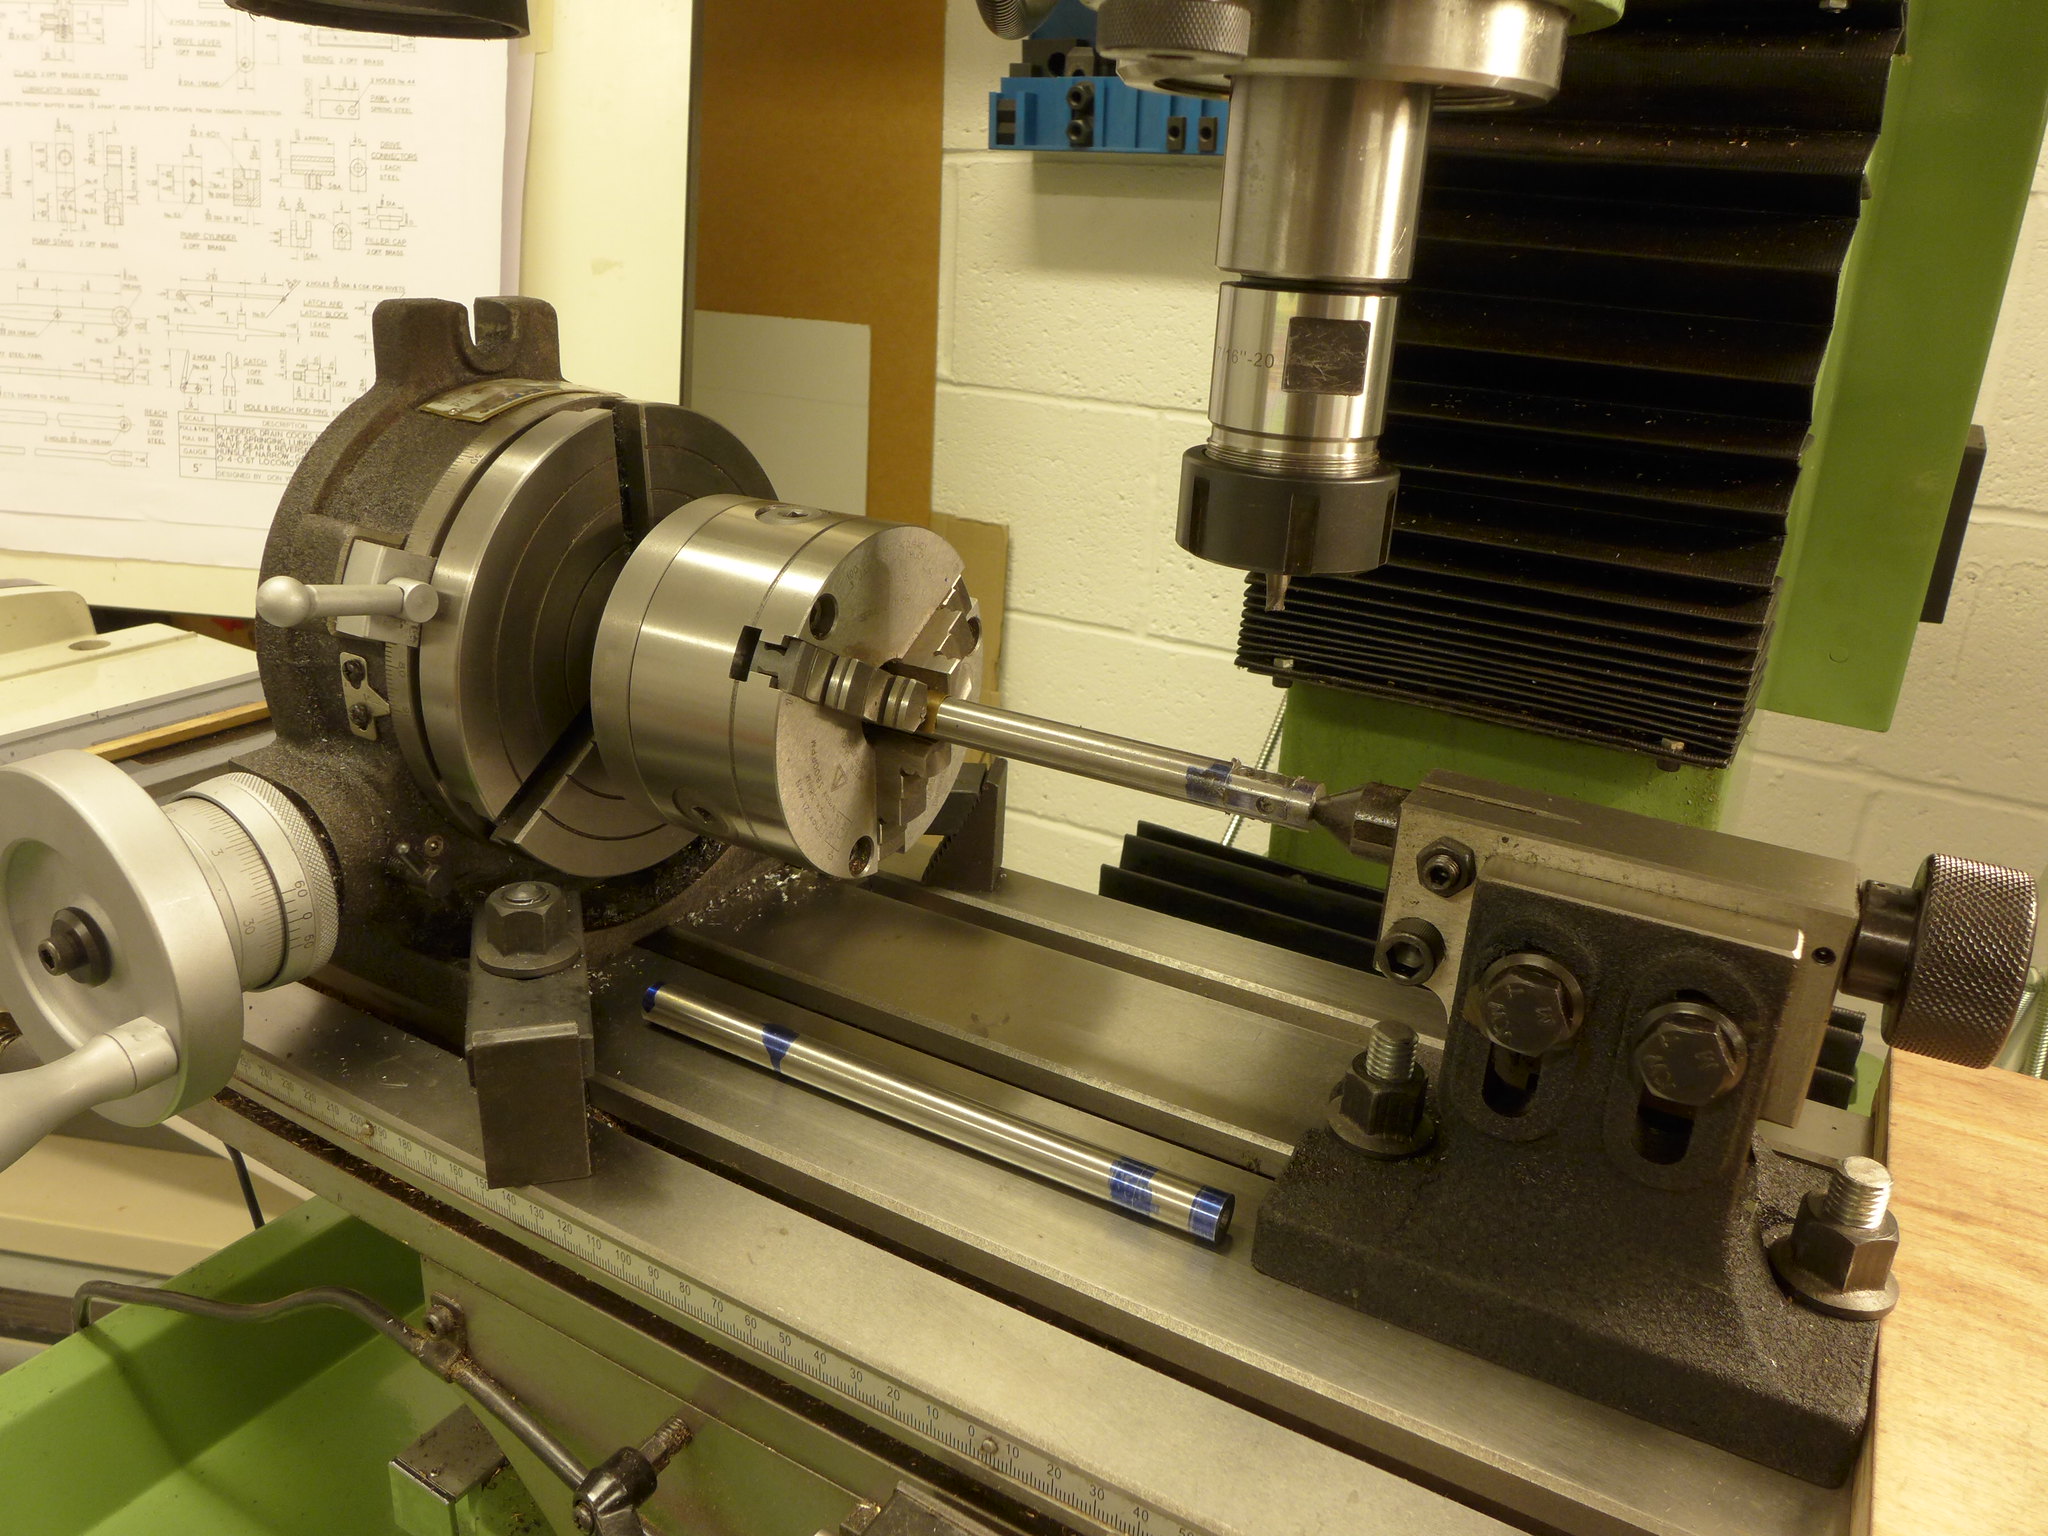 P1010210 P1010210 by Malcolm HARWOOD, on Flickr One end of the valve spindle is now more or less finished the other needs its "center drill hole" removing and the clevis end radiussing. 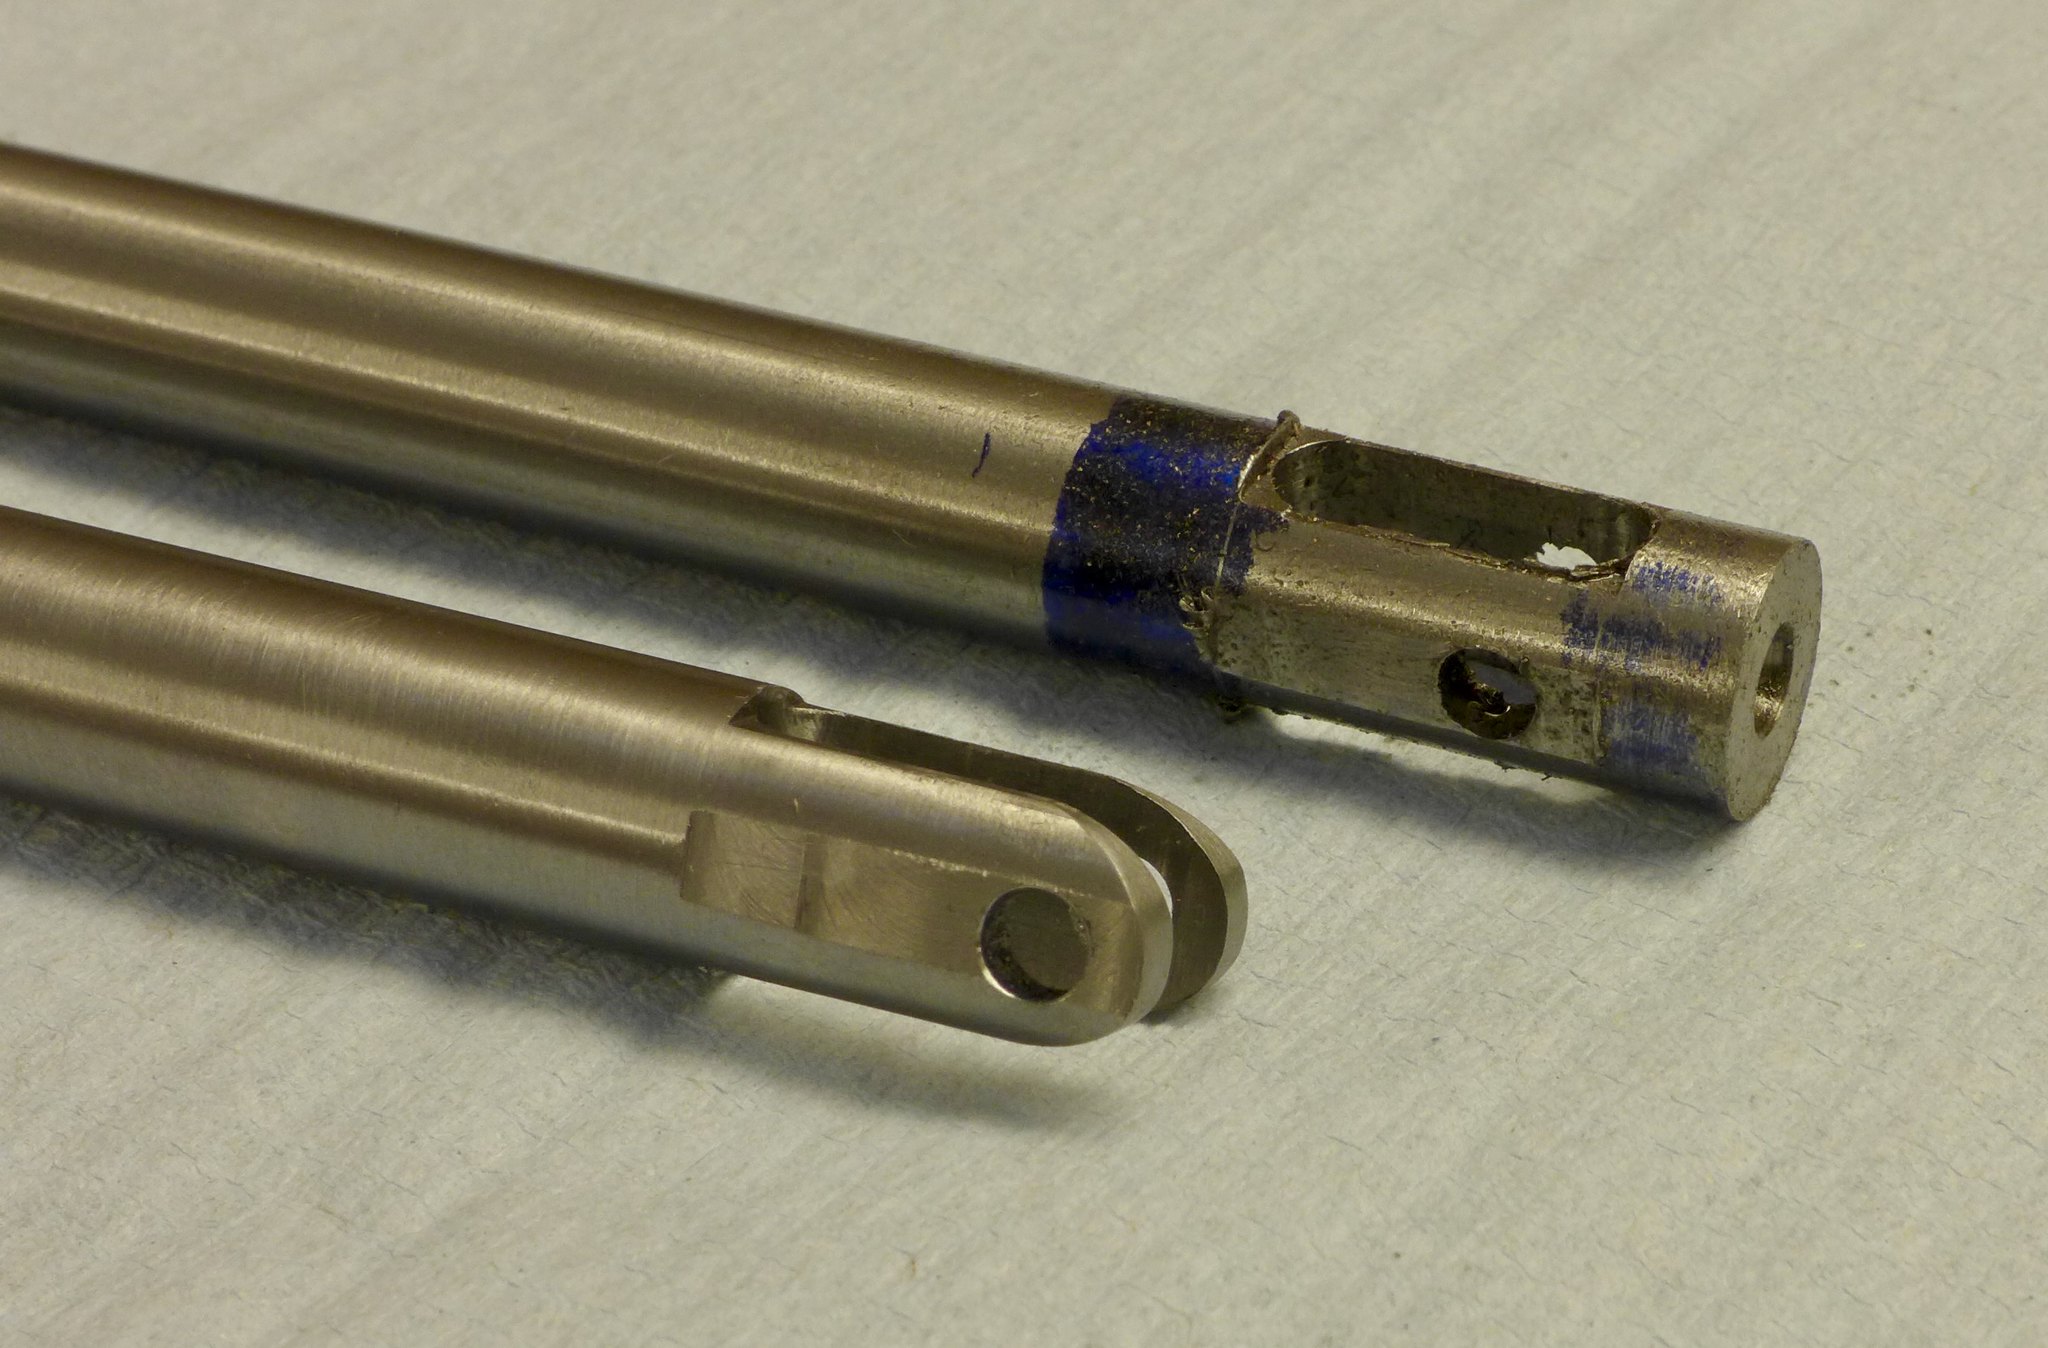 fullsizeoutput_668 fullsizeoutput_668 by Malcolm HARWOOD, on Flickr Returning the valve spindle to the lathe allows the 5/16" waist to be turned and the newly acquired button tool to turn the radiused shoulders. The extended thread can now be removed and the overall dimension checked against the drawing. 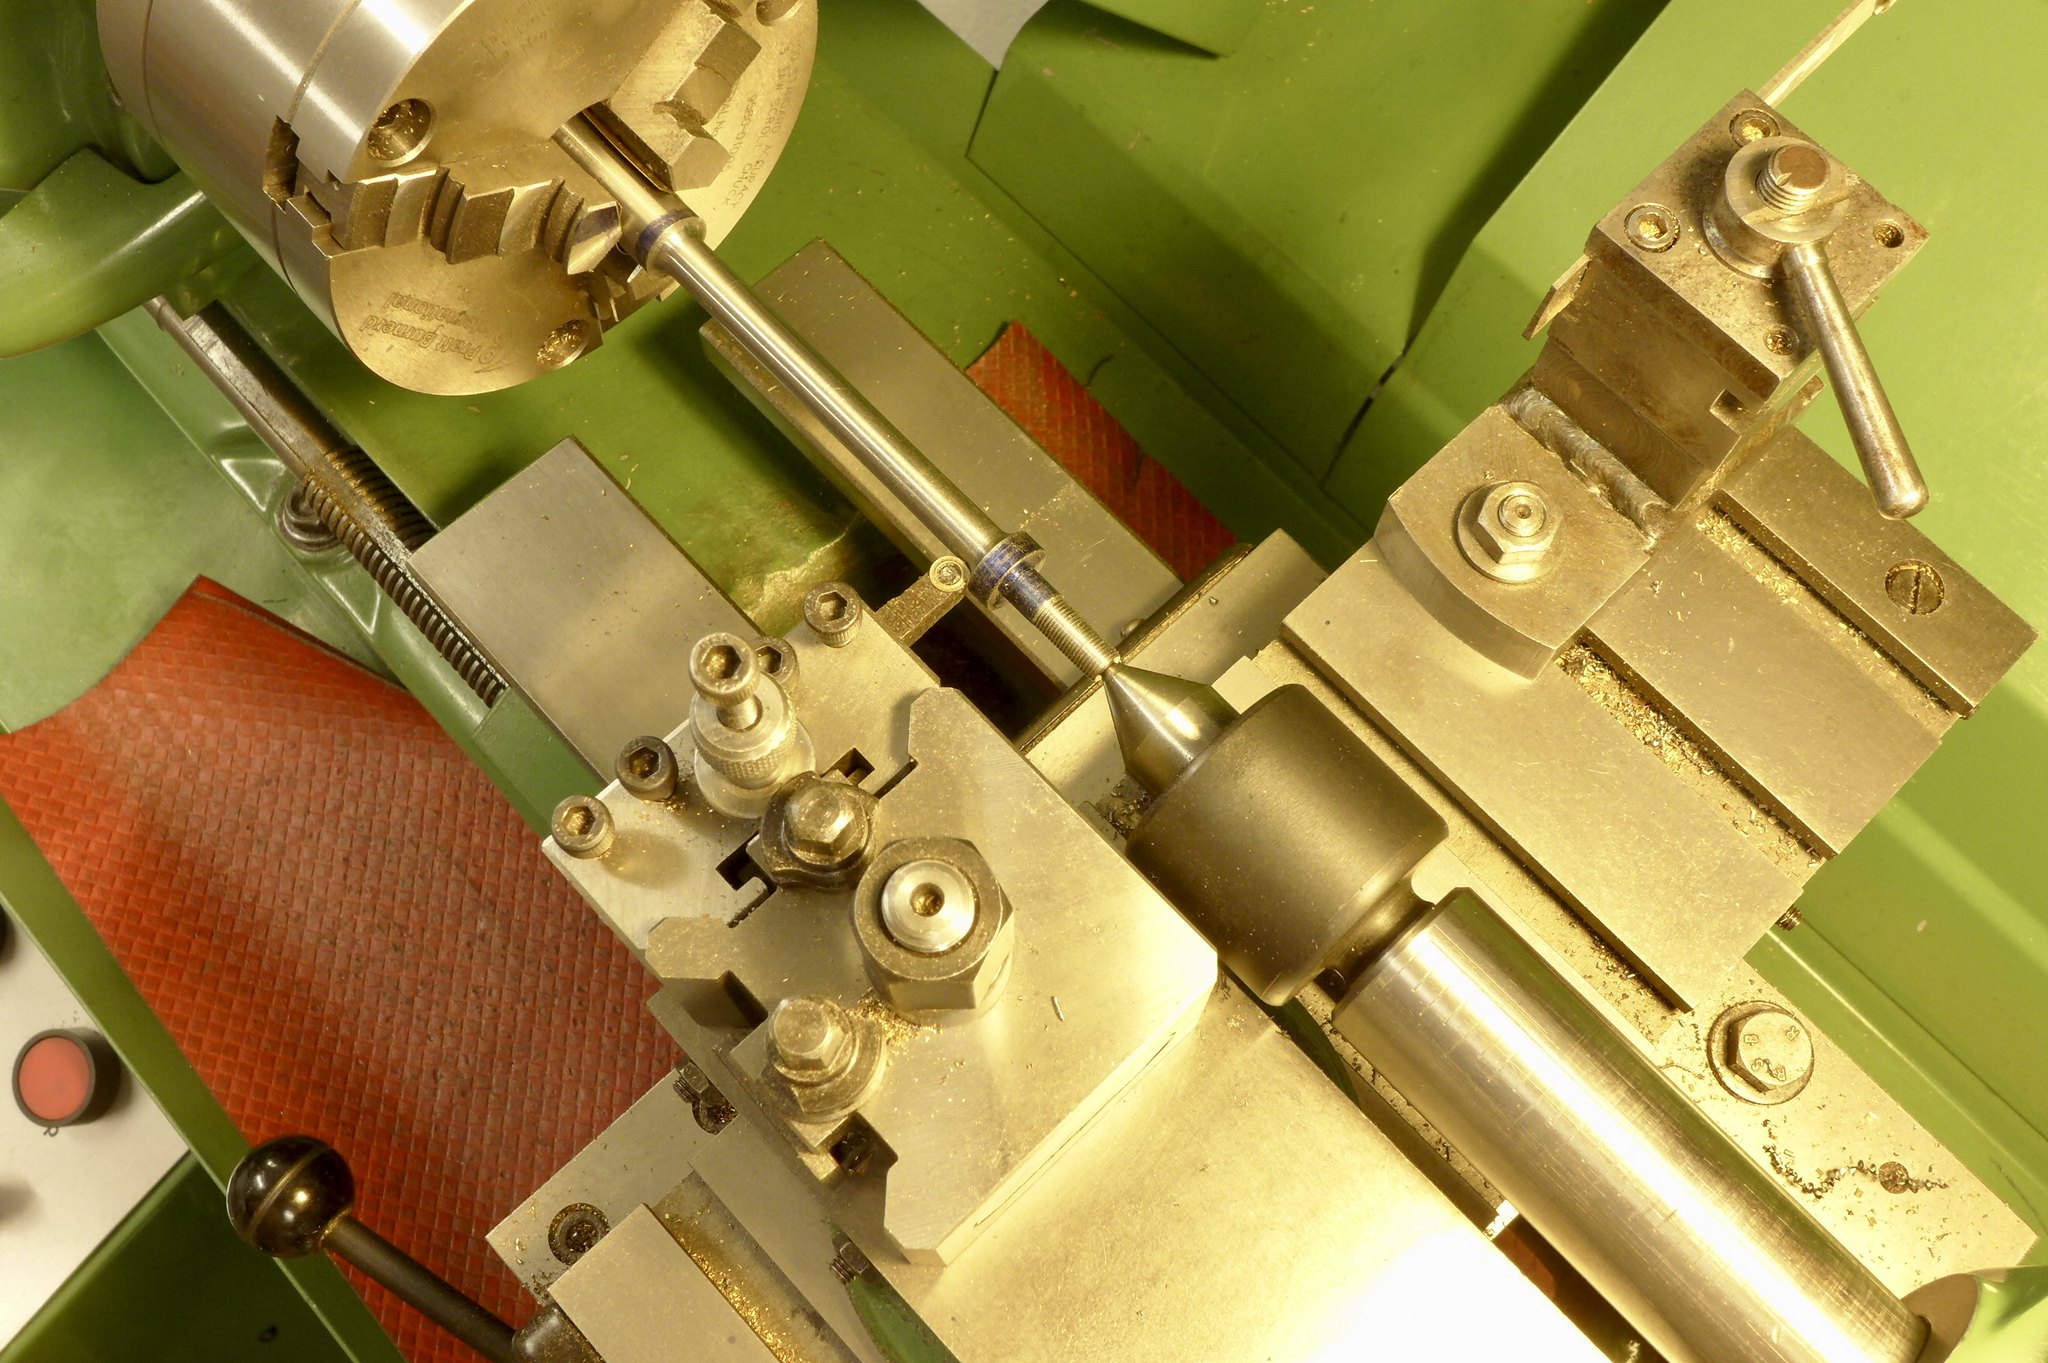 fullsizeoutput_66f fullsizeoutput_66f by Malcolm HARWOOD, on Flickr Whilst waiting for some other part I make a start of the lifting and reversing arms and links. Here I have "gang marked" them out to ease drilling prior to cutting and shaping 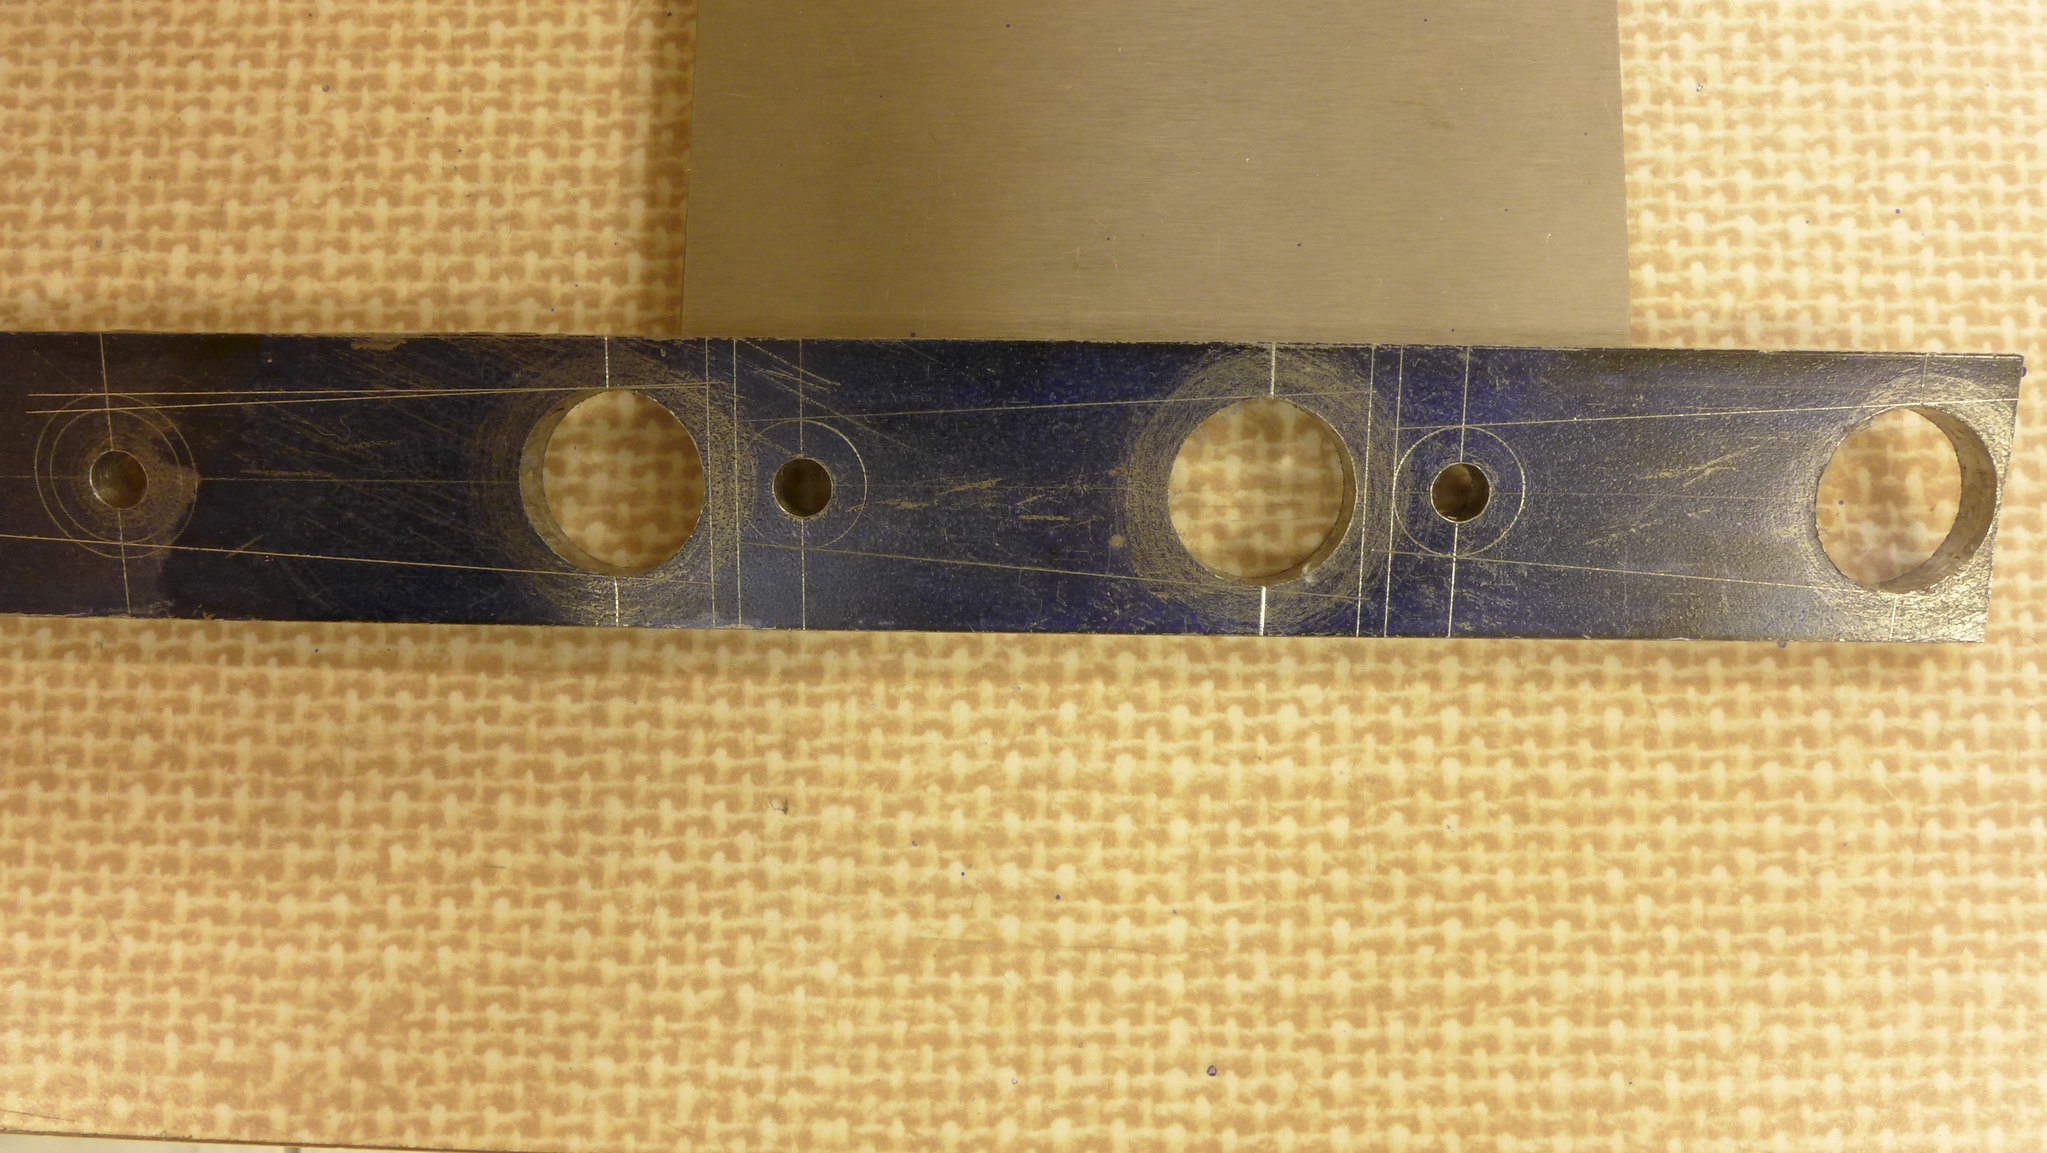 P1010204 P1010204 by Malcolm HARWOOD, on Flickr Brazing jigs have been made for the lifting arms (2 off at 1 9/16"centres ) and the reversing arm (1 off at 1 3/4" centres). The lifting arms are to the Bill Hall optimised dimension, not the Don Young dimension. (1/16" difference). The lifting links are to drawing. 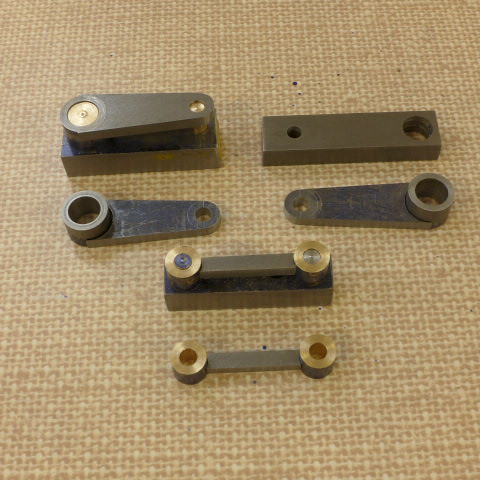 P1010208 P1010208 by Malcolm HARWOOD, on Flickr I am trying to get the complete valve gear assembly made so make a start on the cab mounted pole reverser. I need to locate the exact centre of the rotary table with respect to the spindle centre. I have not got one of those gadgets, at present, for mounting the DTI in the chuck to centralise it. Thus I make a brass button that fits into the center bore and align the spindle/rotary table by eye (i am only cutting quadrants remember) 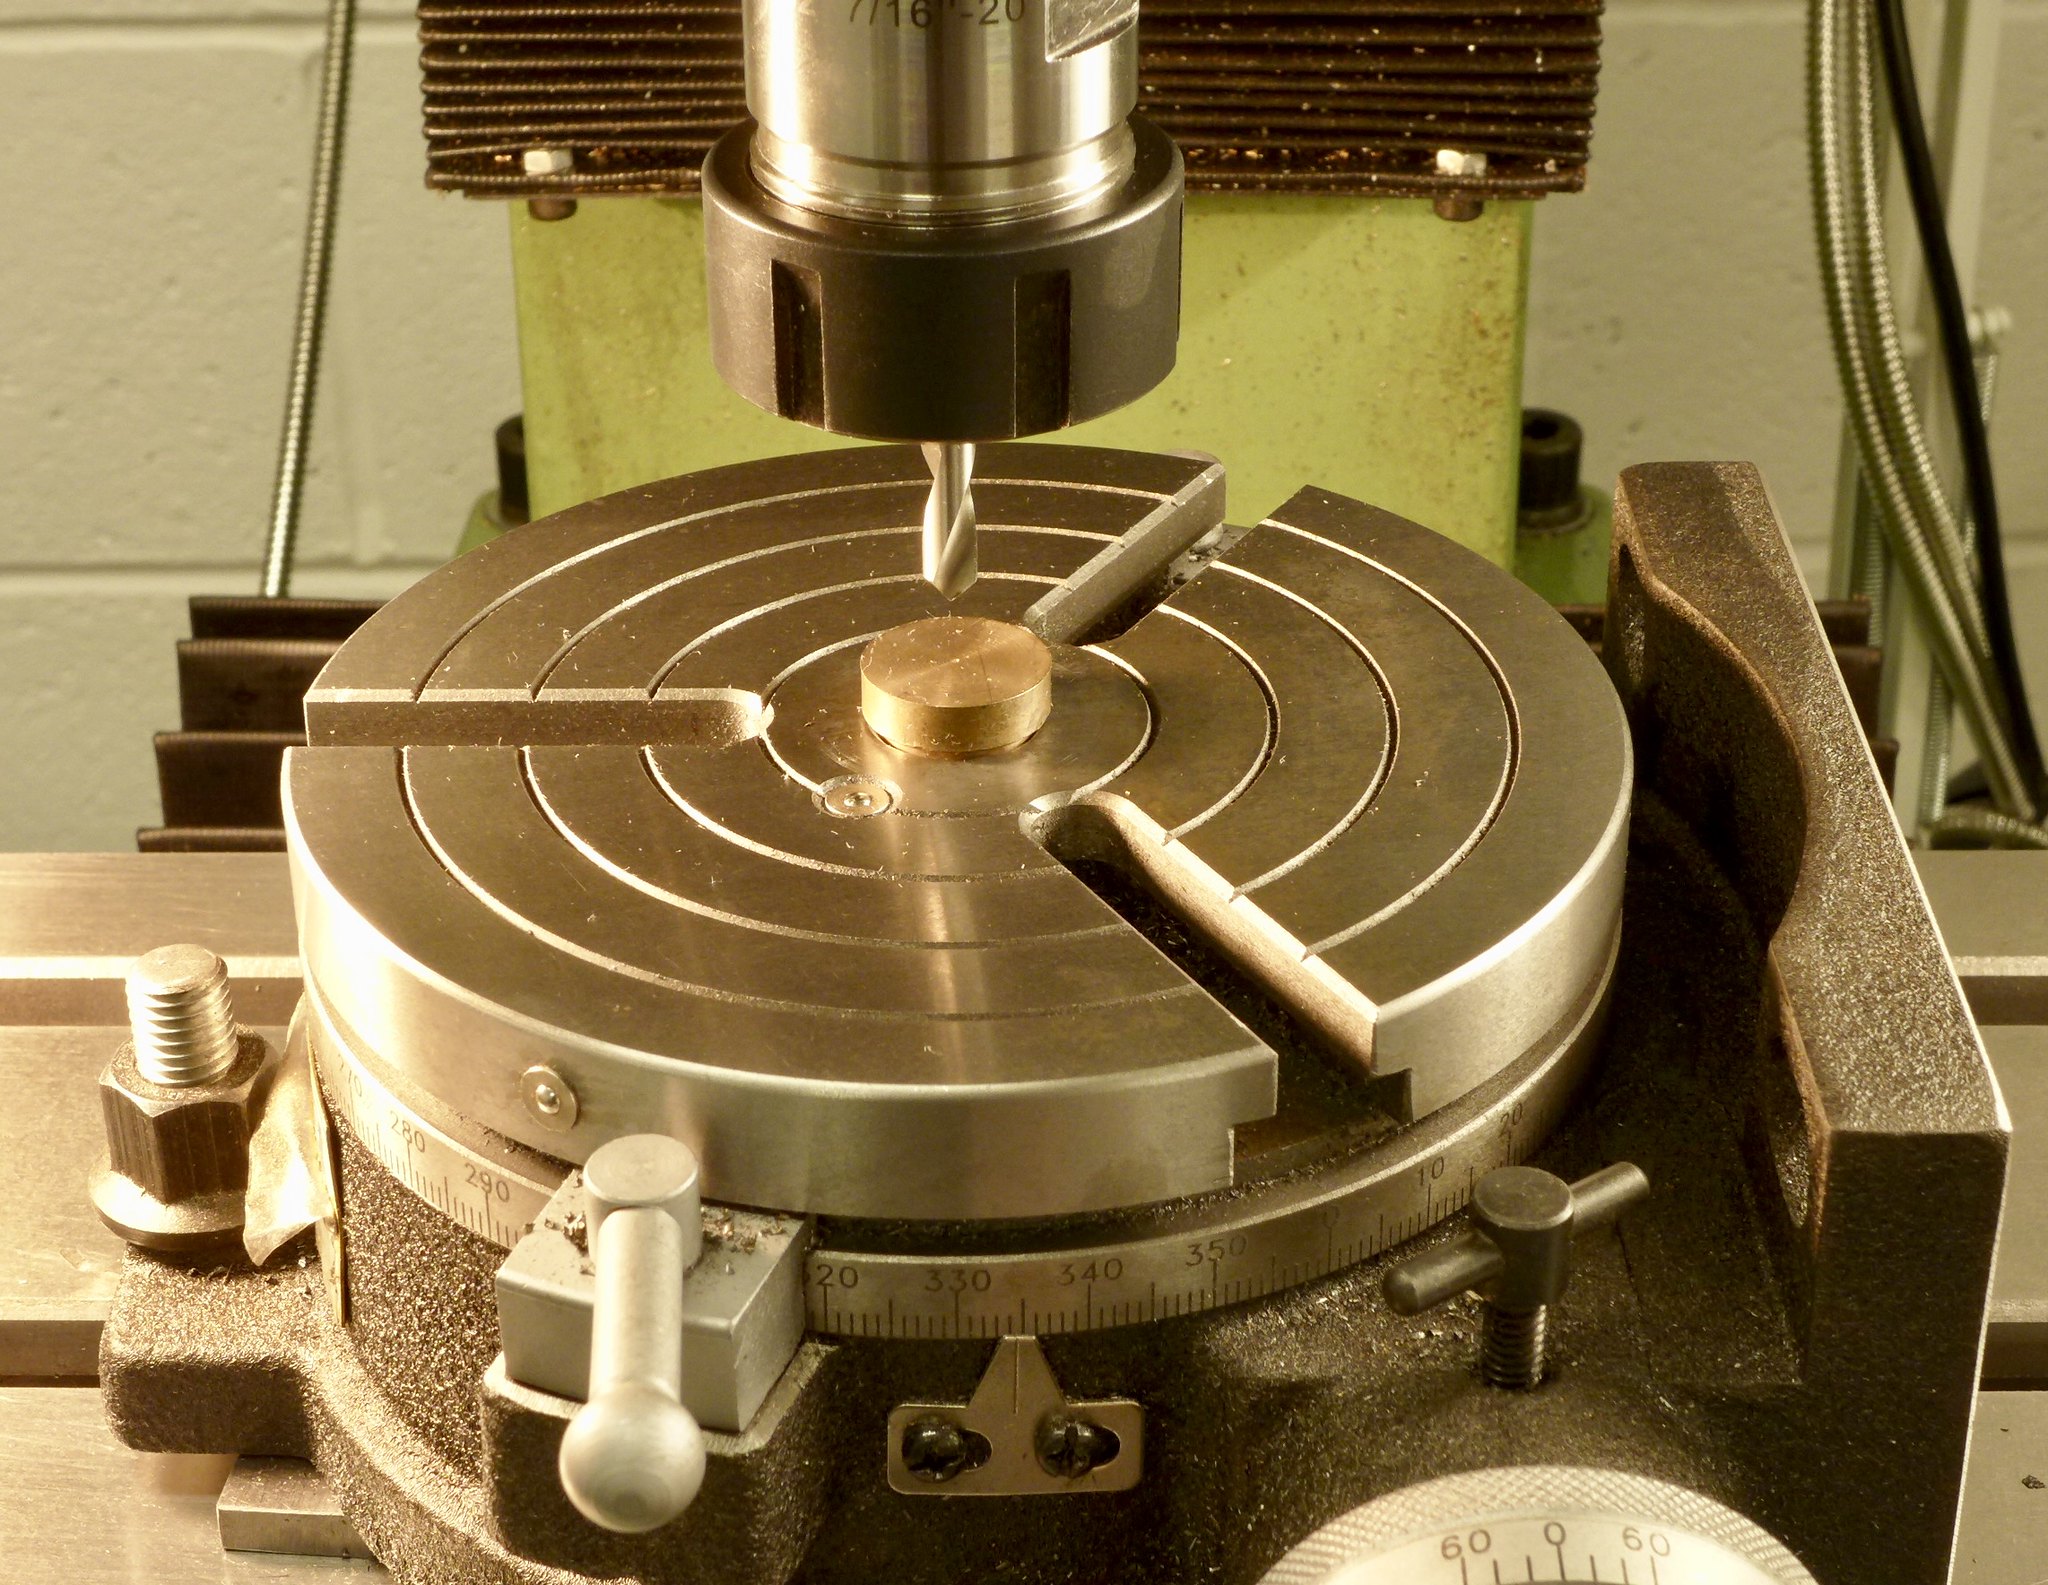 fullsizeoutput_66d fullsizeoutput_66d by Malcolm HARWOOD, on Flickr Next I take apiece of 1/8" plate and mark out the three quadrants. The two large ones for the reverser pole. The small one for the cylinder drain cock lever. I seem to have run out of small wood screw so try to make do with just three. With the help of the DRO I can set the end mill at exactly the correct OD and ID. 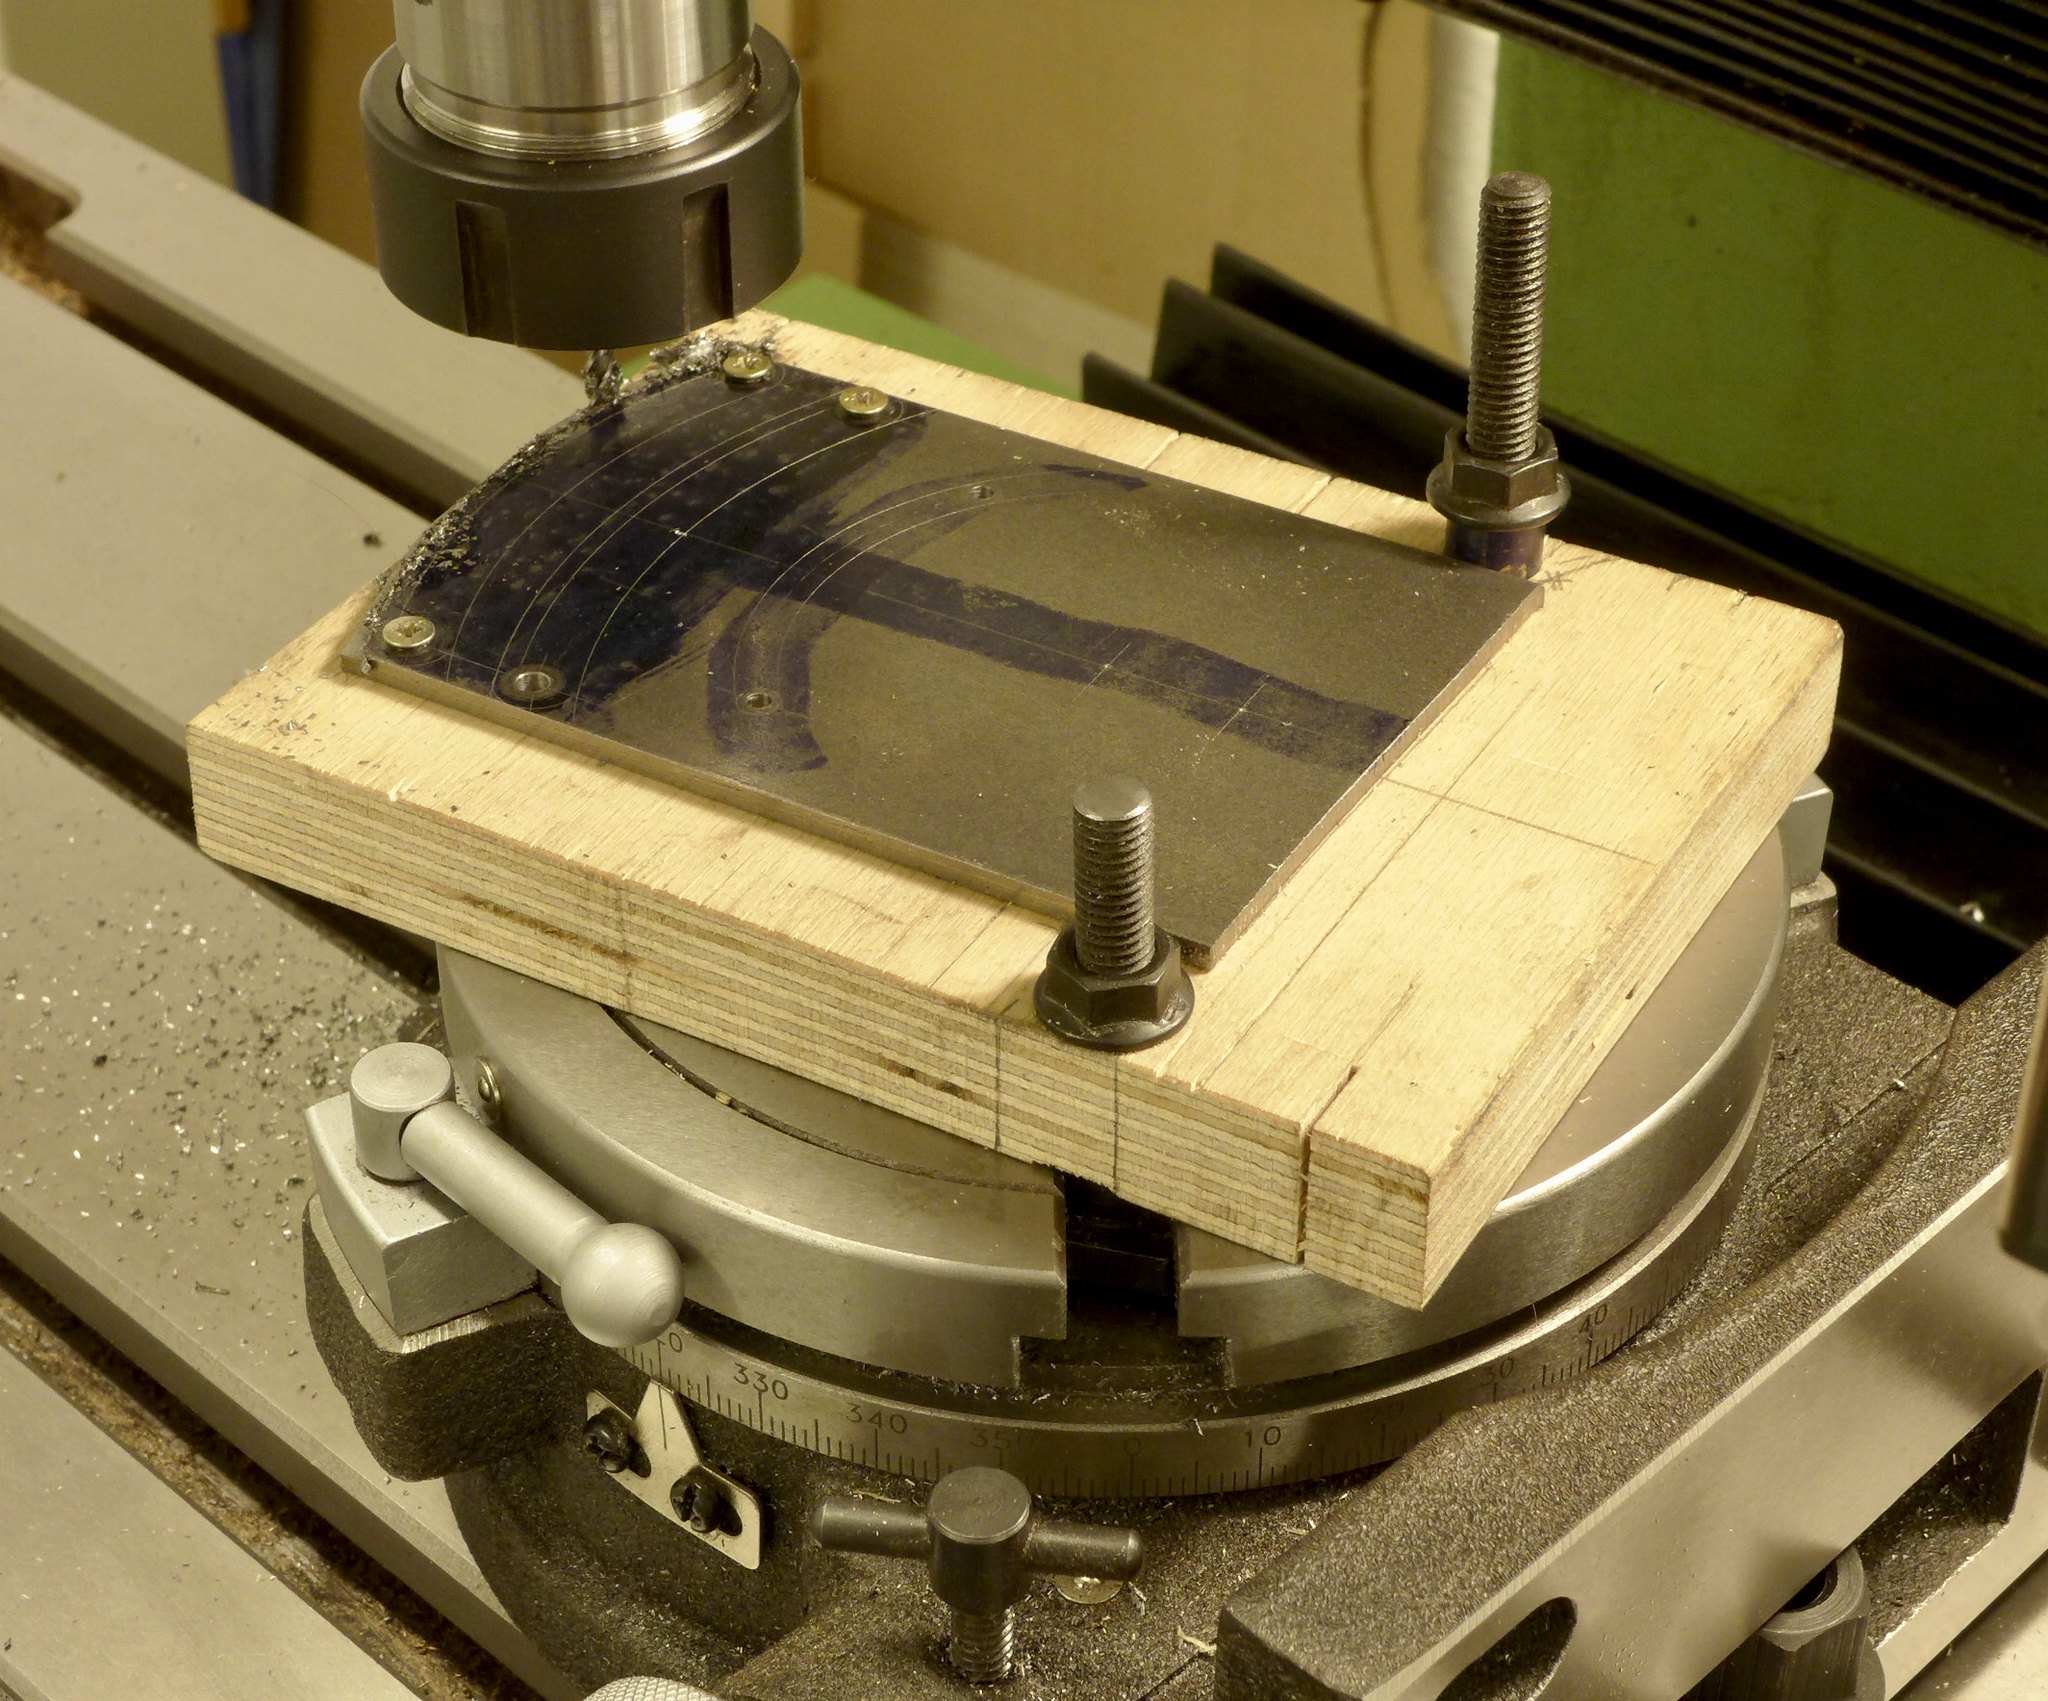 fullsizeoutput_669 fullsizeoutput_669 by Malcolm HARWOOD, on Flickr Maybe not such a good idea.. I manage to cut the two larger quadrants, but only just. There is an OD and ID to cut. The OD is fine, but the ID, unless the cutter is fed in from the opposite end is climb milling. The quadrant pings harmlessly out of its minimal fixture. The small quadrant is cut correctly with just about everything screwed down. The two larger ones, cut earlier, are there just for the picture. Note that flat on its back the bolt holes do line up nicely. 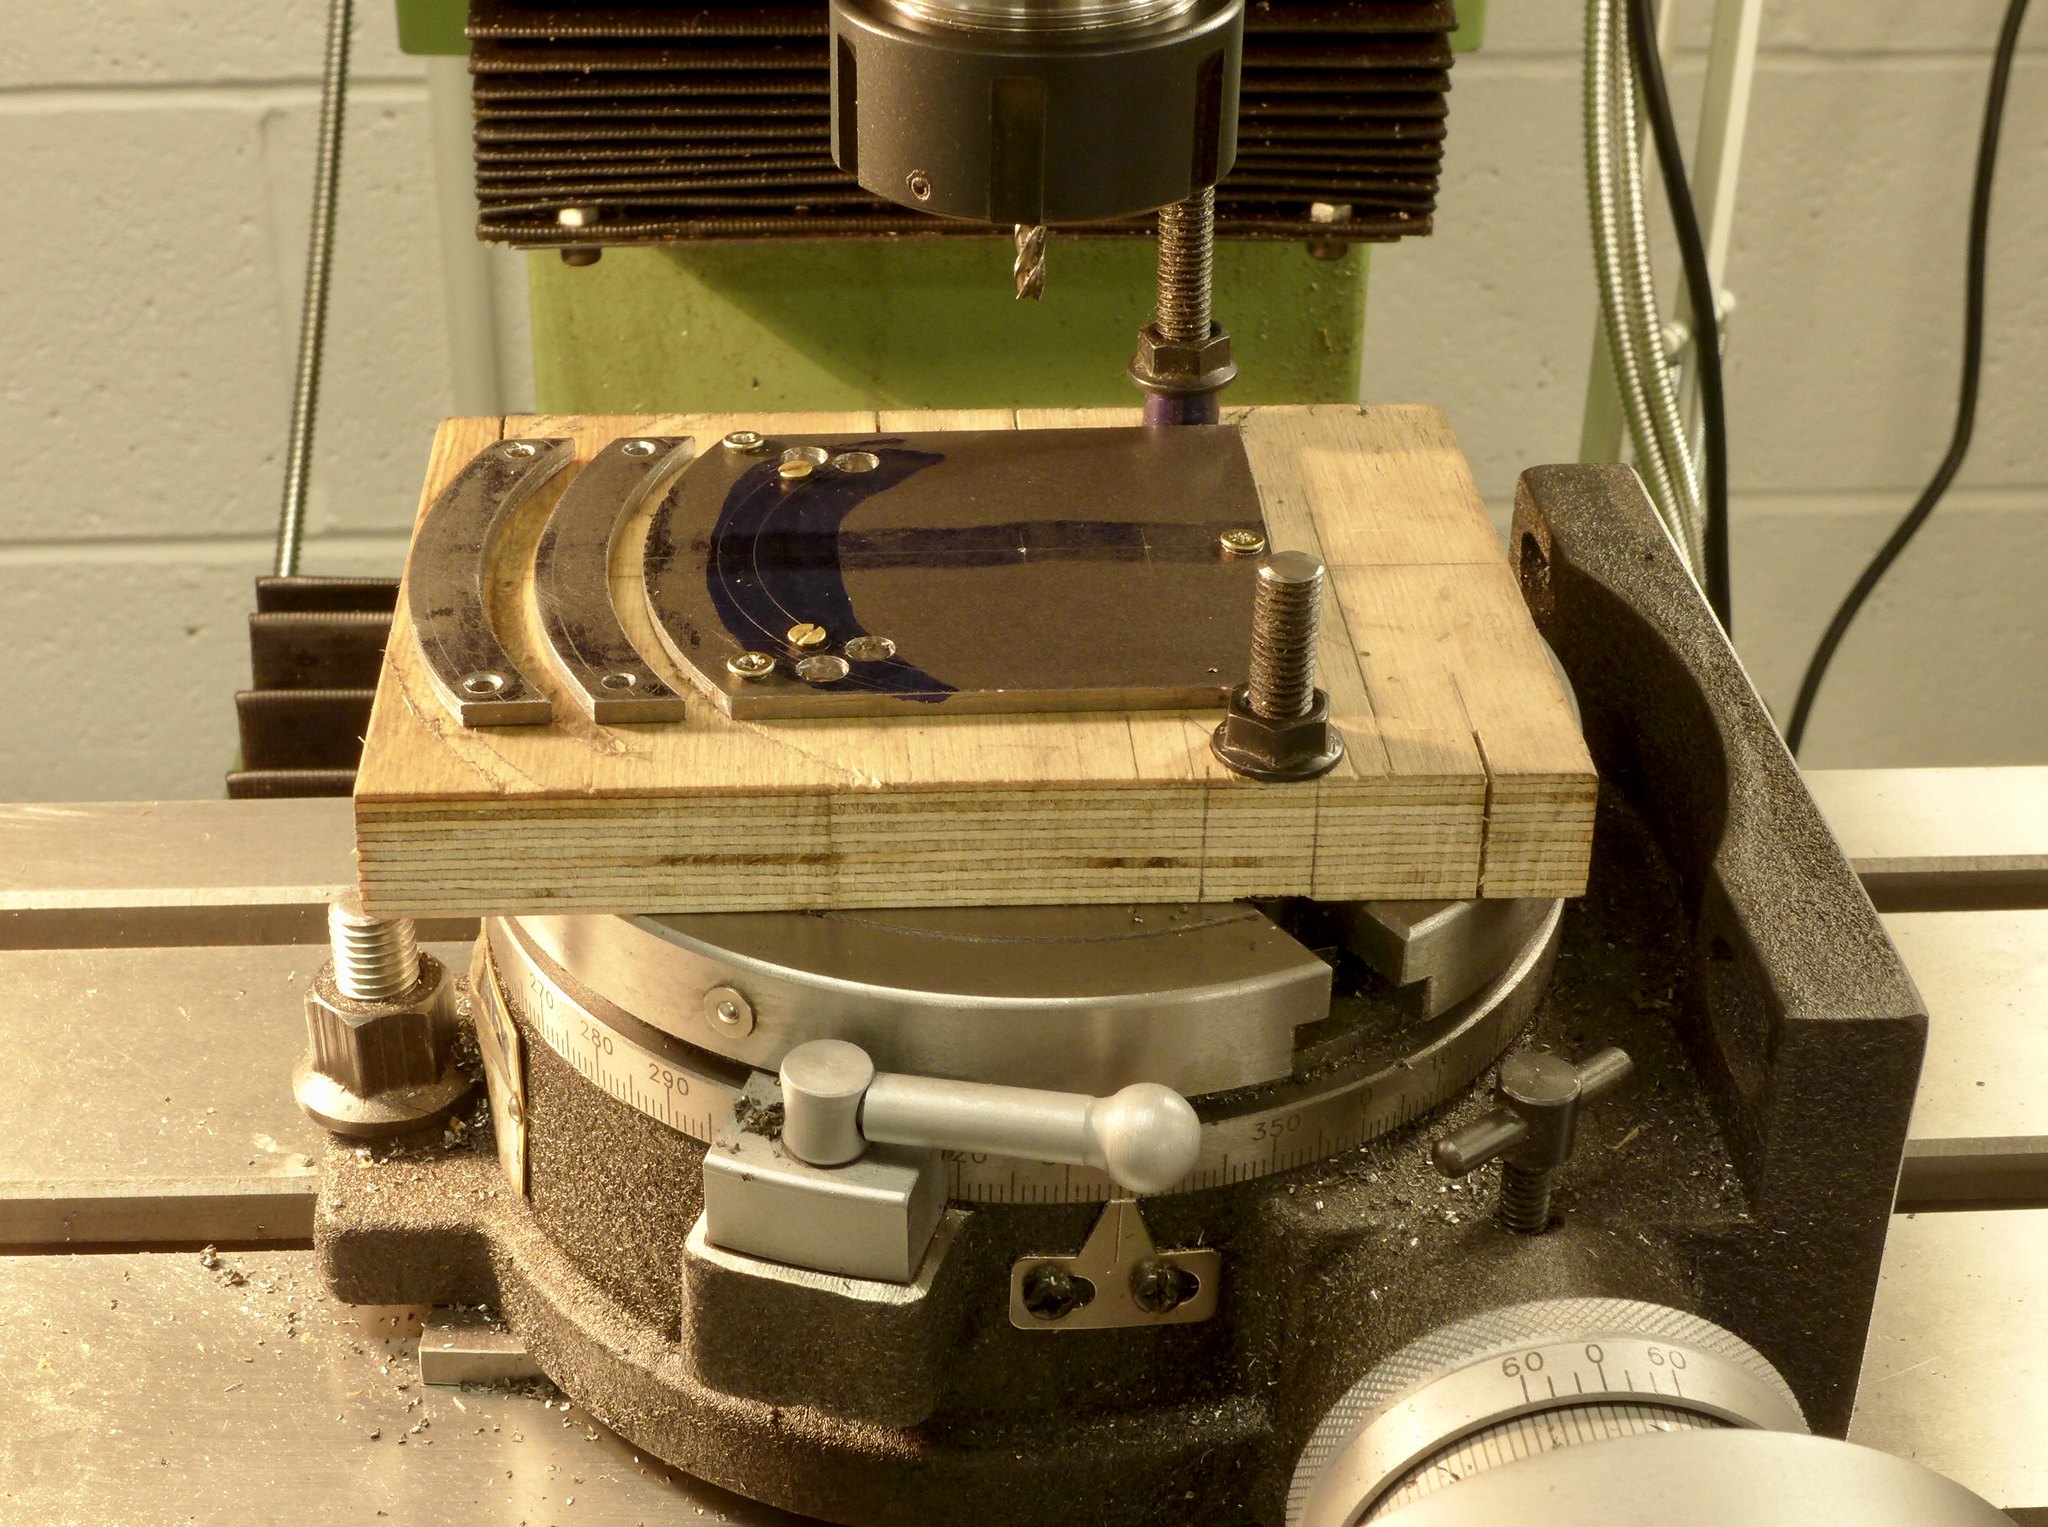 fullsizeoutput_66c fullsizeoutput_66c by Malcolm HARWOOD, on Flickr I will include pictures of the rest of the pole reverser in my next post plus the dreaded expansion link and die block. Thanks for reading. Cheers Malcolm |
|
rrmrd66
Part of the e-furniture
Posts: 339
|
Post by rrmrd66 on Nov 17, 2017 8:24:26 GMT
Keeping it all in one place. A few of us went out for a bit of a play yesterday. Mid-week, next to no public so we had the place to ourselves to do what we wanted. My main purpose was to get some shots of the motion to see if there was anything that needs attention. The beginning has a shot of the "haystack" at the back of the track after the grass had been mowed (maybe we should have done a walk round before we started running!!). For some reason I'm afraid there's no sound on the first section looking at the motion. The gland nuts may need nipping up, a bit of a high pitched squeal on some of the starts. Other that a good clean out to remove the grass and not a lot else. Pete Hi Pete This is really useful video. I am finishing off my Stephenson's valve gear for my 5" Hunslet and being a complete newcomer to all of this have trouble getting my head round of exactly what does what. I am using the Don Ashton/Bill Hall optimised geometry, with the assistance of Julian Atkins. My boiler, ex Weston Steam, is due in August 2018 so it will be some time before I get to run the engine on steam. Thanks a lot Malcolm |
|
rrmrd66
Part of the e-furniture
Posts: 339
|
Post by rrmrd66 on Nov 15, 2017 8:43:27 GMT
Hello Keith
Thought I would add my fourpenyworth. It may help.
As an absolute beginner in April this I went through the same thought process as you.
I have had a 50 year career in many aspects of mechanical engineering from tool making. jet engine R&D, dynamic balancing and industrial hydraulic applications, but never steam.
I was fired up (sorry unintentional pun) by Tornado at NRM but was busy building a house plus most of its cabinet work. So 5" gauge was a source of mystery to me.
This discussion board can be very helpful but also a bit off putting with all the differing opinions available.
I think Roger of Speedy is correct in saying do what YOU want and not what the "old wise heads"say.
Is it the journey you want or the destination?
I get much satisfaction out of the build itself although I do look forward to actually running the thing when completed. (5" Don Young Hunslet)
My 7 month experience is that if you have never done a steam locomotive before there is no such thing as a "simple" model. I am pretty certain though there are some very complex models best to leave until you have more confidence.
Stephenson's valve gear, as an example, is quite fiendishly complicated if you have never come across it before.
In conclusion good luck and don't forget to take pictures and write a build log. We are all interested.
Cheers
Malcolm
|
|
rrmrd66
Part of the e-furniture
Posts: 339
|
Post by rrmrd66 on Oct 20, 2017 8:06:26 GMT
Morning everyone.
I too was at the Midlands show yesterday.
It was certainly busy. Possibly too busy?
I was looking for Roger with a baseball cap, sunglasses and a Tee shirt.
I think I may have seen him on the Cro stand but there was little room for more that two people. Where was the Tee shirt?
I then saw him later again and thought I will keep bumping into him and say hello. But of course he melted into the thousands attending.
My first year of engine making and have attended the three major shows.
If anyone from Meridien is reading this is my report. What doe anybody else think?
Alexandra Palace.
Great venue with lots of room.
Surprisingly easy transport to and from Central London for a North Yorkshire man!
Catering ok.
Doncaster
Disappointingly disorganised for my "local" show. Photographing bar codes on prepaid entry tickets with i phones on entrance tickets crazy.
Stand signage shocking (I think it was non existant). Black drapes everywhere gives a funerial feel
Bit cramped. Catering good.
Should have stayed at Harrogate.
Midlands
Sat nav users nightmare even though I know the area well.
Crowded into large agricultural barns/portal buildings
Signage good
Catering poor, not enough choice, long queues.
All of them could improve.
However all are saved by the outstanding quality of the exhibits,the exceptional friendliness and helpfulness of all the trade exhibitors towards idiot questions from a virgin builder and the buying of all those little things you have not managed to get so far for your build.
Cheers
Malcolm
|
|
rrmrd66
Part of the e-furniture
Posts: 339
|
Post by rrmrd66 on Oct 20, 2017 7:31:46 GMT
Hi Jools Have a look at this: www.arceurotrade.co.uk/Catalogue/Adaptors-SleevesCan you not get a cylindrical sleeve in your lathe chuck/spindle, with an internal MT2 bore , then turn up the end detail and then transfer it to the Vertex MT2 bore? Good luck. Malcolm |
|
rrmrd66
Part of the e-furniture
Posts: 339
|
Post by rrmrd66 on Oct 18, 2017 6:56:59 GMT
Hi David
Just make sure that you nail the spec down exactly as you want it.
Demand a written order acknowledgement before you take delivery (mine arrived without the DRO)
Suggest you read my post in "Tools and Tooling".
Caveat emptor
Regards
Malcolm
PS The Super Major Vario is a big lump on top of a light weight box and needs 2-3 people plus 1 ton engine hoist to install. Think about self leveling HD anti vibration pads for the feet if you do not want to drill into workshop floor.
|
|
rrmrd66
Part of the e-furniture
Posts: 339
|
Post by rrmrd66 on Oct 17, 2017 18:06:12 GMT
I will be there on Thursday as well
I will look out the Cro stand.
Would be good to say hello to "Speedy Roger"
You cant miss me 6ft 1"tall, no hair.
Malcolm
|
|
rrmrd66
Part of the e-furniture
Posts: 339
|
Post by rrmrd66 on Oct 17, 2017 17:58:57 GMT
Hi Malcolm,some nice work and progress there. I too have a vertex rotary table identical to yours. I have always had problems fixing work to be concentric to the centre for accurate radius machining - I was unaware the centre hole was an MT2 taper ! What I am searching for now is a an MT2 taper shaft with a tapped end to allow me to use this as the mounting reference for work. Did you manufacture your tool shown or was it purchased ? I would be interested to know where you sourced it if so. cheers Jools Hi Jools Try this: www.rdgtools.co.uk/acatalog/ADAPTOR-FOR-ROTARY-TABLE-6--MYFORD-THREAD-898698.htmlor this maybe: Chronos ref BEA2T The MT2 arbor fits into the Myford spindleas well butmaybe you know this.Useful for turning wheels and then transferring to the Verte without disturbing the eccentricity (or lack of it) Cheers Malcolm |
|
rrmrd66
Part of the e-furniture
Posts: 339
|
Post by rrmrd66 on Oct 12, 2017 17:46:44 GMT
What I did last week actually. Those that may have been following my Hunslet build and are interested in these Leeds engines may like to see the attached. Lake Bala last Wednesday was not running but they very kindly let me in their engine shed to have a look and a chat What a site! Four little shiny engines all having a rest. Many thanks to the kind guys there for putting up with me for an hour. PS also went to Porthmadog for the Ffestiniog railway. Very interesting and beautifully kept. Cheers Malcolm  P1010179 P1010179 by Malcolm HARWOOD, on Flickr |
|


