|
|
Post by springcrocus on Mar 15, 2015 9:15:14 GMT
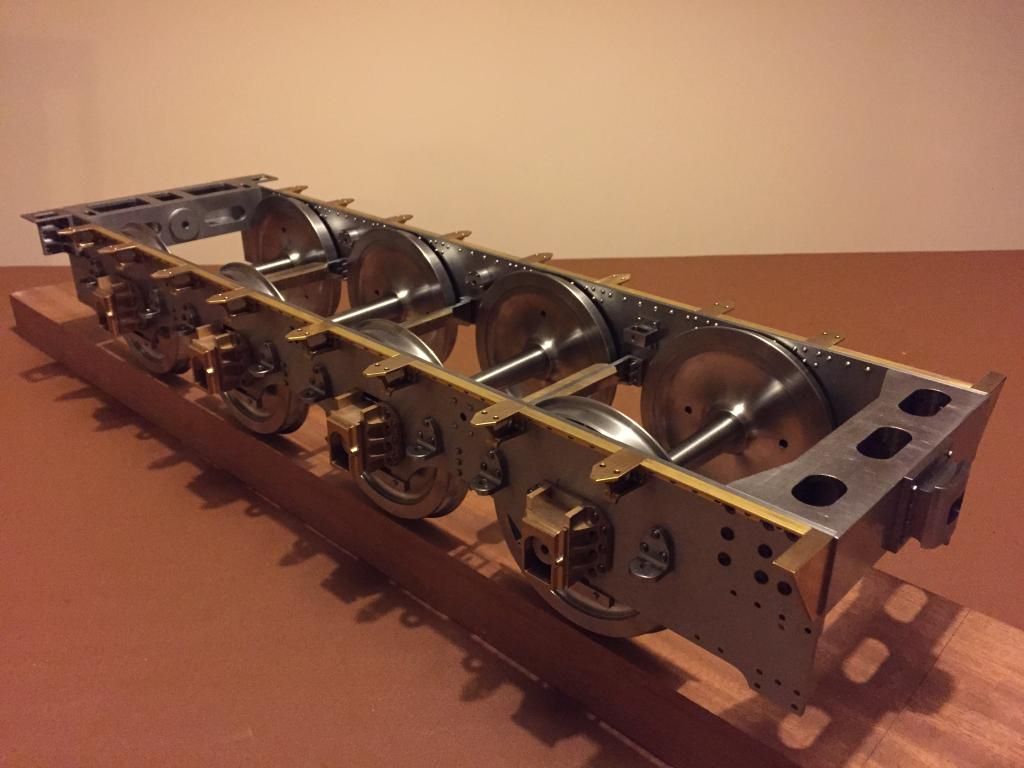
A recent thread bemoaned the lack of build logs on the forum, and now that we all appear to have settled down after the custard pie exercise of the past couple of months I am starting this build diary of my own loco. Unfortunately for you lot, it's another Britannia  of which, I am sure, you are all heartily sick of. There are already some excellent threads covering the class and its cousins including John Johnsons (JJ) 5" modelworks version, a 3.5" scratch build from John (simplyloco), Jim and his 5" Boadicea from the original Perrier drawings and Geof (routledgeg) with his Clan. Between them, they have set the bar quite high so I might have to deliberately blur some of my photographs to disguise the results of my fumbling around in the workshop. This is also a scratch-built 5" gauge Britannia from a more recent set of Perrier drawings that the late Norman Spink had redrawn and updated. At this time, the original tender drawings were replaced with the BR1F drawing set from Les Warnett which was the tender produced for the 9F. However, It's close enough for me and, probably, only a perfectionist would notice. My assocciation with the class started with a footplate ride as a seven-year-old on Britannia herself when she used to pull the holiday trains to Clacton and Walton, courtesy of my uncle who was fireman on her that day. Unfortunately, an old black and white photo of a grubby-kneed child grinning from the cab doorway got lost during a house move about fifteen years ago. I started this build about fifteen years ago and then, for various reasons, it took a back seat in my life. Nearly two years ago I reinstated the project but, unfortunately, there are no photos of the earlier work although I do have my build notes. Also, I need to strip the whole thing down and prep everything for painting so, although I shall be playing catch-up for some while, hopefully I can cover the build from cutting the frames to the final paint job. It is not meant to be an exhibition job but nor do I want it to be a total bodge so sometimes there will be detail and at others a shortcut. As long as the end result is pleasing overall and it looks like Britannia, thats all I'm trying to attain. And she will carry the 70000 number and the 30A Stratford shed plate.  Because I am not yet retired, the amount of time I can devote to the project is limited but I hope to be at or very near completion in about five years time. For those of you who want to come along for the ride, I say welcome aboard, it will probably be a long and bumpy journey. And thanks to all who look in. Steve |
|
|
|
Post by joanlluch on Mar 15, 2015 10:17:48 GMT
Hi Steve. It's refreshing that a new build thread is opened, specially one that does not aim for the absolute perfection. Talented people tend to undervalue a little their own job, do I doubt your build will be anything below a high standard. In any case I will follow it with interest. .
|
|
|
|
Post by springcrocus on Mar 15, 2015 17:15:36 GMT
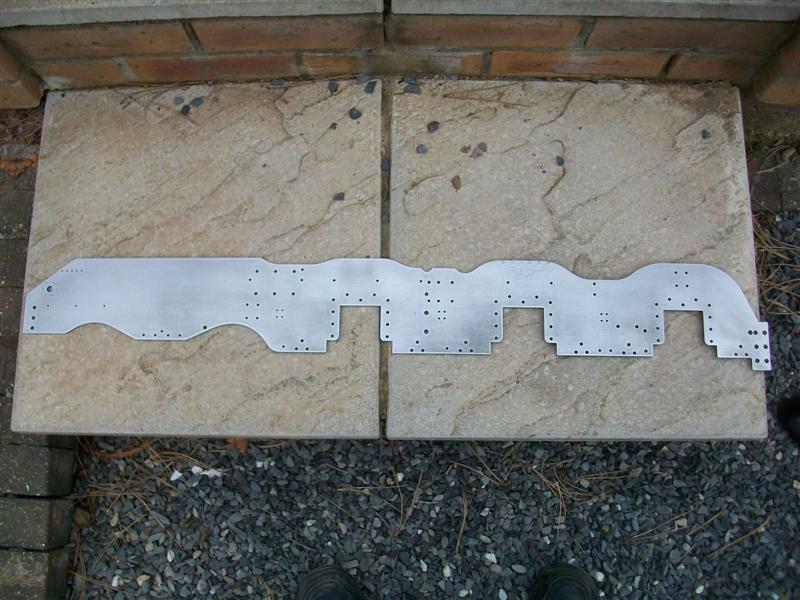
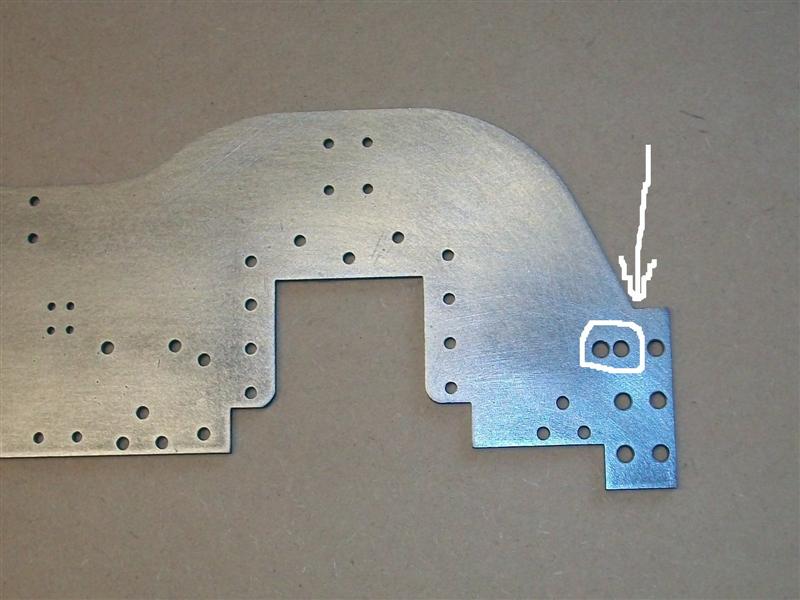
It seems that the first job we all do when starting a locomotive is to cut out, or have made, the mainframes. The drawing called for 10 swg hot rolled mild steel (which normally has a black scale and is sometimes called black bar or black sheet) but I made my mainframes from 3mm mild steel guillotined from bright GCQ (general commercial quality although I'm not sure if this classification is still used - about equal to EN3B) sheet and marked out the basic shape in the time-honoured way using calipers, the height gauge, dividers and scribers. I think the reason for using hot rolled steel is that there is less chance of distortion after machining the material but I have found no distortion in my mainframes. Because I wanted to keep the outside distance of the frames correct, I made notes on the drawings to increase the length of all the frame stretchers and other bits by twenty thou. The frames were then cut and carved about in a variety of ways including stitch drilling, cold chisel, hacksaw and file. Once I had got to the finished shape and size, it was time to drill a load of holes. At the time, I had a Bridgeport mill with DRO so the obvious way was to do co-ordinate drilling after choosing a suitable datum point. This was actually the front and top edges of the frame so the two plates were clamped together and set up on the mill table with a lump of MDF underneath to allow drilling right through. The Bridgeport table is 42" long so I was able to do all the holes in one session. The only holes I didn't do at this stage were for the cylinder mounting plates. The drawing does not give dimensions for these holes due to the inclination of the cylinders and the need to get them accurately in line with the centre of the driving wheels. These will be spotted through at the right time. I did make one mistake through my own carelessness - the hole on the right should not be there!  Thanks for looking in. Steve |
|
|
|
Post by Deleted on Mar 15, 2015 19:21:37 GMT
Well done, a nice crisp clean start - start as you mean to go on etc. etc..
Just out of interest, how do you intend to fill the hole drilled in error? (when that happens to me I take it into work, weld it up then file smooth at home).
I always (try to) tell myself the cock-up doesn't matter. It's how you get out of it that does!
Regards,
James.
|
|
|
|
Post by Jim on Mar 15, 2015 19:36:29 GMT
No need to thank us for looking Steve your build thread looks like being a ripper. As to filling in unwanted holes I've found automotive body filler does the job easily for the holes the workshop gnomes added for the fun of it.  I for one am looking forward to more of your updates. Jim |
|
|
|
Post by Deleted on Mar 15, 2015 20:38:52 GMT
Well done, a nice crisp clean start - start as you mean to go on etc. etc.. Just out of interest, how do you intend to fill the hole drilled in error? (when that happens to me I take it into work, weld it up then file smooth at home). I always (try to) tell myself the cock-up doesn't matter. It's how you get out of it that does! Regards, James. Hi James...as has been advised to myself on this forum before it's best to avoid any form of heat on the frames as they may and probably will distort.... another way of filling the hole is to countersink it either side and fix a rivet in place and file flush to finish. Regards Pete |
|
|
|
Post by Deleted on Mar 15, 2015 21:41:16 GMT
Hello Pete. Welding certainly can cause distortion. Of course each job needs assessing on its particular requirements and the experience of the operator. I certainly wouldn't recommend anyone "having a go" with a buzz box and a couple of 3.25 "sixty-thirteens"! I had assumed the O.P had decided how to proceed, my input was more for the sake of conversation, as it is a method that has suited me in the past.  On the other hand and speaking generally, you could screw in a stub of steel as hard as you dare with loctite to taste, and file that down. There are many ways to skin the M.E. cat which is what makes it so interesting! Regards, James. |
|
|
|
Post by joanlluch on Mar 15, 2015 21:54:55 GMT
And of course you can also just draw the frames on any 2D CAD and get them laser cut at a very low cost.
|
|
|
|
Post by springcrocus on Mar 15, 2015 23:10:38 GMT
And of course you can also just draw the frames on any 2D CAD and get them laser cut at a very low cost. Even cheaper if you are prepared to do the work yourself.  And there is a bit more personal satisfaction in sawing, filing and drilling your own frames. Mind you, Joan, I have been following, and will continue to follow, your own thread with great interest but that way is not for me.... James - as Pete pointed out, the last thing I want is localised heat on the frames as distortion is inevitable. JB weld works OK for me, exactly as Jim suggested. I have already redrilled the (adjacent) hole in the correct position. It's a cosmetic thing only, not a structural problem. And yes, I am much further on than this but am trying to create a start-to-finish narrative of my build, assuming my memory (which appears to be failing fast - my wife tells me I promised to take her out today but I'm sure she's got her days / weeks / years mixed up) and build notes hold me in good stead.   Steve PS James, I hope your "start as..."etc wasn't referring to my first cockup?   |
|
|
|
Post by runner42 on Mar 16, 2015 0:36:13 GMT
Hi Steve,
a good start of a significant sized locomotive judging by your toes in the first picture. I am not aware of the Britannia design so I am wondering what the additional cut-outs are for at the bottom of the main cut-outs for the driver and driven wheels, the usual in my experience is a rectangular cut-out, whereas yours show a T cut-out. I suppose this will be revealed later. Are there fixing holes in the frames for the smokebox saddle, I mention this because this area on the frames appear to be without fixing holes?
Looking forward to further instalments.
Brian
|
|
|
|
Post by Geoff (Carlisle) on Mar 16, 2015 21:34:47 GMT
Hi Steve, nice to see you are building a good looking loco and I read John Johnsons diary regularly, but if you want to see Britannia in action, Google------PSOV-Mainline 70000 Britannia part 2, it's just great.
Geoff (Carlisle).
|
|
stan
Seasoned Member

Posts: 110 
|
Post by stan on Mar 16, 2015 22:15:04 GMT
Hi Steve
I have over the years made holes that should not be there and I thread them screw in a bolt with a drop of Loctite and clean off when set, you cant see where it is, good luck with the thread look forward to seeing the progress.
Stan
|
|
|
|
Post by joanlluch on Mar 16, 2015 22:42:11 GMT
Hi Steve,
a good start of a significant sized locomotive judging by your toes in the first picture. I am not aware of the Britannia design so I am wondering what the additional cut-outs are for at the bottom of the main cut-outs for the driver and driven wheels, the usual in my experience is a rectangular cut-out, whereas yours show a T cut-out. I suppose this will be revealed later. Are there fixing holes in the frames for the smokebox saddle, I mention this because this area on the frames appear to be without fixing holes?
Looking forward to further instalments.
Brian
The T shaped cutout match the shape of the horns at the basis of the frames. Other designs have a trapezoidal shape at that point to fully embrace the horns in a way that they can't move. As far as I can see these frames still lack a number of holes for the cylinders and smokebox saddle. |
|
|
|
Post by simplyloco on Mar 16, 2015 22:55:06 GMT
As Steve said here " The only holes I didn't do at this stage were for the cylinder mounting plates. The drawing does not give dimensions for these holes due to the inclination of the cylinders and the need to get them accurately in line with the centre of the driving wheels. These will be spotted through at the right time.
"
My Brit was the same. Lined up when the driving wheels were in place.
John
|
|
|
|
Post by Deleted on Mar 16, 2015 22:59:00 GMT
Hi Steve,
a good start of a significant sized locomotive judging by your toes in the first picture. I am not aware of the Britannia design so I am wondering what the additional cut-outs are for at the bottom of the main cut-outs for the driver and driven wheels, the usual in my experience is a rectangular cut-out, whereas yours show a T cut-out. I suppose this will be revealed later. Are there fixing holes in the frames for the smokebox saddle, I mention this because this area on the frames appear to be without fixing holes?
Looking forward to further instalments.
Brian
The T shaped cutout match the shape of the horns at the basis of the frames. Other designs have a trapezoidal shape at that point to fully embrace the horns in a way that they can't move. As far as I can see these frames still lack a number of holes for the cylinders and smokebox saddle. Hi Joan some holes are best done using the matching component to get an accurate fit... the cylinders being such an item as they are inclined and need to line up perfectly with the driving axle at their correct angle...I believe that Britannia is a two cylinder design so perhaps Steve is going to do the cylinders with holes and transfer the holes to the frames when held in there correct position, same goes for the smokebox saddle.. My own build will be the reverse of this for both the cylinders still to be done and the saddle which is already done... holes in the frames first and with the cylinders held in their correct position ( i'll make a temp rod and eccentric that fits the crank and cylinder bore) I'll transfer the holes from the frames to the middle cylinder. the outer's i'll do slightly differently but will still be transferring the holes from frames to cylinders again using a jig to ensure all is as should be, depending on what i find I may drill one hole in each cylinder for reference/datum point. Not sure if any of this makes sense but it does to me... when I get to this point in my build I will cover the process in more detail...  Pete |
|
|
|
Post by springcrocus on Mar 16, 2015 23:11:24 GMT
Quite right, Pete. If those querying the absence of the cylinder holes would care to go back and read my second post, it clearly states why.  As for the smokebox - well, we'll get to that all in good time.   Steve |
|
|
|
Post by joanlluch on Mar 17, 2015 3:05:35 GMT
I give up, guys. I intent to help to someone who asked something and I just get replies of too basic stuff.
Pete, BTW, it is not "there" it's "their". Basic grammar.
|
|
|
|
Post by Deleted on Mar 17, 2015 4:55:56 GMT
I give up, guys. I intent to help to someone who asked something and I just get replies of too basic stuff. Pete, BTW, it is not "there" it's "their". Basic grammar. You give up?! Joan your continuous trolling is causing a fair percentage of the troubles in this forum! I'm sorry but I can't stay quiet any longer, this has to stop before we lose any other members. |
|
|
|
Post by joanlluch on Mar 17, 2015 6:15:09 GMT
Trolling? You either transfer the holes from the cylinder to the frames or you do the opposite. This is what I did at least. I mean, is there another way?
So Pete replying to my correct answer on Brian's question instead of replying directly to Brian's question is not trolling, then?
|
|
tim
E-xcellent poster
  
Posts: 236
|
Post by tim on Mar 17, 2015 6:27:10 GMT
I give up, guys. I intent to help to someone who asked something and I just get replies of too basic stuff. Pete, BTW, it is not "there" it's "their". Basic grammar. What childish behaviour. Joan rule no1. If you're going to correct someone on their grammar try to ensure your own is 100% first. Language barrier or not. And secondly why the bitchy behaviour?There was absolutely no call for your last remark whatsoever. Tim. |
|
 of which, I am sure, you are all heartily sick of.
 of which, I am sure, you are all heartily sick of.


 And there is a bit more personal satisfaction in sawing, filing and drilling your own frames. Mind you, Joan, I have been following, and will continue to follow, your own thread with great interest but that way is not for me....


