mbrown
Elder Statesman

Posts: 1,719
|
Post by mbrown on Apr 3, 2022 20:30:06 GMT
You can always drill a hole in a length of rod to take the shaft of the tap and then Loctite the tap in place to make a long tap. If you want to revert, just warm it up and the Loctite will let go! I have done that with taps, drills etc many times - in fact I keep a very long 8 BA tap in an extension like that permanently as I find i need it quite often..
Malcolm
|
|
dalboy
E-xcellent poster

Posts: 235
|
Post by dalboy on Apr 3, 2022 21:21:19 GMT
You can always drill a hole in a length of rod to take the shaft of the tap and then Loctite the tap in place to make a long tap. If you want to revert, just warm it up and the Loctite will let go! I have done that with taps, drills etc many times - in fact I keep a very long 8 BA tap in an extension like that permanently as I find i need it quite often.. Malcolm Not thought of that stored in the memory banks for future use thank you. I have found one and ordered it as well as a long series drill to match so have one handy if needed |
|
stevep
Elder Statesman
Posts: 1,070
|
Post by stevep on Apr 4, 2022 8:29:13 GMT
I have a box of each of the BA tapping and clearance size drills, Loctited into the end of pieces of bar, just for doing this sort of thing.
|
|
dalboy
E-xcellent poster
Posts: 235
|
Post by dalboy on Apr 7, 2022 18:37:45 GMT
Frame is now altogether I will take all the screw and bolts out one at a time and put some loctite onto them but not yet until I know that it will not need pulling downs again. I am please it is all level and square, Started the wheels today as well and boy doesn't the cast iron turn you hands black I could even taste it after doing two of them  DSCF2354 DSCF2354 by Dalboy, on Flickr I got a little interruption as I needed to go and collect these boring bars so spent this morning ordering some inserts and a torx driver to replace them.  DSCF2359 DSCF2359 by Dalboy, on Flickr |
|
|
|
Post by John Baguley on Apr 8, 2022 12:07:02 GMT
Before you go too much further you may be interested in a small modification to improve the valve gear. I worked this out when I was working on a Rob Roy chassis for a chap at our club some years ago.
It just involves increasing the offset of the suspension point of the expansion link from 0.0625" to 0.160" and shortening the lifting arm on the weighshaft from 1.25" to 1.0625".
The original Martin Evans valve gear is not too bad but these mods do improve it considerably. It will probably pay to shorten the reversing arm on the weighshaft by 0.1875" as well so that the travel on the reverser will be the same as before.
The mods were calculated using Don Ashton's spreadsheets and checked using the Allan Wallace valve gear simulator.
John
|
|
dalboy
E-xcellent poster
Posts: 235
|
Post by dalboy on Apr 8, 2022 12:18:54 GMT
Before you go too much further you may be interested in a small modification to improve the valve gear. I worked this out when I was working on a Rob Roy chassis for a chap at our club some years ago.
It just involves increasing the offset of the suspension point of the expansion link from 0.0625" to 0.160" and shortening the lifting arm on the weighshaft from 1.25" to 1.0625".
The original Martin Evans valve gear is not too bad but these mods do improve it considerably. It will probably pay to shorten the reversing arm on the weighshaft by 0.1875" as well so that the travel on the reverser will be the same as before.
The mods were calculated using Don Ashton's spreadsheets and checked using the Allan Wallace valve gear simulator.
John
Thank you John. All help is much appriciated
philh1aa had pointed me to your comments on it on the ME forum which I had already read |
|
dalboy
E-xcellent poster
Posts: 235
|
Post by dalboy on Apr 10, 2022 18:45:38 GMT
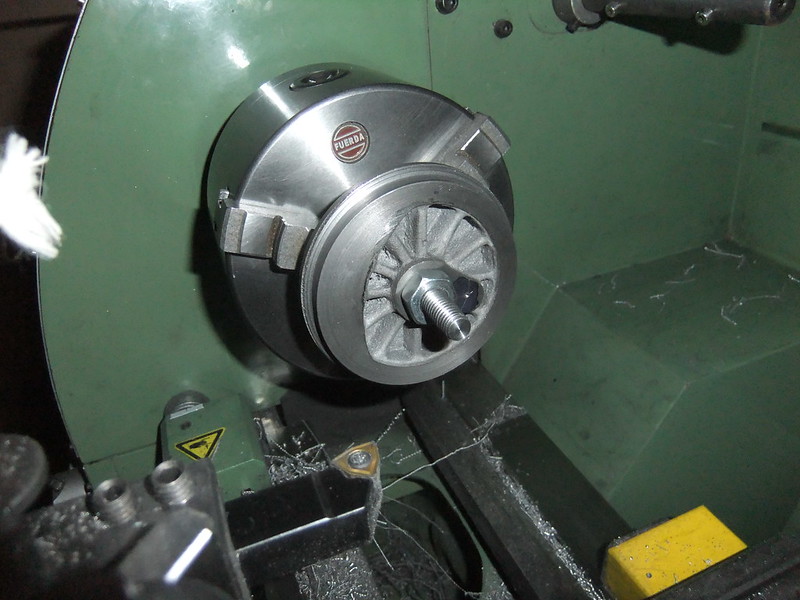
Default Have been working on the wheels this is taking a bit of time so far 4 days but that is not solid as I have the garden as well as other jobs. Started with 6 rough cast wheels which are very good quality as far as casting go no blow holes either  DSCF2374 DSCF2374 by Dalboy, on Flickr This is what it looks like all that needs doing now is to make a mandrel and finish turning the outer rims  DSCF2373 DSCF2373 by Dalboy, on Flickr Well that is three down before the next stage three more to go then I will complete the rims on all of them as once the mandrel is turned I do not want to loose the setting of it while turning the rims.
|
|
dalboy
E-xcellent poster
Posts: 235
|
Post by dalboy on Apr 12, 2022 17:11:13 GMT
OH bugger it managed to mess up one of the wheels every thing turn on it except the tread went to drill the axle hole and walking to the drill bit shelf thinking to myself must get it to 7/16" yes you guessed it instead of picking the drill smaller so I could put a 7/16" reamer through I grabbed the 7/16" bit and drilled the hole ans as you all will know a drill bit will always drill oversize.
The air was blue for me doing a stupid thing so have just now ordered a new casting.
Yes I could have bored slightly over size and turn the axle to match but I am the sort of person that want it just right(maybe not perfect but the best I can do).
Well at least I could go into the garden and mow the lawn as well as pot on some plants on top of that plant some other bits and pieces we both brought yesterday at the garden centre. I am sure the garden centre cost more than bit for my loco.
|
|
millman
Part of the e-furniture

Posts: 297 
|
Post by millman on Apr 12, 2022 17:50:29 GMT
Very easily done Dalboy, look on the bright side you can use the scrap one as a practice for turning the tread and setting up for crankpin holes, nothing is ever totally scrap.
|
|
dalboy
E-xcellent poster
Posts: 235
|
Post by dalboy on Apr 12, 2022 17:57:50 GMT
Very easily done Dalboy, look on the bright side you can use the scrap one as a practice for turning the tread and setting up for crankpin holes, nothing is ever totally scrap. That is true I can make a jig while I am waiting for the new one just for the crankpin. I have just reground a lathe tool for the 1/16" radius for the treads and as soon as I get the replacement wheel and turn it to width I will make a mandril and do all six treads while it is in the lathe |
|
|
|
Post by philh1aa on Apr 12, 2022 20:05:17 GMT
Just a point. Please try to keep the 'scrap' one in good shape. You just never know what could happen during stage 2. You might just find yourself trying to re-salvage the so called scrap one.
Phil H
|
|
|
|
Post by philh1aa on Apr 12, 2022 20:12:39 GMT
One of my wheels had to be rebored oversize because the front of the wheel had a horrible run out. I had gone through a similar machining sequence to yours but the runout only came to light when I tried fitting the wheels to their axles.
|
|
|
|
Post by springcrocus on Apr 12, 2022 21:16:00 GMT
OH bugger it managed to mess up one of the wheels every thing turn on it except the tread went to drill the axle hole and walking to the drill bit shelf thinking to myself must get it to 7/16" yes you guessed it instead of picking the drill smaller so I could put a 7/16" reamer through I grabbed the 7/16" bit and drilled the hole ans as you all will know a drill bit will always drill oversize. The air was blue for me doing a stupid thing so have just now ordered a new casting. Yes I could have bored slightly over size and turn the axle to match but I am the sort of person that want it just right(maybe not perfect but the best I can do). Well at least I could go into the garden and mow the lawn as well as pot on some plants on top of that plant some other bits and pieces we both brought yesterday at the garden centre. I am sure the garden centre cost more than bit for my loco. Why not just sleeve it? I bought four wheels from Wilf (uuu) for my Adams O2 but the bore was already oversize. Four sleeves made, then a trip to the garage where they pressed them in with their 40-ton press and I was good to go. You may be interested in my post HERE where I descibed what I did. Regards, Steve |
|
dalboy
E-xcellent poster
Posts: 235
|
Post by dalboy on Apr 12, 2022 22:16:36 GMT
Why not just sleeve it? I bought four wheels from Wilf (uuu) for my Adams O2 but the bore was already oversize. Four sleeves made, then a trip to the garage where they pressed them in with their 40-ton press and I was good to go. You may be interested in my post HERE where I descibed what I did. Regards, Steve I did think of doing that but I have ordered a new one now along with a couple of other bits. Thank you for the link something that may come in useful in the future |
|
dalboy
E-xcellent poster
Posts: 235
|
Post by dalboy on Apr 17, 2022 19:08:57 GMT
Well now the new wheel has arrived I brought that up to the same stage as the others which was yesterdays job. As well as mark the holes for the crankpins. Today was a case of mounting the wheels on a mandrel and turning all six with the tread profile. I will get around to taking a photo tomorrow.
At least something has gone right this week. On top of mucking up one wheel I brought the wife a garden ornament place it in the garden following day I put up some hanging basket brackets and promptly knocked over the ornament and breaking it, this morning cut the grass and strimmed the edges turned the head on the trimmer and managed to break that so new trimmer now ordered for me to collect, lastly helped the neighbor get a metpost out and ended up on my back after the post at first failed to come out.
So hopefully this afternoons wheel turning has broken the run of bad luck.
|
|
dalboy
E-xcellent poster
Posts: 235
|
Post by dalboy on Apr 18, 2022 18:39:58 GMT
Photos from yesterday of the wheels on the lathe and the treads all machined as well as the crank pin holes marked awaiting for a reamer to arrive to do them.
Started on cleaning between the webs of the wheels drill holes to get in and one complete using my dremel and a DURA-GRIT pointed burr(works great on cast iron but only do one at a time as it is hard on the hands
After drill holes
And after cleaning out. Just another five to do.
|
|
|
|
Post by pandsrowe on Apr 19, 2022 12:23:10 GMT
To ensure equal crank pin throw, rather than rely on a scribed centre pop where the drill might wander slightly, why not make a simple jig that guarantees equal throw. Doesn't have to be anything fancy just a block of m/s with a pin fitted equal diameter to your axle diameter and a hole distance equal to your crank throw. Drop the jig pin in your wheel axle hole and run a drill through the jig hole that is equal to the crank pin diameter. Repeat for all six wheels and you then know all crank thows are the same.
Phil
|
|
stevep
Elder Statesman
Posts: 1,070
|
Post by stevep on Apr 19, 2022 13:12:47 GMT
Alternatively, mount the wheels, one at a time, on a stub axle bolted to your faceplate such that the location of the crankpin is running true. You can then drill/bore/ream the crankpin hole - again ensuring that each crank is exactly the same distance from the axle. Here is my set-up for a Pansy wheel, which is much bigger and heavier. 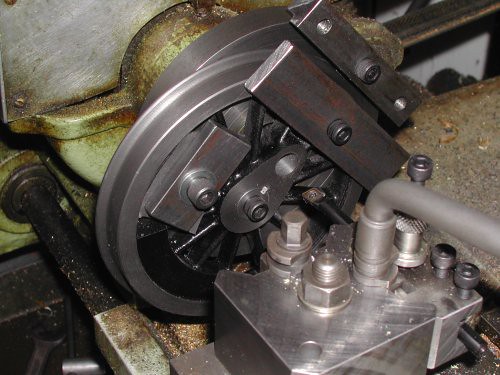 |
|
dalboy
E-xcellent poster
Posts: 235
|
Post by dalboy on Apr 19, 2022 14:35:06 GMT
Thank you both I did make a plate with a nice fitted pin for the centre and a hole where the crank pin will go. I used a transfer punch to first mark an arc then measured to get the centre replaced the jig and centred it over the two marks and then transfer punched a centre.
A photo of my little jig ignore the outer holes it was just a piece of metal I used rather than cut a new piece off of my good stock
|
|
dalboy
E-xcellent poster
Posts: 235
|
Post by dalboy on Apr 22, 2022 19:09:24 GMT
All six wheels are now complete in regards to the machining and cleaning ready for the crankpins to be made and fitted. The little jig was worth making even if it was a simple one  DSCF2422 DSCF2422 by Dalboy, on Flickr  DSCF2424 DSCF2424 by Dalboy, on Flickr |
|