|
|
Post by GWR 101 on Dec 24, 2014 9:09:12 GMT
Looking really good Jim, must be nearly time for you to be tucked up or the man in the red suit will pass you by. Regards Paul  |
|
|
|
Post by Deleted on Dec 24, 2014 9:59:55 GMT
She's a beaut Jim! I'm very jealous! Can't wait to see the first vid of her on the move!
Have you considered looking at Doug Hewsons manifolds? They are pretty tasty if you have the budget?
Cheers
Ben
|
|
Andrew C
Part of the e-furniture

Posts: 447
|
Post by Andrew C on Dec 24, 2014 10:16:15 GMT
Hi Jim
Looking good.
While you are getting Doug's Manifold will you be fitting all the mud hole and inspection doors? they are the biz!
That's two each side on the curve of the firebox the one each side on the barrel just in front of the clacks and the ones in the corners near the foundation ring. plus all the extra washout plugs
oh and don't forget that there are a different number washout plug on each side of the firebox. That one caught me out for a bit
Regards and Merry Christmas
Andrew
|
|
|
|
Post by Jim on Dec 24, 2014 10:28:14 GMT
Thanks Paul and Ben. I've got a little while longer Paul before it's time to hit the sack, not Santa's I hasten to add....it's full of tools for all you UK model engineers.  I will have another look at Doug Hewson's manifold Ben along some other drawings I have too. The current manifold is based on the Perrier drawings and is purely functional...a bit too functional I think. John (Simplyloco) made a nice manifold so will go back and have a peep at his too.  Have a great and merry Christmas. Jim Sorry Andrew your post came through as I was posting this one. I've had a PM from Adam Cro on this site who also has some nice washout plugs to. All very tempting i must say. |
|
|
|
Post by Deleted on Dec 24, 2014 10:36:10 GMT
Jim I have to say Adams ones are more prototypical, the Hewson washout plugs don't have the flush fit that Brits and 9s had on the firebox
(Usual disclaimer!!)
Cheers
Ben
|
|
|
|
Post by joanlluch on Dec 27, 2014 10:15:02 GMT
Hi Jim, First of all, I want to congratulate you for the excellent work you are doing at building your loco. Definitely, your thread is helping me a lot with mine despite it will be a much simpler one. I have a question about something you posted some time ago. It is about the grate design you are using.
You posted some photos here:
modeleng.proboards.com/thread/6349/70036-boadicea?page=8 I noticed that in most locos a kind grate made of parallel spindles is used. However yours looks as a plate with holes. My understanding is that the usual grate would allow more air flow than the one you are using. So my question is, are you using this for some particular reason? Thanks |
|
|
|
Post by Deleted on Dec 27, 2014 10:39:22 GMT
Hello Joan------------ As you intend to fire by gas or similar then will you be needing a grate ??
|
|
|
|
Post by Jim on Dec 27, 2014 11:47:55 GMT
Hi Joan, Thanks for your kind comments.
In answer to your question about the grate I'm using, it's called a table or rosebud grate and I believe it was originally designed for American locomotives using coal from the Rosebud mines.
To summarize an ARHS article (Journal 409 Nov 1979 by R L Abbott.) Rosebud grates were introduced by the Victorian State Railways as a means of stopping the fire 'lifting and dragging' on fixed bar grates where the airflow was 33%. The first rosebud grate had 9/16" holes giving a 15% air flow but this was later modified with 15% in the rear 2/5ths and and 5/8" holes giving 20% in the middle 2/5ths with the front 1/5th dump section left at 33%. The result was an even stable burning fire when worked hard.
I believe rosebud grates were also used extensively on the New South Wales Government Railways (NSWGR).
Here they are also used though not as common as the traditional bar grates, in 5" and 7.25" gauge here where char, a form of coked brown coal is used.
My grate is designed to give a 10% airflow but I may have to do some adjusting of the holes if the fire doesn't burn evenly but that is a relatively easy task. To remove the grate you simply slide it out to the side. I should add the holes are counter bored on the underside to prevent clogging.
If my memory serves me right there was also an article on rosebud grates in the Australian Model Engineer sometime back, I must check.
Jim
|
|
|
|
Post by joanlluch on Dec 27, 2014 11:50:49 GMT
Hello Joan------------ As you intend to fire by gas or similar then will you be needing a grate ?? Hey Allan, of course I will not fit any grate. Air will flow around the burner in my loco whatever it ends to be. The question about the grate was just out of interest. Also, to my understanding the induced air flow effect by the smoke box is crucial on coal fired locos, but not that important (or even negative, if it is too much) on gas fired locos. |
|
|
|
Post by joanlluch on Dec 27, 2014 11:53:42 GMT
Thanks for your thorough answer, Jim.
|
|
|
|
Post by Jim on Dec 29, 2014 9:28:45 GMT
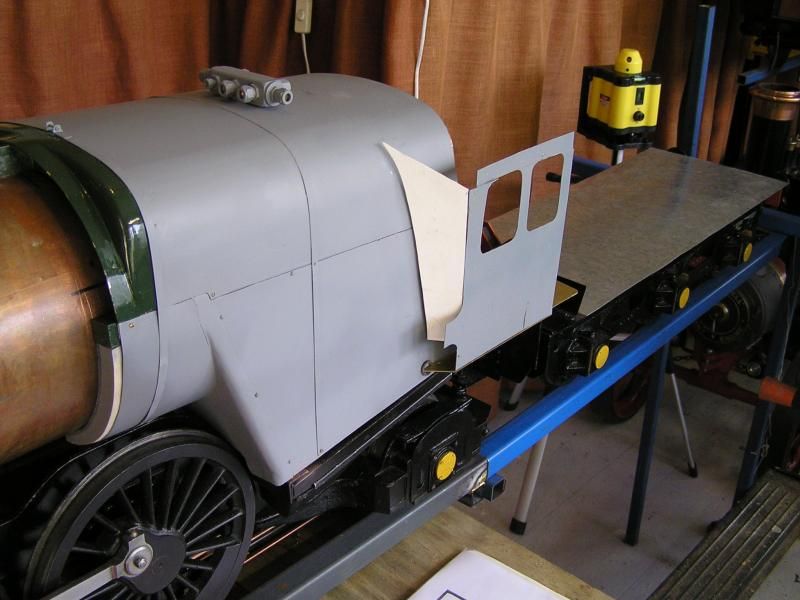
Just a quick update. Progress has been slow but at last the fire box cleading is complete with the retaining bands now fitted, though I had to shift the one just in front of the manifold as I had it too far forward the first time. JP doesn't provide any dimensions or much detail for the cleading so the location of the bands and washout plugs etc has to be determined by cross checking photos and line drawings in books. The next job will be to form the backhead and locate the various pads needed for fixtures such as the regulator arm and the fire hole doors. The photo shows the cleading and bands and the start of determining the shape of the cab front, the cab side shown is a trial piece as there is an error in the location of the end of the foot boards where they join the cab. The drawings has the point too high.  Jim |
|
|
|
Post by Jim on Dec 31, 2014 20:56:35 GMT
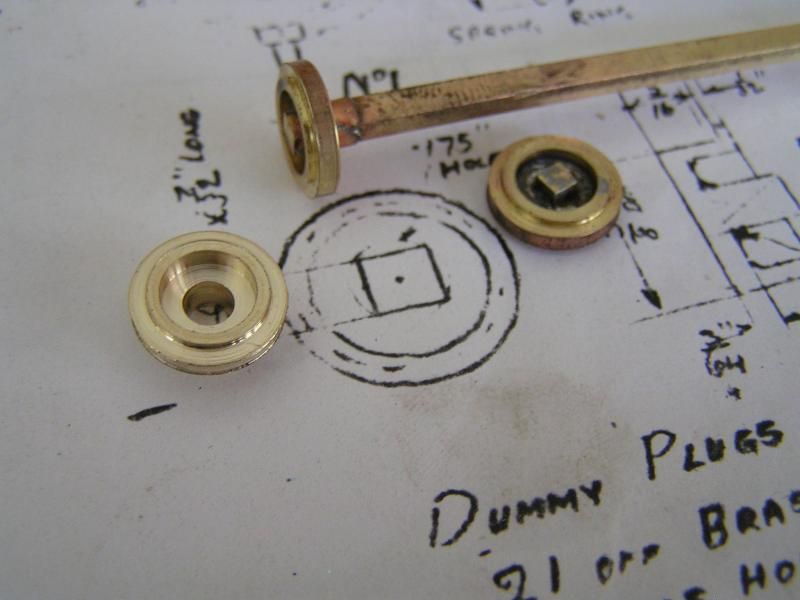
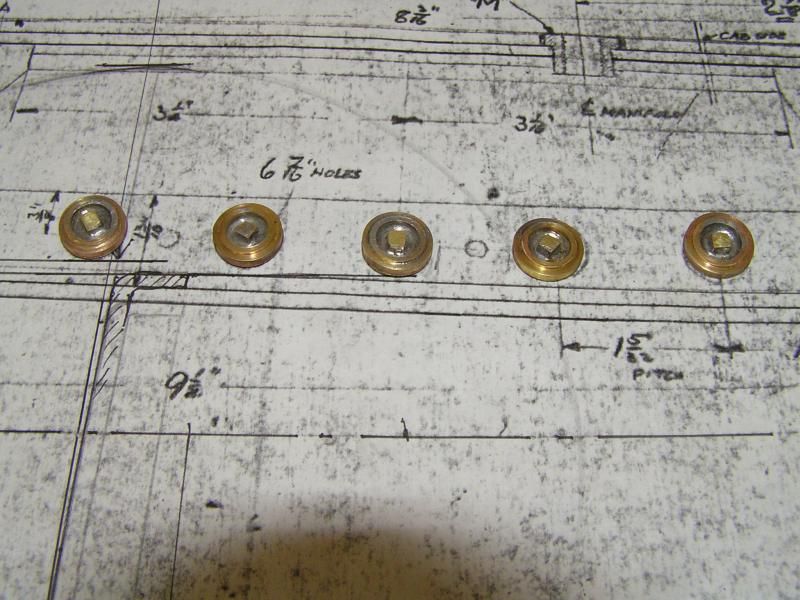
After considering all options I've decided to have a go at making my own dummy wash out plugs for Boadicea. Adam Cro who does lovely castings, says his 9F needs about 30!! I don't think my sanity or stock of soothing ales will last to make that many.  So far I've done enough for the top row of the driver's side of the fire box and only burnt my fingers once.  Happy New Year and welcome to the start of 2015. Jim   |
|
|
|
Post by Deleted on Dec 31, 2014 21:22:10 GMT
Hi Jim, and Happy New Year to you! Those square plugs make all the difference. I've threaded my washout bases and I tried threading a piece 3/32 sq. brass in the 4jaw and screwing the plug in. If you polish the end face it looks wonderful against the green background!
Bling Bling...It's for you hoo!
John
|
|
44767
Statesman
 
Posts: 539
|
Post by 44767 on Dec 31, 2014 22:37:07 GMT
You are cracking on with this, Jim. Nice way to do the washout plugs if you have the time! Best wishes to all this year; I feel it's going to be very productive.
Mike
|
|
|
|
Post by Jim on Dec 31, 2014 22:52:26 GMT
Thanks John and Mike.
As for it being a productive year Mike I must say the energy levels have risen with the boiler now complete and the cleading going on.
Jim
|
|
|
|
Post by Cro on Dec 31, 2014 23:05:18 GMT
Jim,
Glad to see you decided to have a crack at them, they look wonderful. I only have that many as I have them all over the backhead too so hence roughly 30!
Keep up the good work, Happy New Year!
Adam
|
|
|
|
Post by Roger on Dec 31, 2014 23:30:08 GMT
Very neat Jim, those look very good. I was interested to see that someone thought it was worth 3D printing and investment casting these, I really don't see the point. What you've done is very straightforward and satisfactory. Ok, I'd have done them on the mill as a 'part on a stick', but without a CNC mill, I would have done exactly what you have. Nice job.
|
|
|
|
Post by Deleted on Jan 1, 2015 1:36:11 GMT
|
|
|
|
Post by Deleted on Jan 1, 2015 1:38:15 GMT
Here's the full-size items >>>>>>>>>>>>>>>  |
|
44767
Statesman
 
Posts: 539
|
Post by 44767 on Jan 1, 2015 2:14:31 GMT
I was interested to see that someone thought it was worth 3D printing and investment casting these, I really don't see the point. It's all about time, Roger, it's all about time! |
|