|
|
Post by Jim on Nov 12, 2015 7:09:33 GMT
Your plate work looks superb Ned and it is a very big plus to have boiler inspector who both knows his stuff and is helpful and constructive. I found changing over to oxy propane as a heating source a big help after I discovered it was possible to buy my own D sized oxygen cylinder. No more exorbitant rental fees just swap, pay and go and the propane tank doubles as a spare for the BBQ.  The oxy propane in use, I still used a large propane torch for general heating of the job. 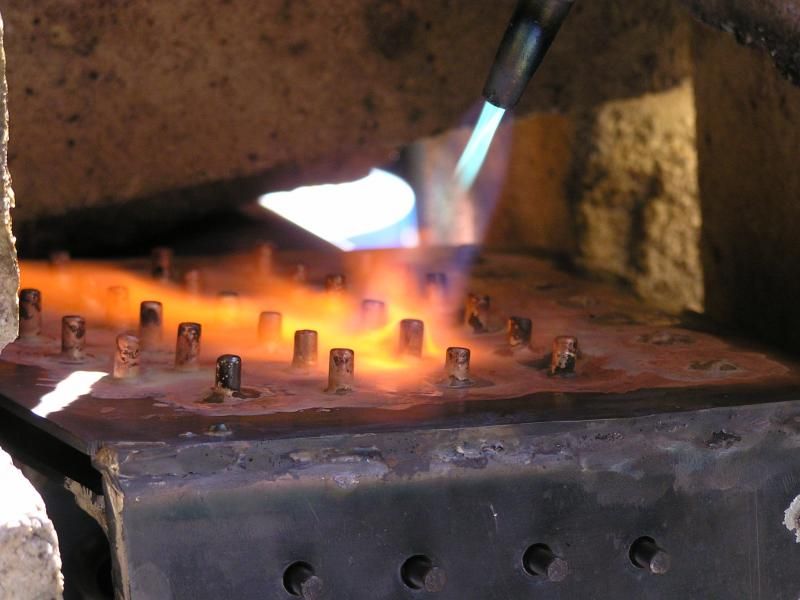 Jim |
|
|
|
Post by NSWGR Steambuff on Nov 12, 2015 11:15:52 GMT
Thanks Jim. I too am about to convert my oxy/acetylene to oxy/propane, but was unaware of the privately owned oxy cylinder possibility. I agree the bottle rental charges here are hideous. Would you mind posting the details on the oxy bottles please?
I don't think I am too much of a 'penny-pincher', but I think we are sometimes taken advantage of by some suppliers here. e.g. I was able to buy 45% silver solder for $7 per stick (1.6mm x 760mm) from a reputable supplier, whilst some model engineer suppliers here are charging between $12 and $17 per stick for 42% sticks. Admittedly I bought it in a 1Kg pack to share some with other friends.
I also plan on using a large propane burner for general area heating as well as the oxy/propane, but will be relying heavily on the advice of the boiler inspector for the actual technique.
As always, I appreciate your contributions.
Ned
|
|
|
|
Post by Jim on Nov 12, 2015 21:26:23 GMT
Hi Ned,
Gasweld Tool Shops supply the oxygen cylinders in the standard sizes. From memory the initial cost of a D sized cylinder was about $A260.00 and about $A65.00 to swap for a new full one. They also sell the propane regulators along with the copper torch tips which screw onto an extension pipe. I found the Oxy-acetylene hand mixer set worked just as well with oxy-propane and the copper torch extension pipe happily had the same thread as the the swaged oxy-acetylene pipe. The standard flashback safety regulators are used too.
I must say I'm very happy with the results achieved so far with the propane set up and gone forever is the high cost of rentals and gases.
By the way where did you find the silver solder?
Jim
|
|
|
|
Post by NSWGR Steambuff on Nov 12, 2015 22:18:40 GMT
Thanks for the info on the bottles Jim. I will check it out and see if they service Queensland. Certainly a much better option than rental. I got the silver solder from SBA Amalgamated Pty Ltd in Bayswater Vic., Ph: 03 97625477. The minimum order is 1/2 Kg which is about 36 sticks, but at that price I am sure you would have no problem sharing an order with other builders. The $7 per stick price was based on a 1 kg order landed here in Queensland, which is a bit cheaper than buying it in a 1/2 kg lot. They supply it both with and without cadmium, and delivery was overnight. They have a website sbagroup.com.au/ |
|
|
|
Post by Jim on Nov 13, 2015 5:12:28 GMT
Hi Ned, I assumed Speedgas was supplied through Gasweld but in Queensland apparently there are other outlets. You might like to check here: www.speedgas.com.au/retail-outlet/ Cheers Jim |
|
|
|
Post by NSWGR Steambuff on Nov 13, 2015 7:28:37 GMT
Hi Jim,
They are in Qld but not close to me. I have since learned that Bunnings here do a very similar deal, so will check that out and probably go that way as they are quite close to me.
Cheers,
Ned
|
|
jma1009
Elder Statesman
  
Posts: 5,922
|
Post by jma1009 on Nov 13, 2015 9:00:05 GMT
hi ned,
the copper boiler parts look superb especially the double flanged throatplate for the belpaire firebox.
a description of how you made the double flanged throatplate would, i am sure, be of great interest.
cheers,
julian
|
|
|
|
Post by NSWGR Steambuff on Nov 16, 2015 3:25:37 GMT
G'day Julian, The double flanged throat plate was a bit of a challenge for me initially, but persistence paid off in the end. I started out by making a duplicate of the back plate on the same former and then chain drilled out a hole in that as a start point for the barrel flange. This was then clamped to a piece of 1/2" steel plate which I had bored out on the lathe to give a hole of barrel O.D. plus twice plate thickness. Obviously both the the hole in the plate and the edges of the back plate former were rounded to a 3 mm (min) radius. The corners were cut off the former plate so it would fit in my 13" lathe without taking the bed out. The throat plate was clamped to this former and much hammering a re-heating begun. Once it got close to fitting over the barrel, an off-cut from the barrel was used as an additional former, if you like, and the final shaping done by slowly tapping the flange over the barrel off cut whilst the throat plate was still contained within the 1/2" plate former. Probably not well explained, but hopefully the photographs will tell the story. 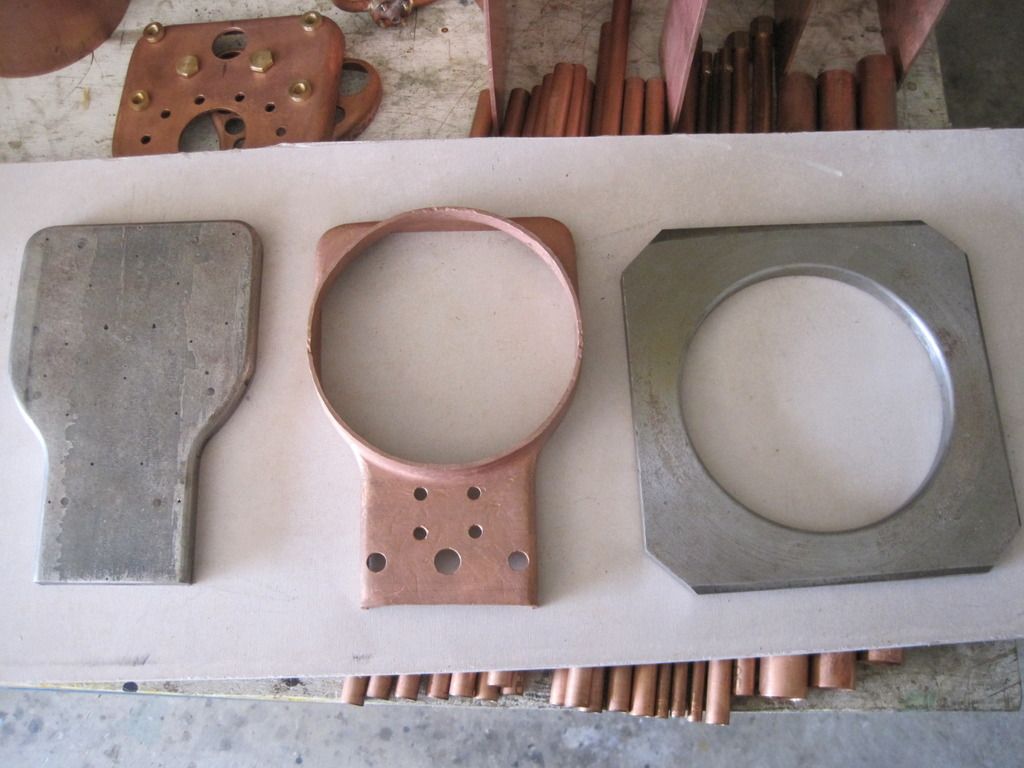 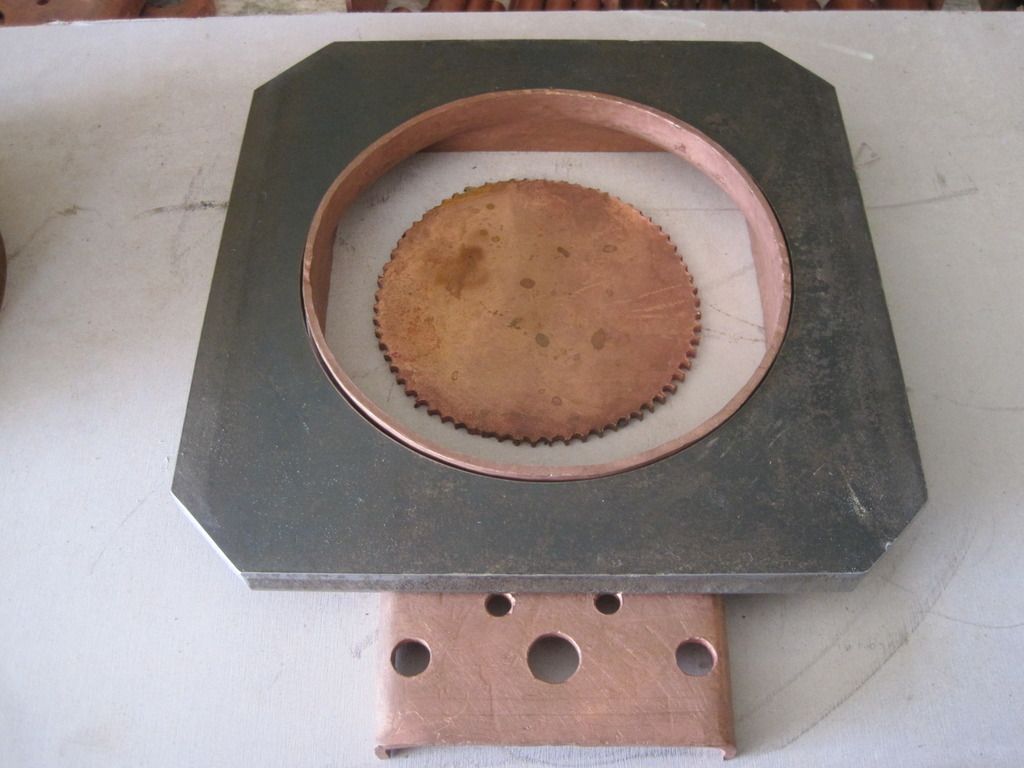 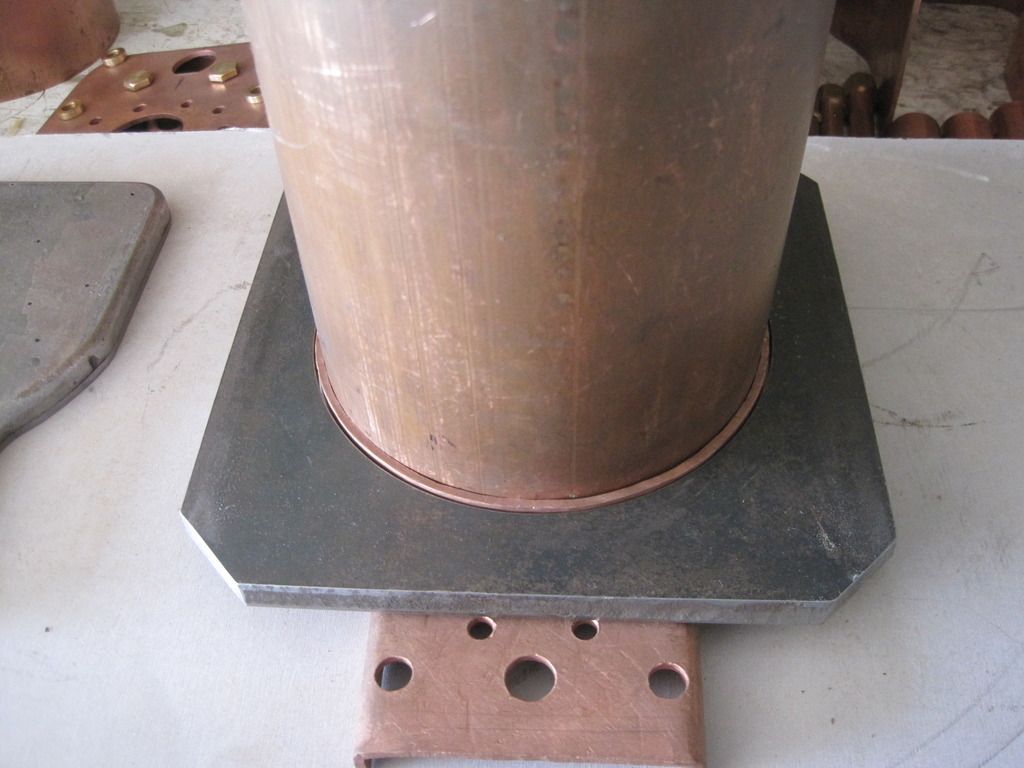 |
|
|
|
Post by Jim on Nov 16, 2015 9:58:15 GMT
You don't show it Ned but I assume you had another former to hold the profile of the flange for the boiler while you shaped the backhead though from what you say you used an off cut from the barrel while you formed the throat plate. Which ever you have done a great job and should be delighted with the end result. Well done.
Jim
|
|
steam4ian
Elder Statesman
   One good turn deserves another
Posts: 2,069
|
Post by steam4ian on Nov 16, 2015 21:57:18 GMT
Ned
Your plate work is beautiful. You deserve success.
Very inspiring.
Ian
|
|
|
|
Post by NSWGR Steambuff on Nov 16, 2015 23:21:37 GMT
Thanks for your comments Ian. Jim, Not sure I understand your question, but to clarify, the formers in the photograph were the only formers I used. The wrapper flange was done first then the hole for the barrel flange was cut out. This is how the initial barrel flanging was done. I did use shaped packing pieces under the pads of the clamps which are not shown here. 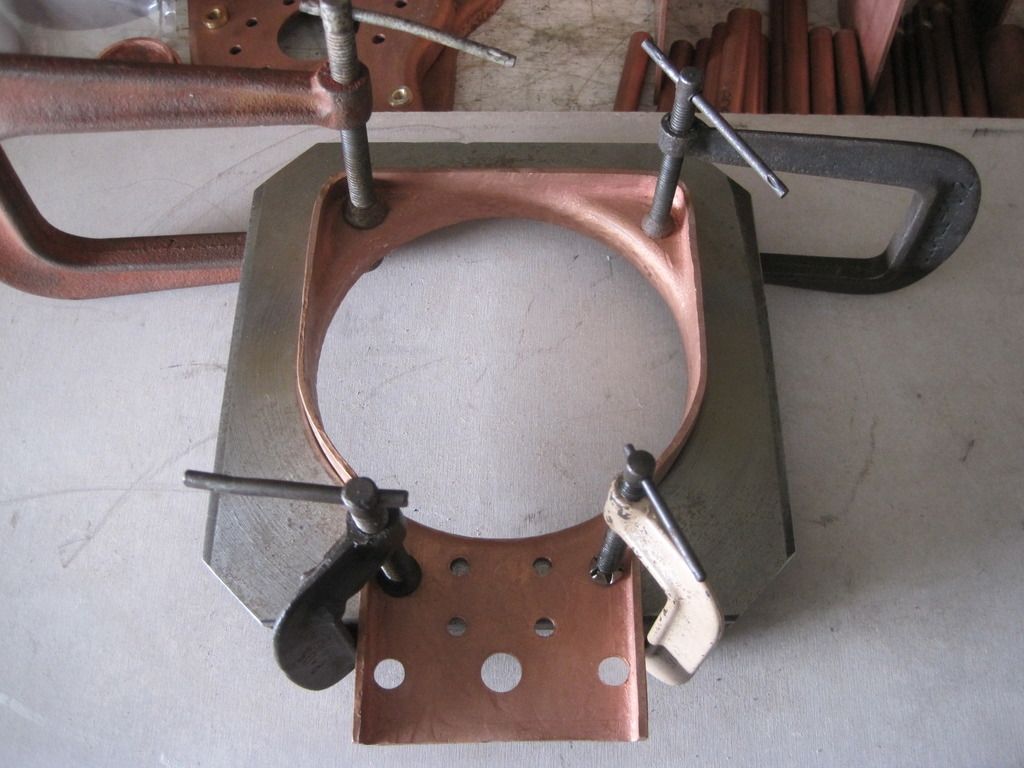 Once the barrel flange was close to fitting over the barrel, the barrel off cut was "massaged" into the hole as you see it to get the final fit. When the barrel flange was right, the back plate former was inserted and the whole thing tidied up as per the next photograph. 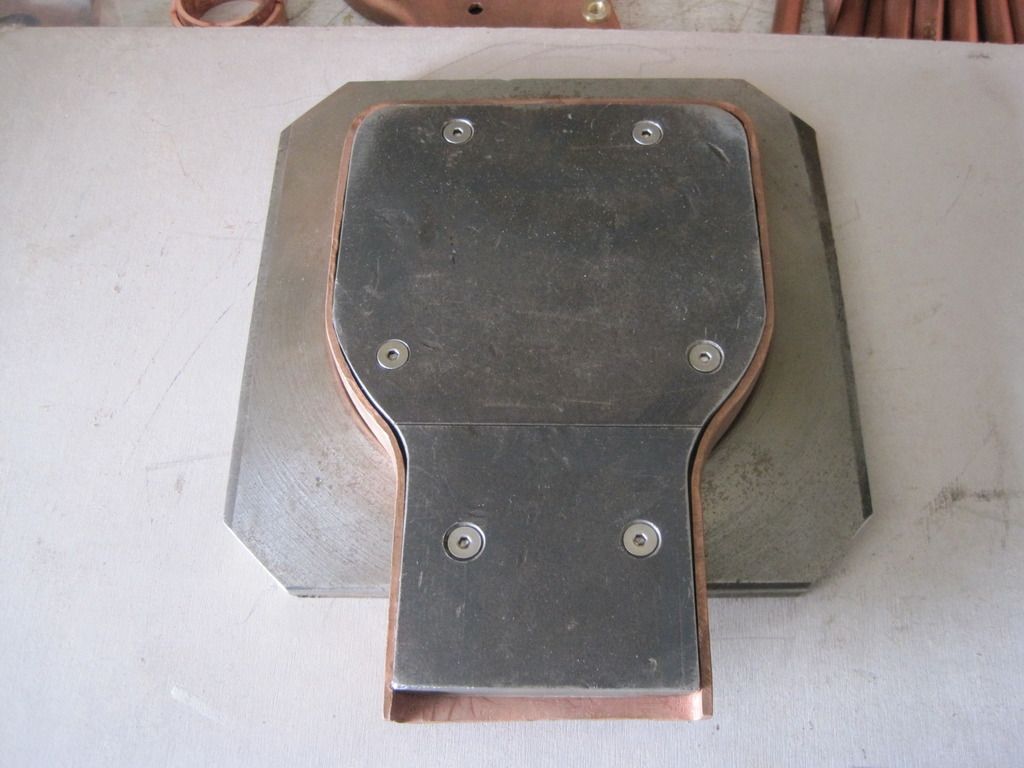 In case you are wondering what the screws are in the former, I originally made the back plate former from 3/8" plate, and on the advice from the boiler inspector, I added another 1/8" to the former from some scrap to make it 1/2", which made it easier to remove the part from the former. I hope this answers your question. Cheers, Ned |
|
jma1009
Elder Statesman
  
Posts: 5,922
|
Post by jma1009 on Nov 16, 2015 23:32:30 GMT
thank you very much Ned for that excellent treatise on making a double flanged throatplate, and for the excellent further pics. i do hope this will encourage others to use this type of throatplate as it is far superior and avoids problems of butt joints between boiler barrel and throatplate cracking later on with silver solder and much else besides. it is also the best arrangement for good water circulation in the boiler.
very well done!
cheers,
julian
|
|
|
|
Post by Roger on Nov 17, 2015 0:08:27 GMT
Many thanks for sharing those most useful pictures Ned, that will save a lot of time and effort reinventing the wheel. I've got those safely squirrelled away for future reference.
One question, do you make the formers under size to account for the amount that the copper springs back? Is it significant?
I'm planning to mount all of the formers onto a common sturdy support that they're dowelled to so that they can easily be held in the mill for machining the holes. The dowel holes can be clocked up to get all of the holes in the right position from a known reference.
|
|
|
|
Post by Jim on Nov 17, 2015 1:13:24 GMT
Thanks for the additional photos Ned, they certainly clarify the steps you took in forming the throat plate. As always in this hobby there are slightly different techniques that achieve the same end result. Yours is far more elegant. Mine is here modeleng.proboards.com/thread/6349/70036-boadicea?page=7Thanks again Ned, Jim |
|
|
|
Post by NSWGR Steambuff on Nov 17, 2015 1:23:06 GMT
Hi Roger,
Firstly, I must stress this is my first boiler, and I am by no means professing to be an expert. Just sharing what I have done and getting constructive feedback from the forum. I am also relying heavily on advice from fellow model makers and the boiler inspector.
The formers were made to the size of the plates as shown on the plans less the plate thickness. There doesn't seem to be any spring back when making the end plates if the copper is well annealed.
There is spring back when bending the wrappers and that should be taken care of with clamps and "massaging" the annealed wrapper to a close fit with the end plates with a hammer prior to applying silver solder tacks, then more hammer tapping to get the joints to conform. Once all looks to be correct, final silver soldering the whole assembly is done. At least that is what I have planned, and is the method used by Alec Farmer in his book "Model Locomotive Boilermaking". ISBN 1-85260-007-1
If there are better suggestions out there, then I welcome them with an open mind.
An area which seems divided in opinion is the order of assembly of the firebox plates, wrapper and flu tubes, i.e. firebox tube plate to wrapper first, or tubes to firebox tube plate first, followed by wrapper. Alec Farmer does tubes to tube plate first, but many others say tube plate to wrapper first.
I am open to all opinions and experiences of other builders.
Cheers,
Ned
|
|
|
|
Post by ejparrott on Nov 17, 2015 9:11:03 GMT
I always make flanging blocks to be the right size or a 1/64" over. I don't try to flange my plates to finish exactly on size after beating, I always leave a whisker on for dressing after beating.
Depending on the size of the boiler, tubes and tubeplate all together at the same time. I did one good size 7.25" boiler many years ago and I did the tubes into the tubeplate separate to the wrapper, but later wished I'd done them at the same time too. I could have done it with the equipment I had too.
|
|
|
|
Post by Roger on Nov 17, 2015 10:11:20 GMT
Thanks for clarifying that Ned, I'll make the formers to size.
Have you looked through Julian's thread where he built STEPNEY's boiler? That's well worth reading.
|
|